Last Updated on 2025-12-17 by Team Ideas24
Most of us would agree that Thanksgiving would be incomplete without the turkey. But this holiday culinary star can be challenging with its five or six hour bake. And you might just be a little bored if you’ve been cooking it the same way year after year.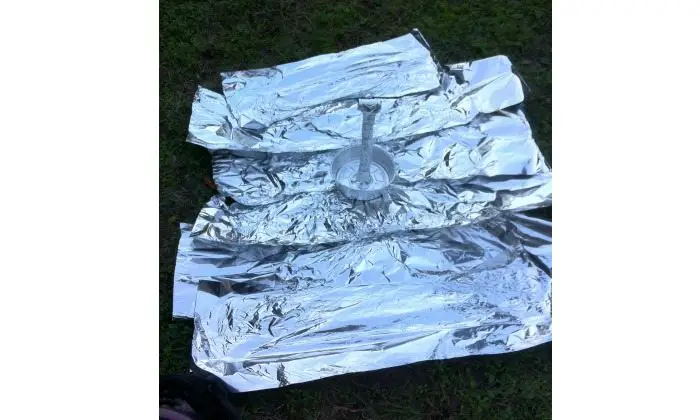
So why not do something really different this year? Cook your turkey in a trash can! Yes — smoking a turkey can be done with a trash can!
Click on any image to start lightbox display. Use your Esc key to close the lightbox. ?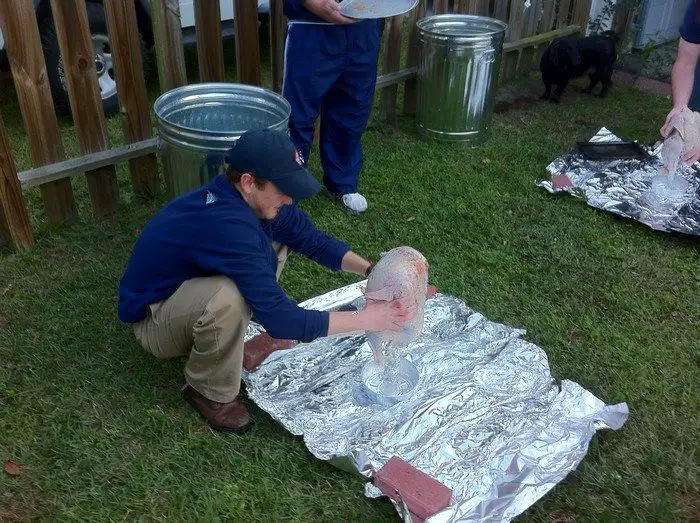
It may sound a little weird, but this kind of outdoor cooking is actually one easy, fun and entertaining way to make delicious turkey for gatherings!
Just make sure to use a NEW metal trash can (of course) and to use a long, hot fire to burn off any heavy metals that could contaminate your dinner. Then wash it out thoroughly with dish-washing detergent! Once done, you’re ready to have fun cooking your Thanksgiving turkey to enjoy with friends and family!
Cooking time will take 1.5 to 2 hours, so prepare some fun backyard activities or entertainment for everyone while you wait for the main dish to finish. :)
Is this how you’re going to cook this year’s Thanksgiving turkey?
Contents
Cooking Turkey in a Trash Can
Materials:
- 1 New Metal Trash Can
- 2 medium size bags of Charcoal (the kind that does not need lighter fluid)
- Tin Foil
- Bricks or Rocks
- Pans (for drippings)
- at least 12″ long Metal Rod/Pipe (with a “T” on top)
- Wood Chips (optional)
- Oven Mitts
Tools:
- Hammer
[adinserter block=”11″]
Steps:
The base: For this you will need the tinfoil, the bricks, the metal rod/pole, the drip pan, and a hammer.
First, find a spot of grass that you don’t mind killing. Please note that the grass will NOT SURVIVE the process so don’t do this in the middle of the front yard. (I warned you).
Second, lay out a square of tin foil larger than the diameter of the trashcan top. Use the bricks/rocks to hold down the edges to keep the wind from blowing the foil up. I have found that if you fold the edges of the foil together as you place them down it helps.
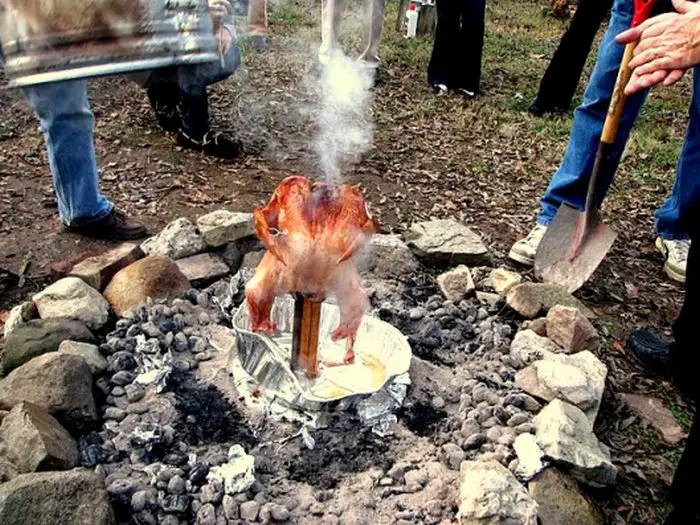
Third, in the center of the foil square place the pan in the center and run the pipe/tube through it and hammer it into the ground. This is what you will place you turkey on for the cooking. Make sure you put the pan there because your turkey will literally fall apart during cooking and this pan will catch it. You want the top of the rod to be about 10″ from the top of the pan so your bird can “stand up.”
Mounting the bird: For this step you will need the bird, the trashcan, and wood chips (if you have them).
First, you want to season your bird. We use some olive oil, salt, and pepper but you can use almost anything. I do know that if you want a crisper skin use some type of oil on the outside of the bird.
Second, take your prize to the tinfoil square and place the bird on top of the pole with the pole running up through the bottom. If you do this correctly the bird will be “standing” just above the pan for the drippings with the wings out. (On a side note, this is a great time for your guests to call you crazy and/or awesome.)
Third, if you have wood chips sprinkle SOME around the bird but not directly under it.
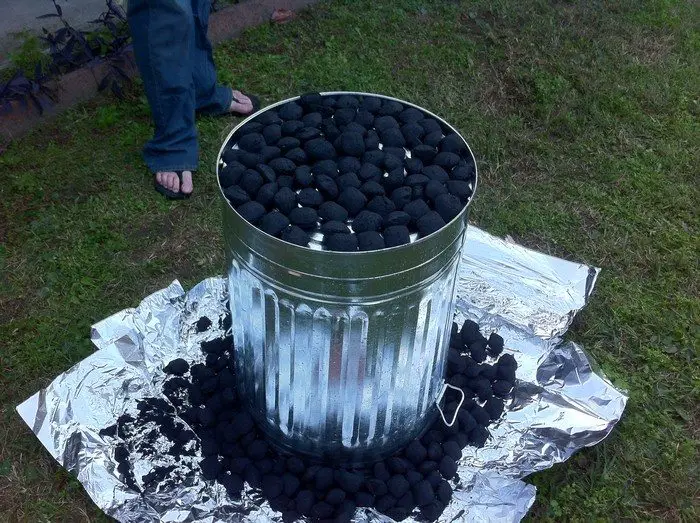
Fourth, carefully place the can over the bird. Make sure not to knock it off the stand.
Fire: For this step you will need charcoal and the wood chips if you have them.
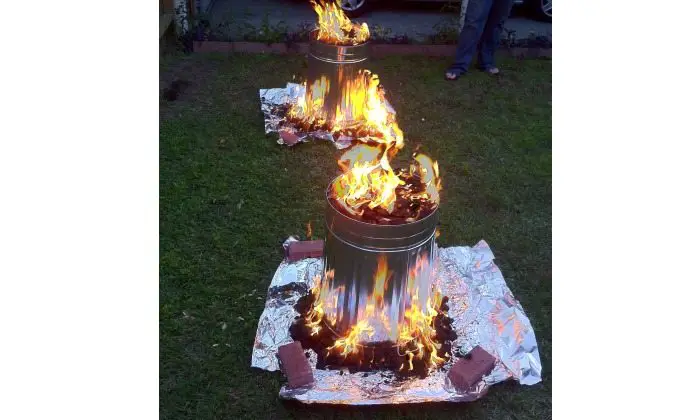
First, place a ring of wood chips around the rim of the trashcan on the foil.
Second, on the top of the can (not touching the foil) put a layer of charcoal. Then using the rest of the charcoal form a ring around the foil side of the can. If the ring starts to get to large you can put more on the top of the can.
Light the charcoal: It’s best to light the top (non-foil side) of the can and then work around the bottom. Make sure that everyone is watching and camera’s are ready. This is going to be awesome.
Once the coals are lit just leave it alone and go play those yard games we talked about. If you do hear a loud bang and then some hissing it’s okay, the bird fell and it’s part of the process.
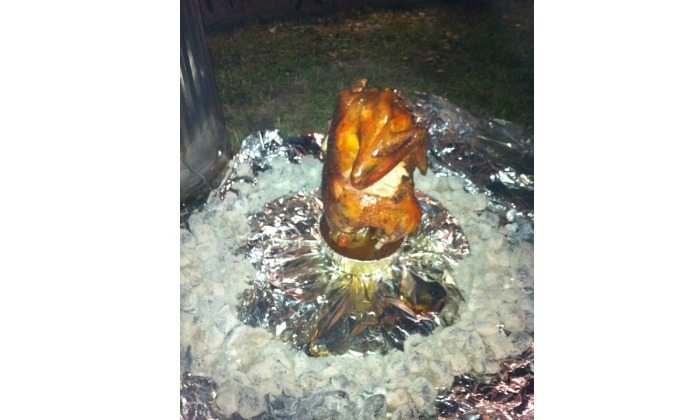
Lifting the can: Let the bird cook until the coals are completely burnt and almost cool. You will need oven mitts to lift the can, but the coals should not be hot. Be careful when lifting the can, make sure to lift directly up so the coals/ashes do not get on the bird. Once everyone gets a good look at your masterpiece take it off the rod and carve that baby.
I hope you enjoy and let me know if you make your own. Be safe and have fun!
Thanks to CrawJac for this great idea!
Is Trash Can Turkey Safe To Eat
The idea of cooking food in a trash can sounds questionable at first, but this method has been used safely for decades when done correctly. Understanding the safety measures and science behind this cooking technique will help you feel confident serving your backyard-cooked turkey to family and friends.
Why A New Galvanized Can Needs Proper Preparation
Starting with a brand new metal trash can is the most important safety step in this entire process. Used cans may have residues from chemicals, cleaning products, or other contaminants that could transfer to your food during the high-heat cooking process. Even if a can looks clean, microscopic residues can remain on the surface and become problematic when exposed to the intense heat required for cooking.
The preparation process involves burning off any manufacturing oils or protective coatings that might be present on new galvanized metal. Running a hot fire inside the can for at least 30 minutes allows these substances to burn away completely before your turkey ever goes near it. After the burn-off, washing the can thoroughly with hot water and dish soap removes any remaining ash or residue, leaving it clean.
How High Heat Creates A Safe Cooking Environment
The charcoal ring surrounding the trash can generates temperatures well above what is needed to kill harmful bacteria in poultry. When properly set up, the can’s internal temperature reaches between 350 and 400 degrees Fahrenheit, comparable to a conventional oven. This intense heat cooks the turkey quickly while creating an environment where bacteria cannot survive.
The standing position of the turkey on the metal rod allows heat to circulate evenly around the entire bird, ensuring that all parts reach safe internal temperatures. The drip pan underneath catches any juices that might otherwise fall onto the coals, preventing flare-ups and keeping the cooking environment stable. This setup mimics the convection effect of a commercial rotisserie, where hot air moves continuously around the meat for even cooking throughout.
What Temperature Checks Tell You About Doneness
Using a meat thermometer is the only reliable way to confirm your trash can turkey is safe to eat. The thickest part of the thigh should reach 165 degrees Fahrenheit, which is the USDA-recommended temperature for poultry. Checking multiple spots, including the breast and the area near the backbone, gives you confidence that the entire bird has cooked through properly.
The visual cues of golden-brown skin and clear juices are helpful indicators, but they should never replace an actual temperature reading. Some birds may look perfectly done on the outside while still being undercooked near the bone, especially if the turkey was particularly large or the fire burned unevenly. Taking the extra minute to check temperatures in several locations protects your guests and ensures the cooking method worked as intended.
Choosing The Right Turkey And Trash Can Size
Matching your turkey size to your trash can dimensions makes the difference between a successful cook and a frustrating experience. Getting these proportions right ensures proper heat circulation, prevents the bird from touching the sides of the can, and allows enough space for the charcoal ring to work effectively.
Finding The Sweet Spot For Turkey Weight
A 12 to 15 pound turkey works best for most standard 20-gallon metal trash cans. This size range gives you enough clearance on all sides while still fitting comfortably under the can when mounted on the center pole.
Birds smaller than 10 pounds tend to cook too quickly and can dry out before developing that beautiful golden skin, while turkeys over 18 pounds may not fit properly or could require significantly more cooking time than the standard 90 minutes.
Fresh turkeys are preferable to frozen ones for this cooking method because they tend to have better moisture content and more predictable cooking times. If you are working with a frozen bird, make sure it is completely thawed before attempting this method, as any ice crystals remaining in the cavity will dramatically affect cooking time and temperature distribution. The turkey should be able to stand upright on the pole without leaning to one side or requiring support.
Measuring Your Trash Can Before You Shop
Standard metal trash cans come in sizes ranging from 10 gallons to 32 gallons, but not all of them are suitable for turkey cooking. A 20-gallon can with a height of approximately 23 to 26 inches provides the ideal cooking chamber for most holiday birds.
The diameter should be at least 18 inches to allow proper air circulation around the turkey and prevent the wings from touching the sides of the can.
Before purchasing your can, measure the height from the ground to the top rim and compare it to the height of your turkey when standing upright. You want at least 4 inches of clearance above the turkey to allow hot air to circulate properly.
The can should be made of galvanized steel rather than plastic or aluminum, as these materials cannot withstand the intense heat generated by the charcoal ring.
Why Clearance Space Matters For Even Cooking
The gap between your turkey and the trash can walls is where the magic happens in this cooking method. Hot air needs room to rise along the sides of the bird, creating a convection current that cooks the turkey evenly from all directions.
When the turkey is too large for the can, the wings or breast may press against the metal, creating cool spots that cook more slowly and potentially leaving you with unevenly done meat.
Proper clearance also prevents the skin from sticking to the can walls, which can tear the bird when you lift the can off at the end of cooking. A minimum of 2 inches on all sides allows the turkey to cook in its own radiant heat environment without interference.
This spacing also makes it easier to position the charcoal evenly around the can, ensuring consistent heat distribution throughout the cooking process.
Adding Wood Smoke Flavor Without Overpowering The Meat
Wood smoke adds complexity and depth to trash can turkey, but too much can turn your holiday centerpiece bitter and unpleasant. Learning to balance smoke with the natural flavors of the turkey creates a memorable dish that tastes like it came from a professional smokehouse rather than your backyard.
Selecting Woods That Complement Poultry
Fruit woods like apple, cherry, and peach are the best choices for turkey because they produce mild, slightly sweet smoke that enhances rather than masks the meat’s natural flavor. These woods burn cleanly and create a delicate smoke ring without the harsh, acrid taste that can come from stronger woods.
Apple wood in particular has become a favorite among backyard cooks because it adds a subtle sweetness that pairs beautifully with traditional turkey seasonings.
Hickory and mesquite should be used sparingly or avoided altogether for this cooking method because they produce intense smoke that can quickly overwhelm poultry. If you do want to experiment with these stronger woods, mix them with fruit woods at a ratio of one part hickory to three parts apple or cherry.
Oak is a middle-ground option that provides a more robust smoke flavor without crossing into bitter territory, making it suitable for cooks who want something between mild and strong.
How Much Wood Creates The Perfect Smoke Level
A single handful of wood chips scattered around the base of the turkey before covering it with the can provides plenty of smoke flavor for a 90-minute cook. This small amount releases smoke gradually as the charcoal heats up, infusing the meat without creating the thick, billowing smoke that leads to bitter flavors. The chips should be dry rather than soaked, as wet wood produces more steam than smoke and can lower the cooking temperature inside the can.
Adding a second light ring of chips around the outside of the trash can, just before you pile on the charcoal, creates a secondary smoke source that activates as the fire burns down. This technique extends the smoking period without concentrating too much smoke at any one time. The key is restraint, as you can always add more smoke flavor next time but cannot remove it once the turkey has absorbed too much.
Timing Your Wood Addition For Maximum Impact
The first 30 minutes of cooking is when your turkey absorbs the most smoke flavor, as the meat is still cool and the surface is receptive to smoke particles. This is why placing chips directly around the bird before covering it with the can is so effective.
As the turkey heats up and the surface begins to cook, it becomes less able to absorb additional smoke, which naturally prevents over-smoking even if your fire continues producing smoke throughout the entire cooking time.
Avoid the temptation to lift the can and add more wood chips during cooking, as this releases all the accumulated heat and can add 20 to 30 minutes to your total cooking time. The initial wood placement should be your only smoke addition, allowing the cooking process to proceed undisturbed.
Trust that the small amount of wood you started with will provide plenty of flavor, and remember that smoke flavor intensifies as the turkey rests and the juices redistribute throughout the meat.
Conclusion
Cooking turkey in a trash can transforms your holiday gathering into an unforgettable backyard event that guests will talk about for years. The method delivers juicy, flavorful meat in half the time of traditional roasting while freeing up your oven for side dishes and desserts. Once you master the basic technique and safety steps, this becomes one of the easiest ways to prepare a crowd-pleasing centerpiece without spending hours in the kitchen. The combination of spectacle and simplicity makes trash can turkey worth trying at least once, and most people who attempt it never go back to conventional methods.
If you are serious about cooking this classic bird. read our recipe on the perfect Thanksgiving turkey.
FAQ: Cooking Turkey in a Trash Can
- Can I Cook A Stuffed Turkey Using The Trash Can Method
- Stuffing should never go inside a trash can turkey because the high heat and rapid cooking time create uneven temperatures that leave stuffing undercooked while the meat finishes. The standing position also makes it difficult for heat to penetrate the cavity properly. Instead, cook your stuffing separately in a casserole dish and use aromatics like onions, apples, or herbs inside the turkey cavity for flavor without the food safety risks.
- What Should I Do If It Starts Raining During Cooking
- Light rain or drizzle will not significantly affect your cooking process as long as the charcoal stays lit and the can remains in place. Heavy rain can extinguish the coals and drop the internal temperature, potentially leaving you with an undercooked bird. If severe weather threatens, consider setting up a canopy or large umbrella over your cooking area before you start, or have a backup plan to finish the turkey in your conventional oven if conditions become unsafe.
- How Do I Prevent The Grass From Dying Permanently
- The intense heat from the charcoal will kill the grass underneath your cooking area, but you can minimize long-term damage by choosing a spot you plan to reseed anyway. Laying down a thick layer of sand or gravel under your foil base helps insulate the ground and reduces the depth of heat penetration. Some cooks use old baking sheets or metal plates under the foil for extra protection, though the grass directly under the setup will likely need reseeding regardless of precautions taken.
- Can I Reuse The Same Trash Can For Multiple Turkeys
- Your trash can will last for several cooking sessions if you clean it thoroughly after each use and store it in a dry location. Scrub out any accumulated grease or carbon deposits with hot soapy water and a stiff brush, then dry it completely before storing to prevent rust. Inspect the can before each use for any holes, rust spots, or warping that might affect its performance, and retire it once the metal shows significant deterioration or damage from repeated high-heat exposure.
- What Other Meats Work Well With This Cooking Method
- Whole chickens, pork shoulders, and beef roasts all cook beautifully using the trash can method, though cooking times will vary based on size and meat type. A whole chicken takes only 45 to 60 minutes, while a pork shoulder might need up to three hours depending on weight. The key is maintaining proper clearance inside the can and adjusting your charcoal amount to match the cooking time needed, using more coals for longer cooks and fewer for quick-cooking items like chicken.