
Last Updated on October 13, 2025 by Team Ideas24
Having a hard time working on projects during winter? The freezing cold weather can really slow down your progress, especially when your workshop doesn’t have heating. Well, here’s a DIY project that could warm you up – why not turn an old gas tank into a heater! :)
This owner of this DIY project wanted to be able to tinker in his workshop even during the cold winter months. So he turned an old gas tank into a DIY heater to make the room temperature in his shed more favourable while he worked.
There is nothing like the ambiance and glowing warmth of burning wood. Every fire is different, every day. Each brings you closer to nature and the environment. Wood is a renewable energy resource and burning wood makes economic and efficient use of the earth’s energy.
This wood-fired heater does a really good job at warming up the room when the fire has been well-stoked. And you can boil water for your coffee or even make hot chocolate with it!
Do you need one for your shed or workshop?
Contents
Building a Gas Tank Heater
Materials:
- Butane Tank
- 3pcs 1″x1″x1′ Box Section (for legs)
- 1″ Weld Mesh
- 15kg Fire Cement
- 1/2″ Rebar
- 6-8″ long 3″ Pipe
- 10mm Steel Plate
- 1pc 3″ 90 Pipe Coupling
- 1 broken Brass Dart (optional)
- 1 Steel Hinge
- 3-4ft 20x60mm Flat Bar
- Metal Handle (for lid)
- 4″ Pipe (for flue)
Tools:
- Welder
- Angle Grinder (with cutting, grinding and flap disks)
- Cordless Drill
- Hammer
Steps:
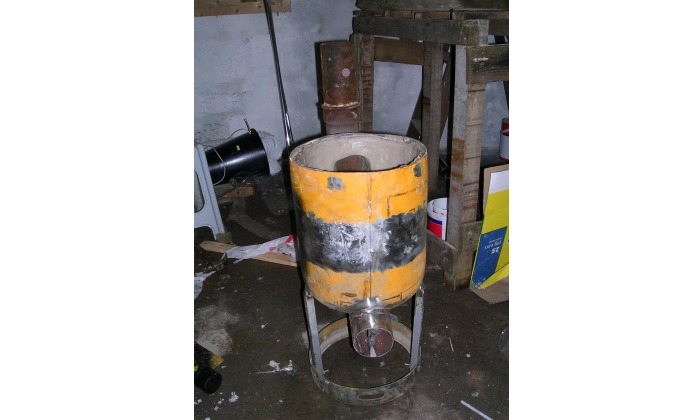
Cutting the gas tank: I first started by removing the handles and the base ring from the tank. I used a flap disk to smooth the welded seam around the middle of the tank.
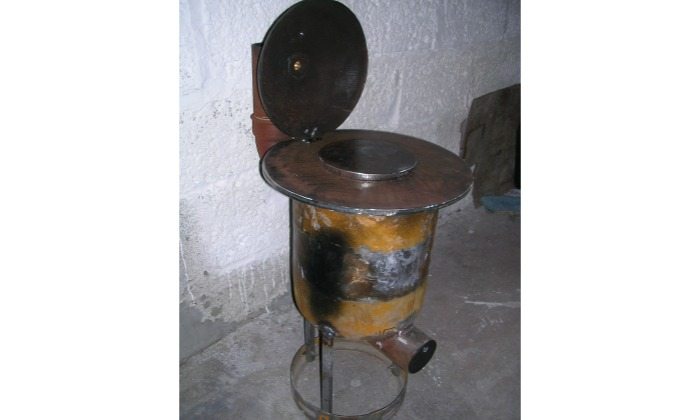
I marked a line around the gas tank just about where the sides become parallel. I used a thin metal cutting disk in the angle grinder to cut the tank along this line. This gave me the belly part of the stove and the lid.
A 3″ hole was marked on the back of the tank about 2″ from the top. The hole was cut out using a thin metal cutting disk. This is where the flue bend will be welded to.
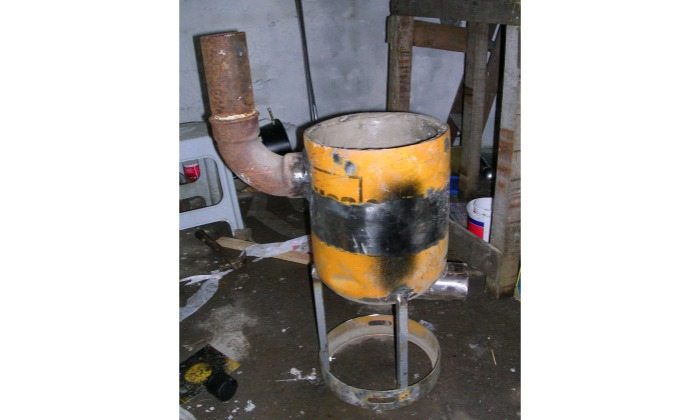
The ash spout: To make the ash spout, I ground the end of the short cutting of the 3″ pipe so its profile was a snug fit to the curve of the tank and the spout was at 90° to the sides of the tank.
I then drew a line around the inside of this joint, to show me where to cut the hole in the tank.
I got a friend to weld the ash spout on using his mig welder as my skills had lapsed somewhat over 20 years.
The 3 1″ box section were bolted on to the base ring in their desired positions. This allowed me to adjust the position of the tank on the legs before they where tacked on, then welded up.
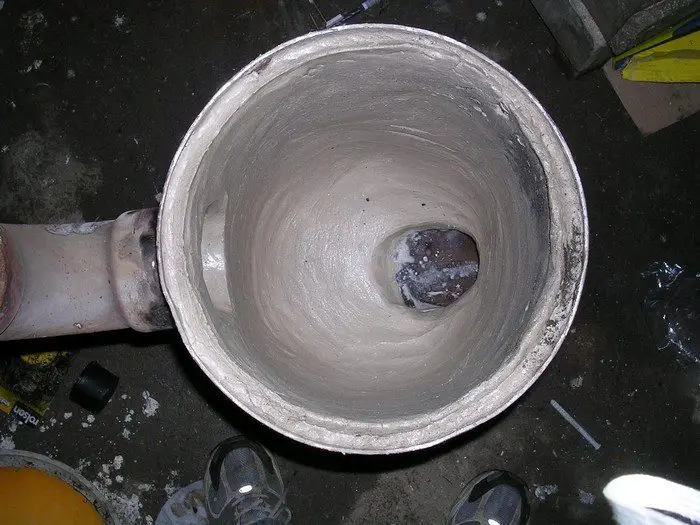
Lining the inside: I first cut a strip of weld mesh about 6″ wide and lined the inside of the tank with them, they where tacked on with the welder.
The weld mesh was added to give the fire cement something to key to as it sets.
I then lined the inside of the tank with fire cement to a depth of about 3/4 – 1″, working the cement in well and trying not to get any air pockets in the cement.
Once I had the inside roughly lined I used a damp sponge to smooth out the surface before firing.
Curing the fire cement: The fire cement I used is a synthetic cement and needs to be fired before it sets
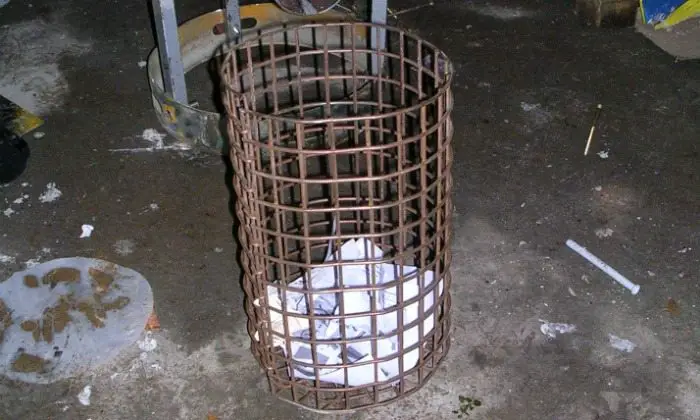
I used some left over weld mesh to make a basket that fitted the inside of the tank without touching the cement lining
This would be suspended using steel bars across the top of the stove and allowed me to fire the cement without the fire touching the wet cement.
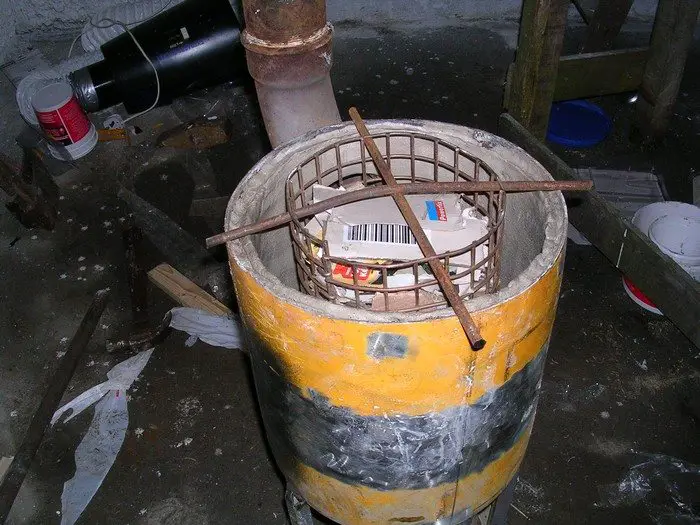
The basket was filled with kindling and suspended in the stove so it was not touching the wet cement lining.
It’s now ready for firing.
The stove was taken outside and the fire was lit and allowed to build up very slowly. After about 15 -20 minutes, I started to build the fire up with small bits of wood. The fire slowly built up over the next 2 hours. At this point I allowed the fire to die out and it was left until morning to cool.
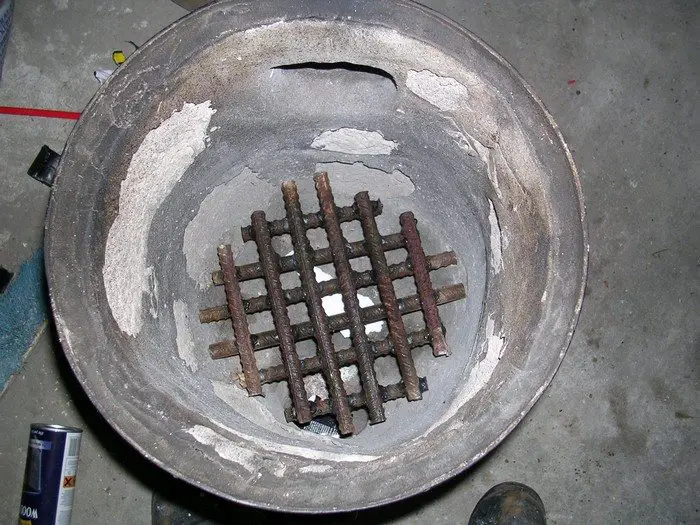
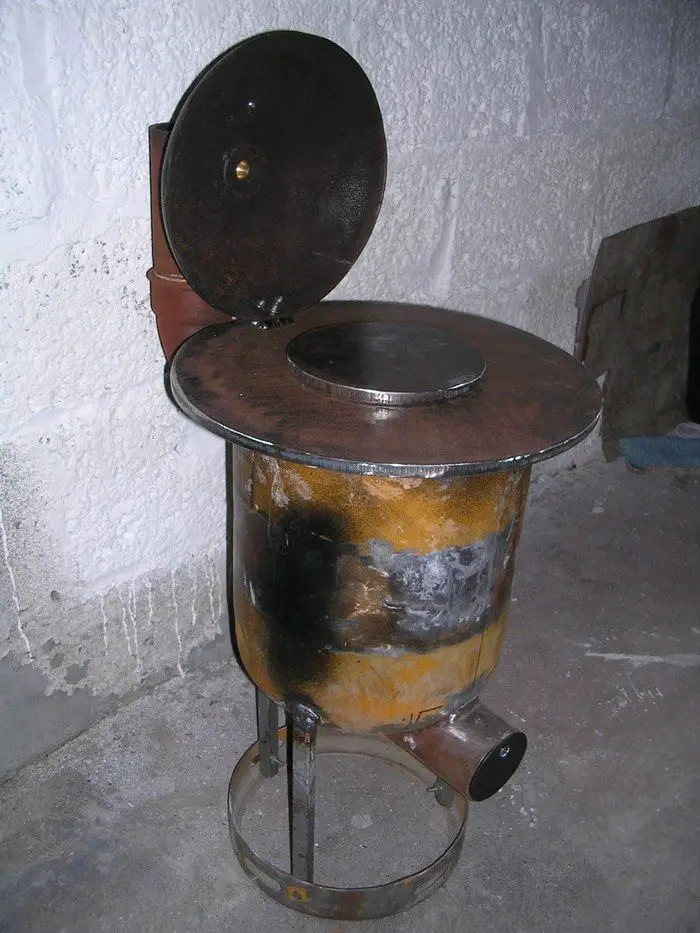
The grate: This pic shows the the fire cement lining after it had been fired and cured. As expected I had a few air pocketa that expanded during the firing and left a few hollows in the lining.
It looks worse than it is. I never did get around to filling these holes up and the stove has been running for almost 2 years now.
The grate was made from various lengths of re-bar welded together in a lattice. After 2 years, it still shows no signs of burning out.
I was very lucky that an engineer friend had this piece of 10mm steel plate 24″ dia with a 5″ hole in the center. It was a profiler job that had gone wrong and was scrap to him.
I was again lucky to find a 6″ round 10mm steel plate in my own scrap heap that was a perfect hot plate
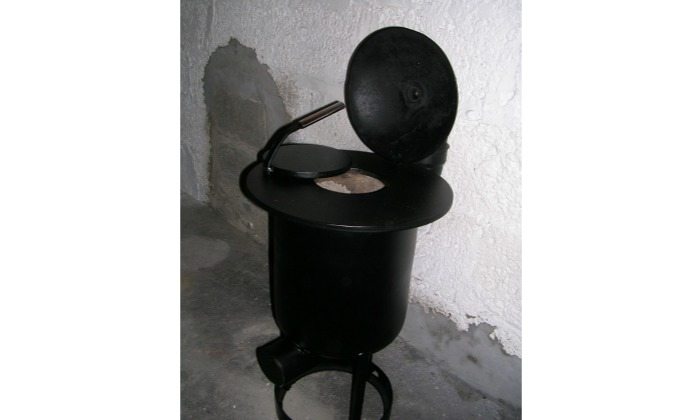
The lid is fixed to the large hot plate with a steel hinge and 4mm bolts.
A small steel plate was cut to fit the ash spout as a damper.
Using the 20x 6mm flat bar, a hoop was made that snugly fitted around the tank. this was then welded to the underside of the large plate to hold it in position. This joint was also sealed using a heat resistant silicone sealer. This gave a smoke free joint, yet it’s easy to remove when I need to do so.
A bracket was added to the edge of the hot plate and a flat bar handle was bent to shape to lift the plate of the stove when fuel is added.
I squeezed a piece of 1″ chrome tube in the vice until it was just flattened enough to slide the flat bar into. Once the vice is undone, the pipe springs back to shape and the handle is firmly fixed in place.
The stove was then sprayed with BBQ paint to give it that expensive store bought look.
I made one fatal mistake here, you really want to buff all the gas tank’s original paint off down to the steel before you paint.
I didn’t. The paint is pretty fire-proof but eventually will start to burn off and lift the BBQ paint where the paint was buffed off the BBQ paint is holding perfectly.
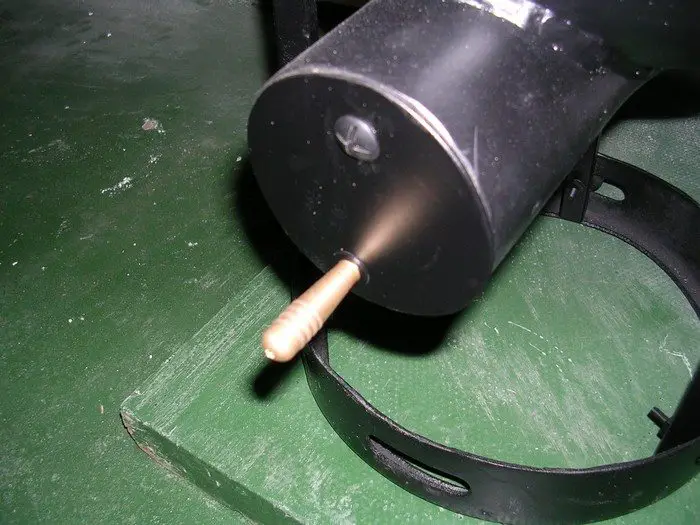
The dart: I bet you wondered what the dart was for.
I found this broken brass dart in a box of bolts and thought it would make a nice handle for the damper plate.
I counter sunk the plate and used a countersunk screw to fix the handle to the plate. This allows the plate to swing without catching and allows for a a good seal when the damper is closed off.
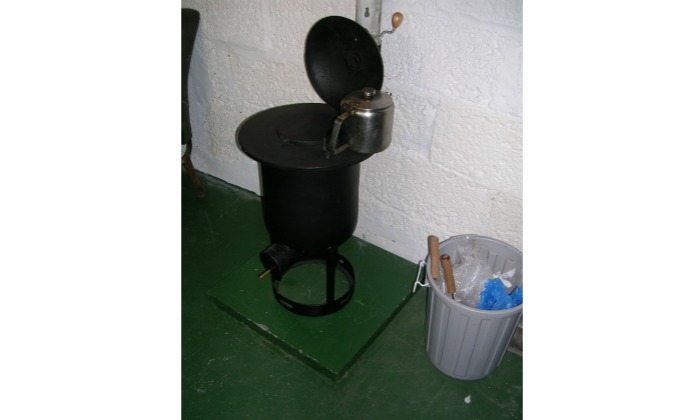
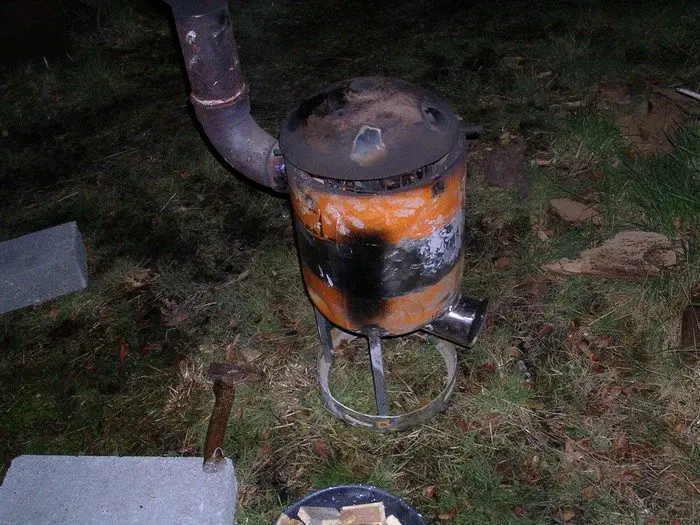
The finished stove installed and working: The stove was mounted on a 2′ x 2′ concrete slab that had been painted with floor paint as would be my fire surround.
Pictured here with the all important teapot on the boil, I have since got a better teapot with a flat bottom that boils quicker. The stove is perfect for heating the shed and can boil a pot of water in about 10 mins if the fire has been well stoked.
The stove was fitted with a 3″ flue made from cuttings of 3″ pipe. It worked well for about 18 months and then it clogged up completely. The only way to unblock it was to go onto the roof and poke a long stick down the flue.
I felt that my luck was eventually going to run out when I was on the roof and decided to close down the stove until a new flue was installed before I fell off the roof and broke my neck.
If you build you own stove, try and go for at least a 4″ flue and design in some way that you can use rods to clean the flue from the ground.
I am now in the process of replacing the 3″ welded flue with one made from a 4″ pipe that will be made in sections so it can be removed for cleaning.
Thanks for looking at my post.
Thanks to Dr Qui for this great project!
Gas Tank Heater Gallery
Click on any image to start lightbox display. Use your Esc key to close the lightbox. ?


Gas Tank Heater Safety Checklist: Purging Tanks and Meeting Codes
Building a gas tank heater can be rewarding, but safety comes first. Purge the tank, plan venting, and follow local rules. This checklist helps you avoid fires, explosions, and violations.
Check Local Rules And Approvals
Call your authority having jurisdiction before any cutting. Ask about solid-fuel appliances in outbuildings, flue requirements, and hearth protection. Permits may be needed. Use listed chimney parts where required. Keep approvals and receipts for insurance.
Verify Tank Type And History
Confirm the tank held LPG, butane, or propane. Read labels and valve stamps. Unknown history means stop. Don’t remove valves yourself. A licensed gas contractor should depressurize, purge, and tag the vessel as gas-free in writing.
Purging Must Be Professional
Insist on a documented purge using industry methods. Nitrogen purge or complete water fill and displacement are typical pro approaches. Ask for a gas-free certificate and keep it with your project file. No certificate, no cuts.
Consider Safer Donor Bodies
If purging access is limited, pick a new steel cylinder or purpose-made stove body. You’ll reduce risk and time. A fabrication shop can perform certified cuts on pre-purged tanks if you still want the look.
Set Up A Safe Work Zone
Work outdoors on noncombustible ground. Keep a 3 m clear radius. Stage a Class ABC extinguisher and a fire blanket within reach. Wear eye and face protection, cut-resistant gloves, hearing protection, and natural-fiber clothing.
Use Low-Ignition Cutting Practices
After purging, the tank must be drained, vented, and fully dry. Verify with an LEL gas detector if you have one. Avoid torches. Use mechanical cutting with an angle grinder and fresh disks. Stop immediately if you smell gas.
Plan Venting And Draft
Aim for the straightest possible flue route with minimal bends. Many builders step up to a 4 inch flue for better draft and easier cleaning. Add a cleanout point and a proper cap to resist downdrafts and rain.
Maintain Clearances And Heat Shields
Keep generous space to walls, ceilings, and storage. Add heat shields with a 25 mm air gap to cut wall temperatures. Protect floors with a noncombustible hearth pad sized for ash spill and ember pops. Anchor the heater so it can’t tip.
Provide Combustion Air And Alarms
Workshops get tight. You’ll need makeup air so the heater drafts cleanly. Install CO and smoke alarms with fresh batteries. Test them before every heating season. A CO alarm is non-negotiable.
First Firing And Cure
Start with tiny kindling loads. Warm the liner slowly to drive off moisture. Watch all seams for smoke leaks. Keep the extinguisher at hand. Stay present until the stove is fully cold.
Fuel Quality And Clean Burn
Use seasoned hardwood with moisture under twenty percent. Wet wood makes creosote and smoke. Split to size for your firebox. Avoid painted, treated, or glued scraps. Clean fires protect your flue and lungs.
Chimney Inspection And Cleaning
Set a cleaning schedule after the first month of use. Inspect for soot and creosote glaze. Add a flue thermometer to monitor burn quality. Use rods and brushes that let you clean from the ground where possible.
Emergency And Insurance Readiness
Mount the extinguisher on the exit path. Keep a burn kit nearby. Photograph the installation, permits, and purge certificate. Tell your insurer what you installed. Annual professional inspections keep coverage safer and your shop protected.
Conclusion
Building a gas tank heater can deliver real warmth to a small workshop. Success rests on safe purging, solid welds, and a clean, well-sized flue. Plan clearances, hearth protection, and reliable CO and smoke alarms. Use seasoned fuel and stick to a regular inspection and cleaning routine. Document permits and the purge certificate so you’re covered with insurers and proud of a safer, efficient build.
For a heating solution to your chickens, check out our cinder block heater guide!


