
Last Updated on October 14, 2025 by Team Ideas24
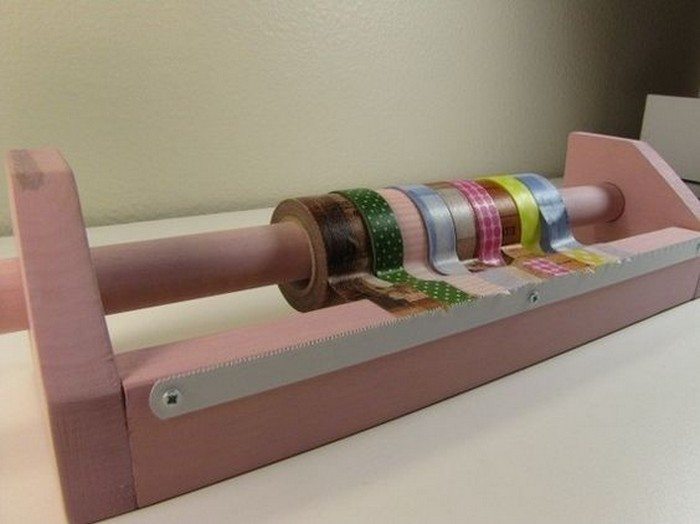
It may look like an unimportant item to have in a workshop, but a multi-roll tape dispenser is a big help if you want to work faster and more efficiently.
Rummaging through drawers looking for a roll of tape, grabbing a pair of scissors, and having to find the end of the roll – these are small factors but they do affect workflow and productivity.
Having a multi-roll tape dispenser simply saves you from wasting time searching for the tape that you need. Plus, it makes it faster to cut tape which is convenient especially when you need to double time on your project!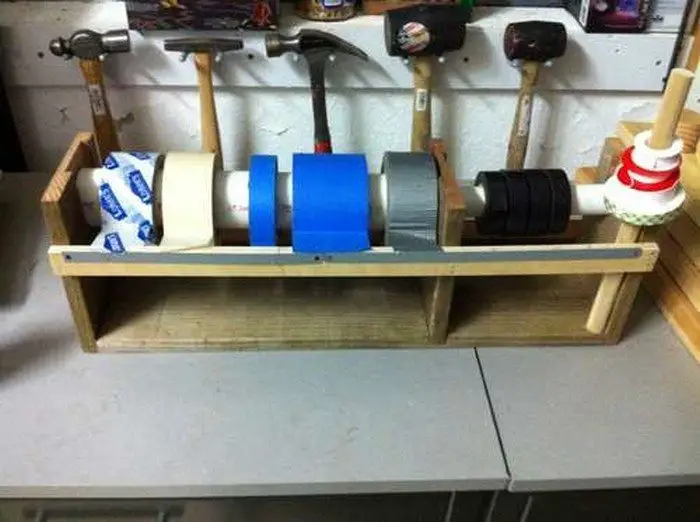
You can use timber offcuts, excess PVC pipe, or any kind of rod which you may already have. Your DIY tape dispenser doesn’t have to look fancy. It just has to be functional to improve your workshop and your workflow. ;)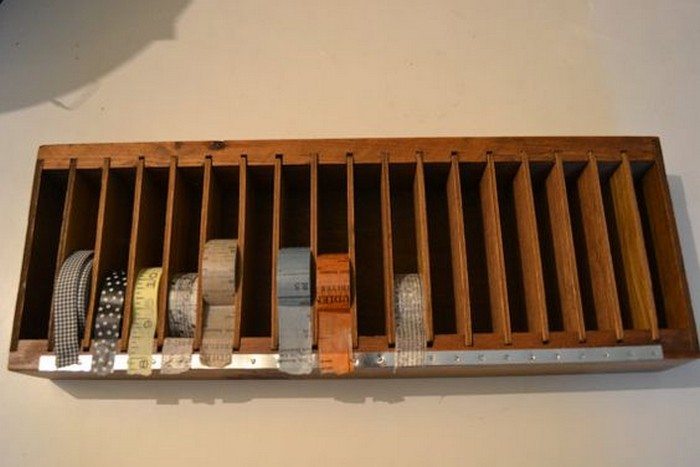
Hang it on a wall close to your table, but make sure that it can also be easily removed for when you want it right next to you while working on a project!
Do you have yet to make a multi-roll tape dispenser for your workshop?
Contents
Crafting a Multiple Roll Tape Dispenser
You’ll need these materials:
- Scrap 3/4″ Timber or Plywood
- 3/4″ Wooden Dowel
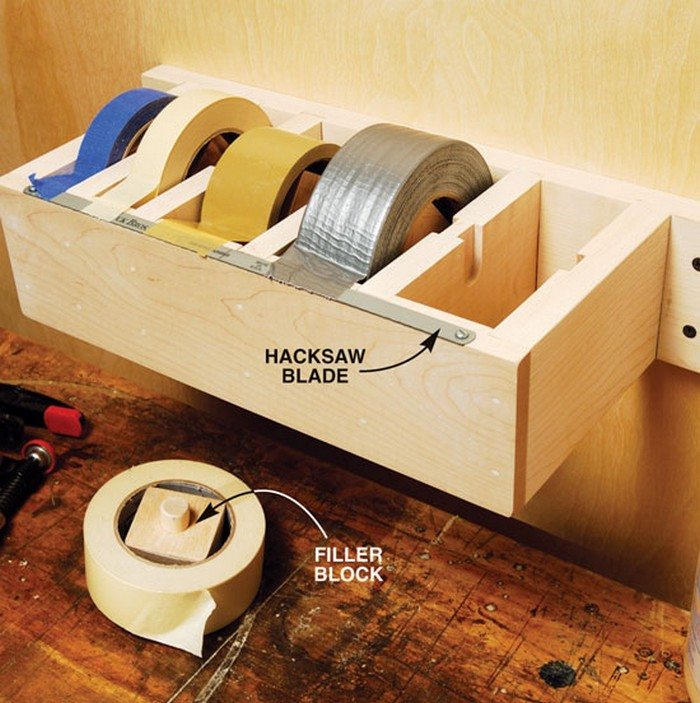
- Hacksaw Blade
- Wood Glue
- Wood Screws
And these tools:
- Saw
- Measuring Tape
- Drill
- Wood Clamps
Steps:
1) Plan your capacity and layout
- Decide how many rolls you want ready at once and their typical widths.
- Sketch a top‑down view: mark roll positions and small gaps (about 1/4″) between them so rolls don’t rub.
2) Cut the base, sides, and front lip
- Cut the base to your chosen length and 6″ depth for stability.
- Cut two identical side panels (6″ H x 5″ D).
- Rip a 1 1/4″‑tall front lip the same length as the base. This lip supports and guards the cutter.
3) Lay out and drill axle holes in the sides
- On each side panel, mark the axle hole center 1 3/4″ back from the front edge and 2 1/2″ up from the bottom.
- Drill a clean 3/4″ hole (spade or Forstner bit). Keep holes square so the dowel runs parallel to the base.
Optional quick‑release: On one side panel, saw a straight slot from the top edge down to the 3/4″ hole. This lets the dowel lift out for fast roll changes. You can add a small wood tab later (pivoting on a screw) to close the slot.
4) Attach the front cutter lip to the base
- Position the lip flush with the base’s front edge, standing 1 1/4″ tall.
- Glue, clamp, and pre‑drill. Drive wood screws from below through the base into the lip every 4–6″.
- The top of this lip becomes the blade mount.
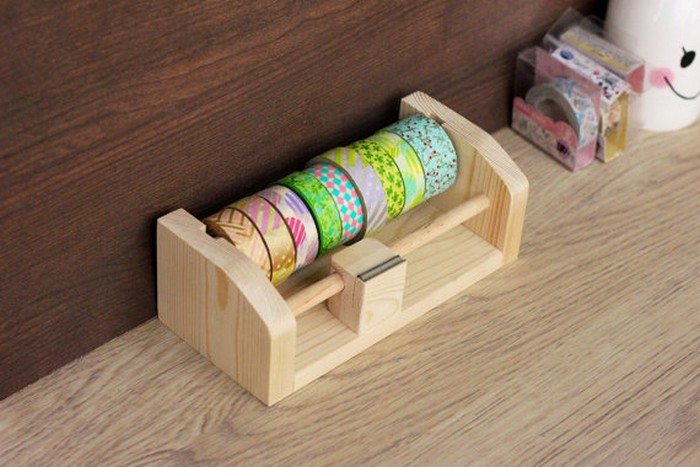
5) Dry‑fit the sides and check the tape path
- Clamp the side panels to the base (no glue yet), aligned flush with the base’s ends.
- Slide the 3/4″ dowel through the side holes and place a tape roll on it.
- Pull tape forward across the top of the lip to confirm the path is smooth and the roll clears the front edge by 1/8″–1/4″. Adjust hole position now if needed.
6) Glue and screw the sides to the base
- With positions confirmed, glue and clamp each side to the base.
- Pre‑drill and drive 2–3 screws through the base into each side panel. Ensure the axle holes remain aligned.
7) Cut the dowel to fit
- Measure the inside distance between the side panels.
- Cut the 3/4″ dowel to that length minus about 1/16″ so it spins freely but doesn’t rattle.
- Lightly chamfer the ends with the saw to ease insertion.
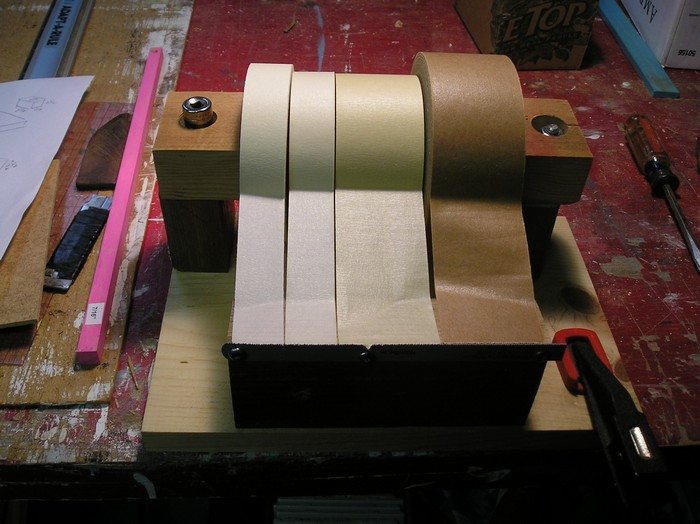
8) Mount the hacksaw blade safely
- Orient the blade so the teeth lean slightly toward the pull direction (for a clean, downward cut).
- Position it along the top front edge of the lip with only 1–2 mm of tooth height exposed above the wood.
- Use the blade’s end holes: pre‑drill the lip and secure with wood screws. Keep the blade straight; a slight 10–15° tilt helps the tape “bite” then shear cleanly.
- For safety, ensure wood sits just proud of the teeth along most of the edge.
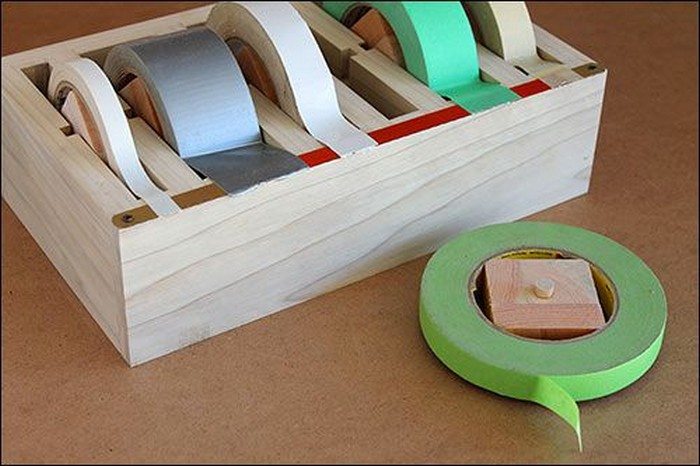
9) Make simple wood spacers (optional but helpful)
- Rip or crosscut a few 1/4″–3/8″ thick spacers from scrap 3/4″ stock, matching your roll widths as needed.
- These keep rolls from rubbing and help them track straight to the cutter.
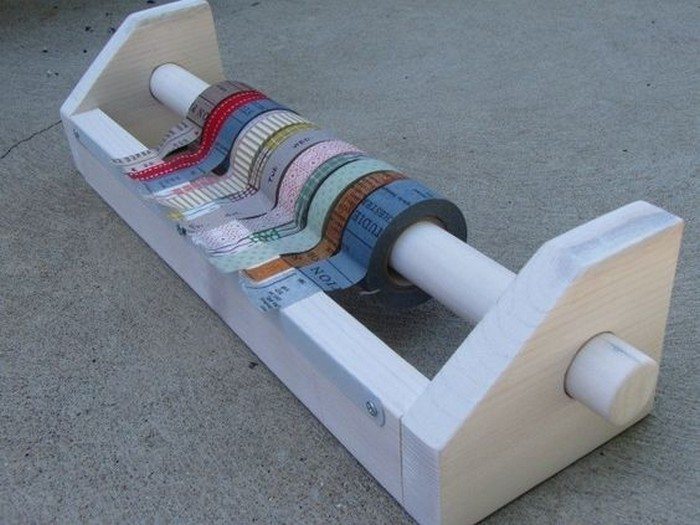
10) Load rolls and test
- Slide the dowel out, add tape rolls and spacers, then reinsert the dowel.
- Pull each tape forward, press it to the blade, and make a test cut. You want a clean snap without tearing.
- If the tape over‑spins, add a thin scrap felt/paper shim at one side panel hole to create a touch of friction on the dowel.
11) Add small usability touches (optional)
- Saw shallow kerfs (2–3 mm deep) along the top of the lip as “parking notches” to hold tape ends ready.
- Lightly round sharp wood edges with a few passes of the saw’s back corner to prevent snags.
12) Use and maintain
- Keep adhesive off the blade: wipe with a small amount of citrus cleaner or a dry rag after heavy use.
- If cuts dull, flip or replace the hacksaw blade.
Dial In Your Multiple Roll Tape Dispenser
Before you build, optimize your multiple roll tape dispenser around the tapes you use most. Dialed sizing, spacing, and tensioning give smoother feeds, cleaner cuts, and fewer mid-project roll changes.
Understand tape cores and widths
Know your core sizes: 1 inch for office tapes and 3 inches for painter’s, masking, and packing tapes. Widths commonly span 12–25 mm (craft), 36–48 mm (shop), and up to 72 mm (shipping).
Size your axle and frame to accommodate the widest roll plus spacer clearance, and allow at least 3–5 mm per side to prevent edge rub. Plan for future tape additions so your multiple roll tape dispenser grows without a full rebuild.
Choose the right dowel or axle
For light, narrow tapes, a 3/4 inch hardwood dowel is stiff and easy to machine. Wide or heavy rolls benefit from a 5/8–1 inch steel rod that resists deflection across longer spans.
Add low-friction bushings or printed hubs for 1 inch cores on larger axles. Chamfer rod ends and add a keeper collar for safety. If you need tool‑less swaps, drill a cross‑hole for a removable pin on your multiple roll tape dispenser.
Spacers, flanges, and alignment
Prevent rolls from touching, telescoping, or wandering by adding spacers: nylon washers, PVC couplers, MDF disks, or 3D‑printed rings all work well. Flanges help keep delicate tapes perfectly wound near the cutter line.
Lock spacing with set‑screw collars or thumb‑screw clamps so positions repeat after roll changes. Square the axle to the cutter and reference a shallow front fence to align edges. Label spacer stacks to standardize common tape combinations across your multiple roll tape dispenser.
Tension and feed control
A hint of drag keeps tape from over‑spinning and sticking to itself. Create adjustable tension using felt washers, rubber O‑rings, or Belleville (spring) washers compressed by a wing‑nut. Heavier packaging tapes generally require more preload than low‑tack painter’s tape.
Test by pulling 300–400 mm strips and checking recoil. If the feed still surges, add a simple felt brake pad riding the roll rim. Properly tuned, your multiple roll tape dispenser dispenses smoothly and stops instantly.
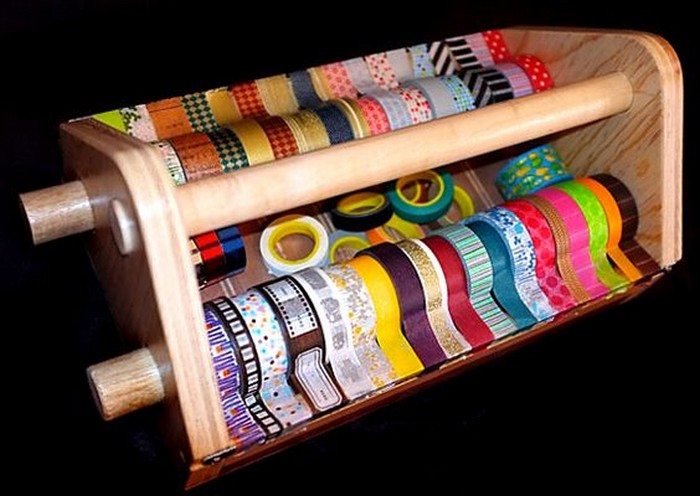
Wall‑mount vs. benchtop placement
Wall‑mounting saves benchtop space and improves visibility, especially when rolls are color‑coded. A French cleat lets you dock and undock quickly, moving the dispenser next to work as needed.
For benchtop use, add non‑skid feet or bench‑dog holes for rigid placement, and orient the cutter for your dominant hand. Keep it out of glue‑up splash zones and dust‑heavy operations. If portability matters, design a compact footprint and a centered handle for balanced, one‑hand carry.
Multiple Roll Tape Dispenser Gallery
Click on any image to start the lightbox display. Use your Esc key to close the lightbox.![]()


Pro Upgrades for Your Multiple Roll Tape Dispenser
Upgrade your multiple roll tape dispenser with features that save time and protect fingers. These add-ons improve cut quality, portability, and durability while making cleanup faster and roll swap-outs effortless.
Safer, cleaner cutting edges
A hacksaw blade works, but a guarded utility‑blade rail or micro‑serrated stainless edge yields cleaner, straighter cuts with less gumming. Set the teeth just behind a small lip to shield fingers and prevent snagging.
Consider a PTFE‑coated or ceramic‑coated edge to resist adhesive build‑up. Mount the cutter at a slight angle to reduce tears on thin tapes, and add a flip‑down blade cover. A magnetic keeper stores spare blades safely on your multiple-roll tape dispenser.
Quick‑change rod designs
Speed matters mid‑project. Use a hinged end block with a latch, an R‑clip/cotter pin through a cross‑drilled steel axle, or a spring‑loaded detent pin for instant releases. A slotted, drop‑in cradle lets the axle lift free without fully removing end caps.
Captive spacers and color‑coded bushings prevent mix‑ups during swaps. If you regularly change widths, consider a split axle: two shorter rods that lift independently, reducing lift height and weight on your multiple roll tape dispenser.
Portability and mounting
Add a padded top handle, rubber feet, and optional toggle‑clamp pads to lock the base onto a smooth bench. For shop carts, space cleats match your shelves, preventing sliding during movement.
If you travel between sites, fit a cleat receiver in your tool trailer or a systainer foam pocket. A slightly heavier base plate reduces tip risk when pulling wide tape. Include tie‑down points so the multiple roll tape dispenser can be strapped securely in transit.
Adhesive management and maintenance
Adhesives dull blades and slow cuts. Degrease the cutter with citrus cleaner or mineral spirits, then wipe with isopropyl alcohol. Avoid silicone sprays near finishing work. Use paste wax or paraffin on wood guides and fences instead.
Lightly oil steel axles to deter rust and creak, but keep oil away from tape edges. Establish a schedule: blade inspection monthly, spacer wear check quarterly, full alignment twice a year. Consistent care keeps your multiple roll tape dispenser cutting like new.
Smart productivity extras
Embed a steel rule or self‑adhesive measuring tape along the front lip for quick length references. Color‑code positions, blue for painter’s, green for masking, tan for packing, and label cores for instant ID.
A magnet strip holds spare blades and a pencil. A spring clip or silicone button anchors free tape ends. Add a small LED task light for shadow‑free cutting. Keep a laminated refill list or QR codes for reordering. Small touches multiply the speed of your multiple roll tape dispenser.
Conclusion
Thoughtful setup turns a simple dispenser into a reliable, everyday time‑saver. By matching cores, spacing, and tension to your tape lineup, you prevent jams and waste. Pro upgrades like safer cutters and quick‑change hardware add polish without complexity. Maintain your multiple roll tape dispenser regularly, and it will deliver faster, cleaner results on every project.
We have more projects to make your work more efficient. Check out our tool wall storage project next!


