Last Updated on September 11, 2025 by Team Ideas24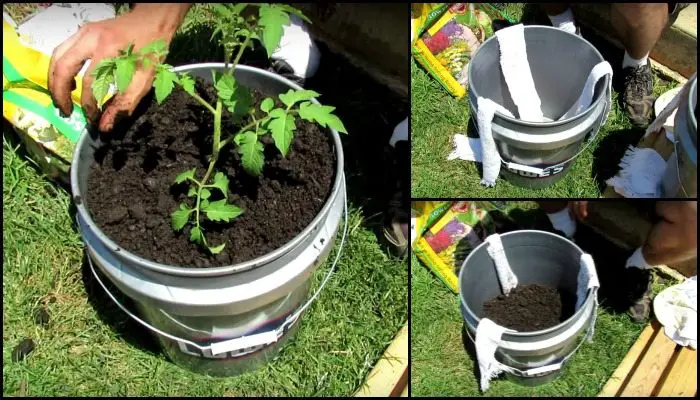
Here’s another great idea that makes gardening possible for busy owners. Are you one of them and you want to grow some tomatoes? Then this is definitely for you!
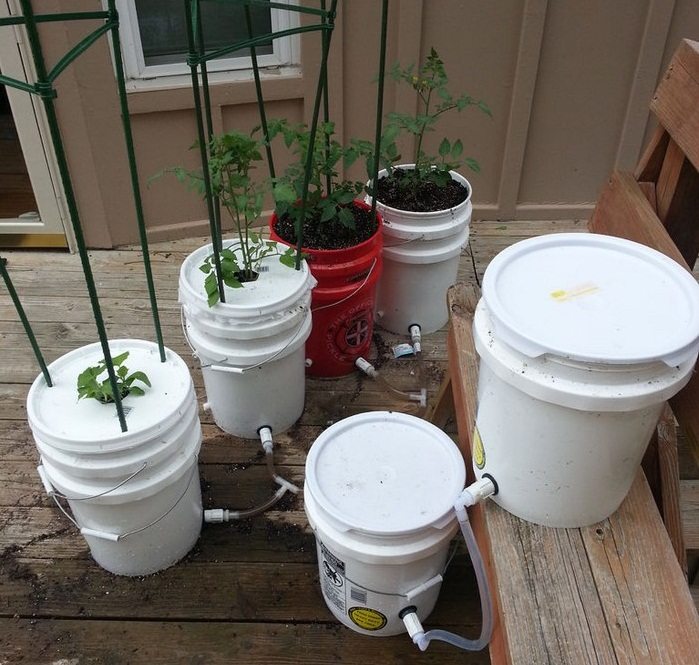
This container garden is a watering system that can take care of your tomatoes for 2-3 days straight. It’s great to have if you constantly forget to water your plants, you’re too busy with other daily tasks, or planning to go on a weekend getaway!
It makes use of 5-gallon buckets, but we don’t recommend getting one that previously contained other substances, like paint. You don’t want any chemicals seeping into your plant! You can find cheap buckets from your local stores, and even Amazon has a relatively inexpensive 5-gallon bucket.
This self-watering tomato garden container is also a good DIY project for people new to gardening or DIY’s because it’s simple and easy to build!
Been wanting to grow your own tomatoes? Then this must be the idea you’ve been looking for!
Guide to Growing Tomatoes in Self-Watering Buckets
You’ll need these materials:
- 2 Five Gallon Paint Buckets
- 2 Standard Kitchen Sponges
- 1 Cotton Towel
- 1 Small Funnel
- Planting Mix (with ‘moisture control’ label)
And these tools:
- Scissors
- Sharp Knife
- Clippers (optional)
- Drill with 1/4 inch bit (optional)
- Garden Trowel
Steps:
Growing tomatoes in self-watering buckets keeps moisture consistent and saves time. This method uses common tools and simple materials to give busy gardeners reliable harvests without daily watering checks.
- Step 1: Prepare the buckets
- Set one bucket aside as the outer reservoir. Use the drill and 1/4-inch bit to make a single overflow hole two inches up the side. That hole lets excess water escape and stops root rot.
- Step 2: Cut the inner bucket
- With the sharp knife, remove a three-inch circle in the center of the second bucket’s base. This opening lets the wicking assembly pull water up. Clip any rough edges to avoid tearing the towel.
- Step 3: Shape the sponges into wicks
- Cut each kitchen sponge into three equal strips with scissors. Stack the strips and trim them until they reach from the reservoir floor to the planting mix line inside the inner bucket. Tight wicks lift water better than loose ones.
- Step 4: Wrap the wicks
- Lay the cotton towel flat. Place the sponge strips in a bundle at one edge. Roll the towel around them to form a soft cylinder. Leave ten inches of towel free at the top to act as a soil barrier that stops mix from falling into the water chamber.
- Step 5: Install the wicking column
- Push the wrapped sponges up through the hole you cut in the inner bucket. Pull until the towel’s loose end lies flat across the bucket floor. The sponge tips should sit one inch above the floor of the reservoir once the two buckets nest.
- Step 6: Assemble the system
- Nest the inner bucket into the outer one. Confirm the overflow hole stays visible. That view tells you the buckets are aligned and the wicks reach water.
- Step 7: Add the planting mix
- Hold the towel edges upright to line the hole. Fill the bucket with moisture-control planting mix. Firm gently around the wick so full contact exists. Good contact ensures capillary action draws water upward.
- Step 8: Plant the tomato seedling
- Use the garden trowel to dig a six-inch hole. Bury the seedling deep, so only the top few leaf sets stay above the surface. Deeper stems develop extra roots for stronger growth.
- Step 9: Fill the reservoir
- Insert the small funnel through the overflow hole until it touches the bottom. Pour water until it dribbles back out. The funnel keeps soil dry while you fill, and the overflow cue tells you the chamber is full.
- Step 10: Maintain and feed
- Check water every two to three days. Top up when the level drops below the overflow hole. Feed a balanced liquid fertilizer through the funnel once a week to keep fruit coming. Prune suckers and tie stems to a stake as plants grow.
Ideal Soil Mixes and Organic Amendments for Moisture Control
Choosing the best soil blend determines how well wicks pull water. It keeps growing tomatoes in self-watering buckets thriving through hot spells without drowning delicate feeder roots.
Key ingredients for water-holding structure
Coconut coir, screened compost, and perlite give a light yet sponge-like texture. Coir locks moisture while still letting air pass. Compost supplies microbes that break down nutrients slowly. Perlite stops compaction so roots can breathe.
This trio keeps the planting zone evenly damp, a must when growing tomatoes in self-watering buckets because the roots pull water from below instead of surface drenching.
Balancing moisture and air
Aim for a mix that stays moist but never soggy. Squeeze a handful firmly. It should clump, then fall apart when poked. That test means capillary action will move water upward without suffocating roots.
Add extra perlite if the ball stays solid, or more coir if it crumbles like dust. Oxygen between particles keeps root tips white and active, boosting calcium uptake and preventing blossom-end rot.
DIY mix recipe you can blend in minutes
Start with four parts bagged potting mix labeled “moisture control.” Work in two parts compost, one part coir, and one part perlite. Dust the batch with half a cup of organic tomato fertilizer per five gallons. Mix thoroughly on a tarp so ingredients spread evenly. This recipe gives the slow, steady moisture release that fits growing tomatoes in self-watering buckets and supports fruit right through harvest.
Adding amendments during the season
Top-dress with a quarter inch of worm castings every two weeks. Castings provide gentle nitrogen that never burns roots. Sprinkle a tablespoon of bone meal once a month to replace phosphorus drawn into developing clusters. Work both additives into the top layer with gloved fingers. The nutrients leach down via wicking water instead of runoff, so nothing goes to waste.
Testing and adjusting pH
Tomatoes like a slightly acidic range around 6.3. Use a soil probe to check monthly. If readings rise toward neutral, scratch in a teaspoon of elemental sulfur. If the mix drops below 6.0, water once with a solution of one tablespoon of dolomitic lime per gallon. Small, timely adjustments keep micronutrients available and fruit flavor rich.
Gallery of Growing Tomatoes in Self-Watering Buckets
Click on any image to start the lightbox display. Use your Esc key to close the lightbox.![]()


Lighting and Temperature Tips for Balcony or Patio Setups
Sunlight dictates sugar content and disease resistance. Follow these practical lighting and heat tricks so growing tomatoes in self-watering buckets matches greenhouse performance on a tiny balcony.
Finding the brightest corner
Track sun paths with a phone compass at breakfast, noon, and late afternoon. Pick the spot that stays lit at least six hours. Rotate buckets a quarter turn every three days so vines develop evenly. Balanced exposure keeps internodes short, builds sturdy stems, and helps the reservoir water evaporate slowly, stabilizing the wicking rhythm.
Managing midday scorch
Summer rays can push leaf temperatures well above air temperature. Hang a sheet of shade cloth during the hottest two hours. Choose thirty-percent density so light only softens, not disappears. The cloth drops leaf stress dramatically, yet it doesn’t interrupt the steady water draw critical for growing tomatoes in self-watering buckets.
Temperature swings after sunset
Balconies often cool fast once the sun dips. Slide sheets of cardboard behind buckets to block conductive heat loss through railings. You can also place the containers on thick rubber mats that insulate against cold decking. Stable night temperatures keep flowers from aborting and maintain even ripening.
Supplemental grow lights on cloudy weeks
Clip a clamp-lamp fitted with a full-spectrum LED to the railing. Aim it thirty centimeters above the canopy and run it four hours after dusk when daylight stays below four kilolux. Additional photons push photosynthesis during monsoon skies, ensuring that growing tomatoes in self-watering buckets never stall.
Wind protection without blocking sun
Strong gusts dry foliage and snap fruit-laden vines. Set clear plastic panels at railing height to deflect wind while letting light pass. Secure them with zip ties so they stay put during storms. Leaves stay hydrated longer, and the wick can maintain its capillary pull without sudden reservoir depletion.
Preventing Root Rot and Other Water-Related Diseases
Consistent moisture invites fungus if airflow and hygiene slip. Use these safeguards to keep growing tomatoes in self-watering buckets productive, rather than turning them into a disease lab.
Understanding root rot causes
Pythium and Phytophthora thrive in stagnant water. Overflow holes stop standing puddles, yet spores can still move in. Keep debris out of the reservoir and empty it once a month to flush silt. Healthy white roots are your early indicator that growing tomatoes in self-watering buckets remains on track.
Monitoring reservoir activity
Check water clarity through the overflow hole. Cloudiness signals bacterial buildup. Drain, rinse, and refill with a mild solution of one teaspoon hydrogen peroxide per gallon. Oxygen kills anaerobic microbes and leaves beneficial bacteria unharmed, keeping the entire system odor-free.
Sanitizing tools and containers
Dip pruners and trowels in a one-part bleach, nine-parts water bath for thirty seconds before each use. Wipe bucket rims with rubbing alcohol if sap drips attract flies. Clean tools block disease entry points, a small step that pays off big when you rely on growing tomatoes in self-watering buckets season after season.
Brewing natural anti-fungal teas
Steep a handful of compost in five gallons of water for twenty-four hours, then strain. Add a tablespoon of unsulfured molasses to feed beneficial microbes. Drench the top inch of soil every two weeks. Friendly organisms colonize root hairs and outcompete pathogens, extending the disease shield beyond chemical treatments.
Early detection signs and swift action
Yellowing lower leaves, wilting despite full reservoirs, and brown root tips mean trouble. Pull the plant, trim affected roots, and re-pot in fresh mix if damage is limited. Discard severely infected specimens to protect neighbors.
Quick removal prevents spores from spreading through shared tools or splashing. Acting fast lets the rest of your growing tomatoes in self-watering buckets continue toward harvest without setback.
Conclusion
Growing tomatoes in self-watering buckets proves that smart design beats daily chores. The reservoir keeps soil moisture steady, so plants stay stress free and productive. Combine balanced soil, steady light, and quick disease checks, and yields will rival any in-ground patch. You’re free to travel for days yet return to clusters of ripening fruit. Follow the steps, adjust for local climate, and enjoy fresh tomato flavor straight from your patio.
While tomatoes are great ingredients, your stew or roast can make do with potatoes. Check out our guide on growing potatoes in bucket!


