
Last Updated on October 13, 2025 by Team Ideas24
Here’s a clever project that can cook your food in an emergency situation when no alternative fuel is available. But why wait? You can build one just for the fun of seeing how it works. The parabolic solar cooker a great project to do with the kids as it really highlights the power of our sun!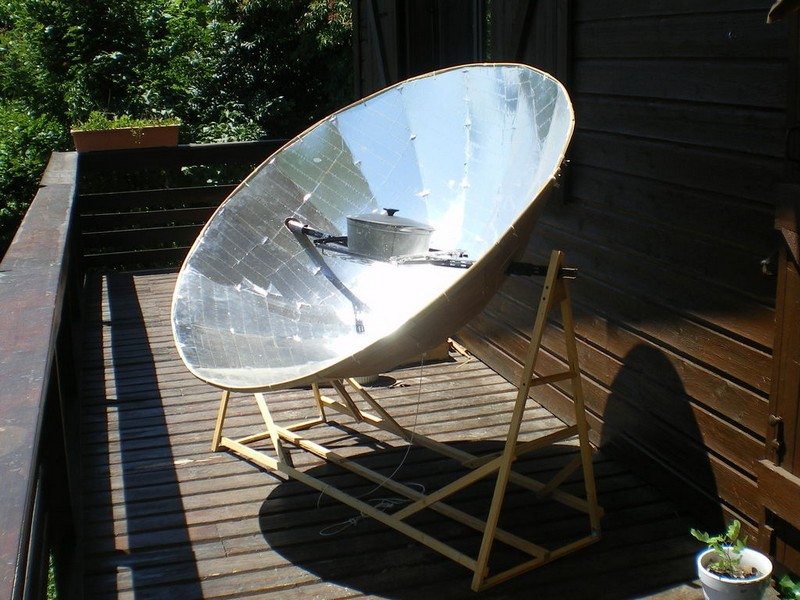
It’s an oven that makes use of solar energy — the cleanest, most abundant renewable (and free) energy source that we have. :) This oven can give you a litre of boiling water within 20 minutes. You can cook a full meal in 45 to 60 minutes on good day!
What do you think?
Building a Parabolic Solar Cooker
Materials:
- 5mm thick plywood
- 1″ thick timber
- Plastic cable ties
- Nuts and bolts
- Screws
- Rope
- 2 rolls of adhesive aluminum tape
- Bamboo pole
- Pot holder setup
[adinserter block=”11″]
Tools:
- Cordless drill
- Welding tools
- Knife
- Hammer
Steps: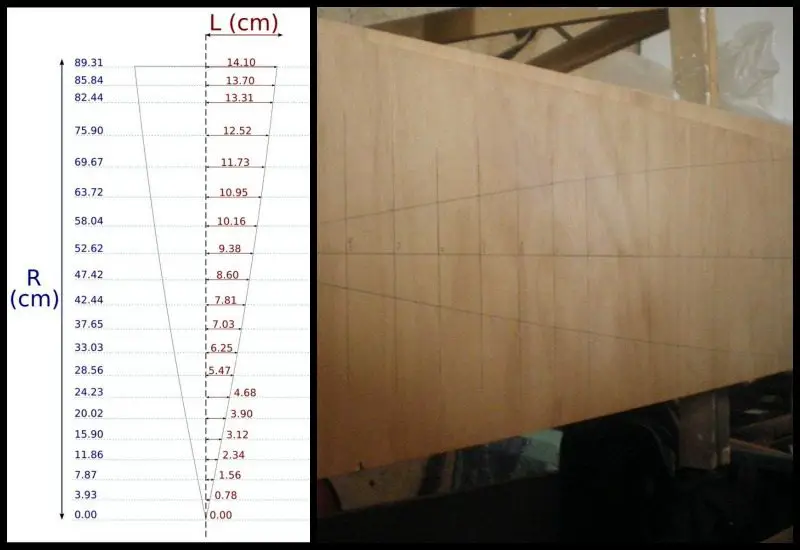
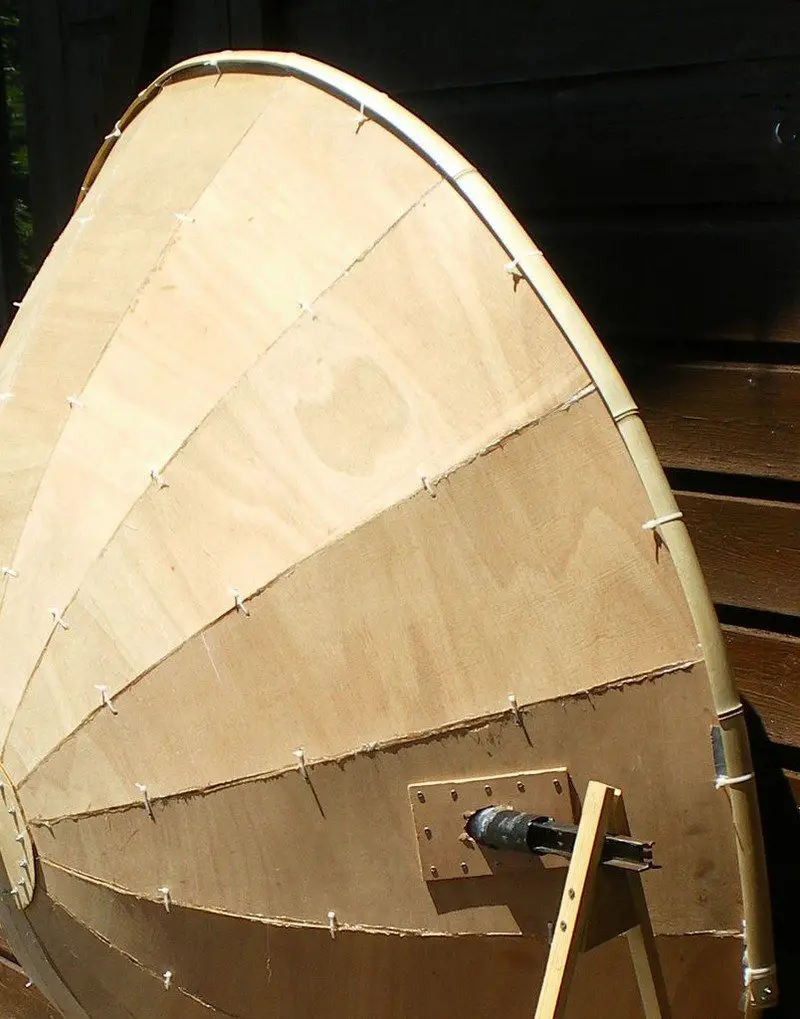
The idea is that if the parabola is cut symmetrically along 8 radial directions and flattened out, then it would appear like an 16-petalled flower. So once you have the petals made of any flexible material you can bend them in the shape of a parabola.
I used 5 mm thick plywood. I think you can use a thinner plywood, but then you’ll need to add a stronger structure to stiffen the parabola. Have a look here, they use a metallic structure to keep everything stiff.
I used this publication to calculate the dimensions of the petals. I had to tweak it a little bit to have something i could actually use.
Here is a google spreadsheet with everything you need (you can download it to modify it).
Once you’ve cut the petals, drill holes every 20 cm along the sides of the petals so that you attach them together with the plastic cable ties.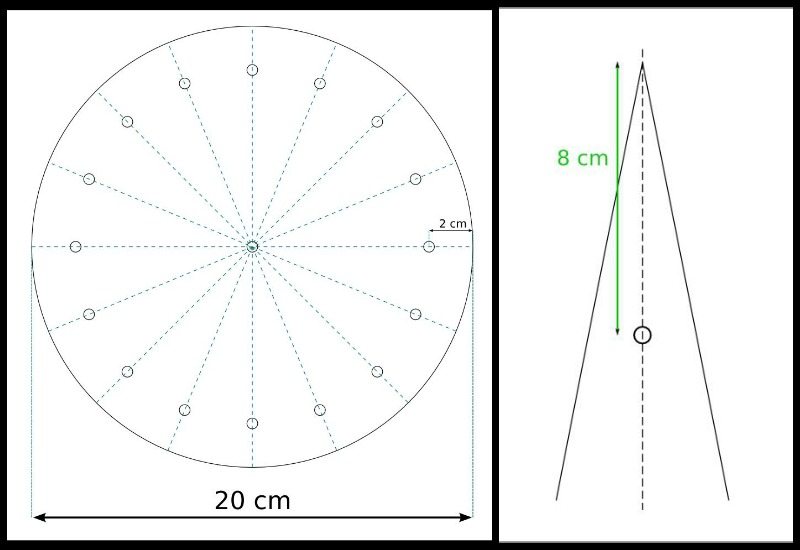
The discs will force the bottom of the parabola to be plane. Without them, it’s just impossible to bend the plywood !
Continued Page 2
Cut two discs of 20 cm out of plywood. Divide them like a pie in 16 equal parts and drill holes 2 cm from the outside of the discs.
Drill a hole of the same width 8 cm from the base of each the petal.
Sandwich the petals between the two discs using bolts.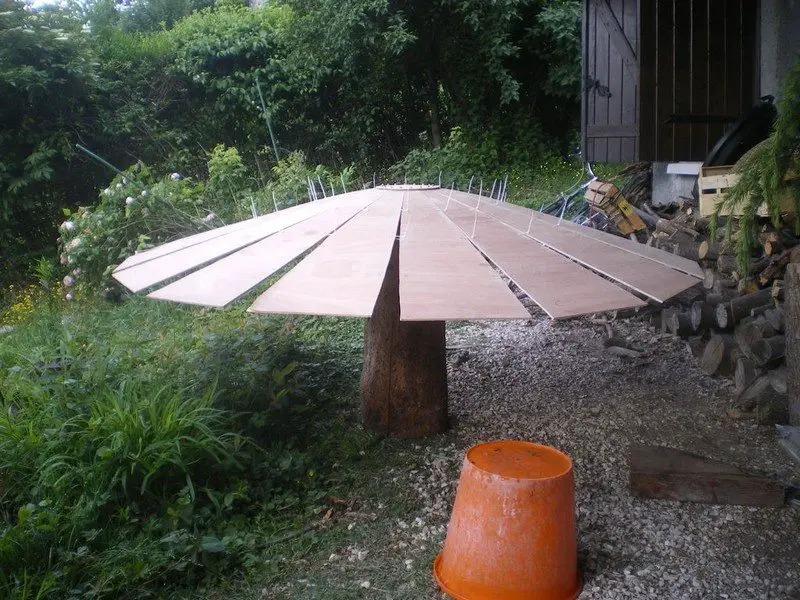

I’ve used plastic cable tie to hold the plywood together. I’ve found it easier to go gradually from the center to the edges of the parabola as shown in the pictures. You can also circle the parabola with a rope, it will help.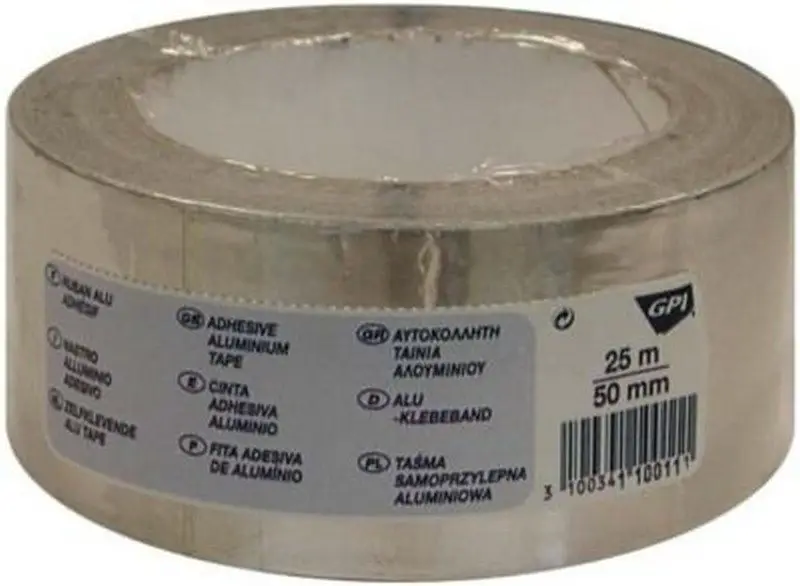
The aluminium will reflect the sunlight on the cooking pot. I used 2 adhesive aluminium tapes of 25mx5cm which cost me 10 € each.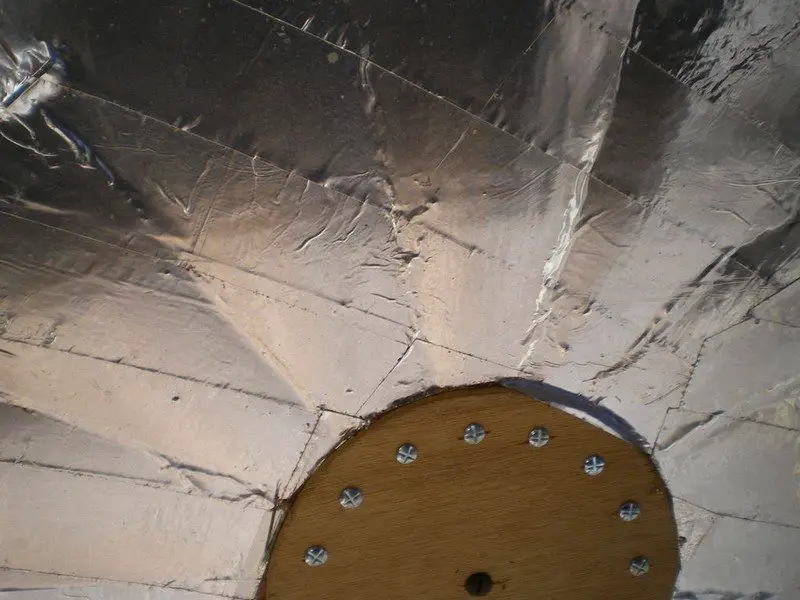
I’ve found that is better to add the aluminium tape when the plywood is already bended (else the surface won’t be flat once bended)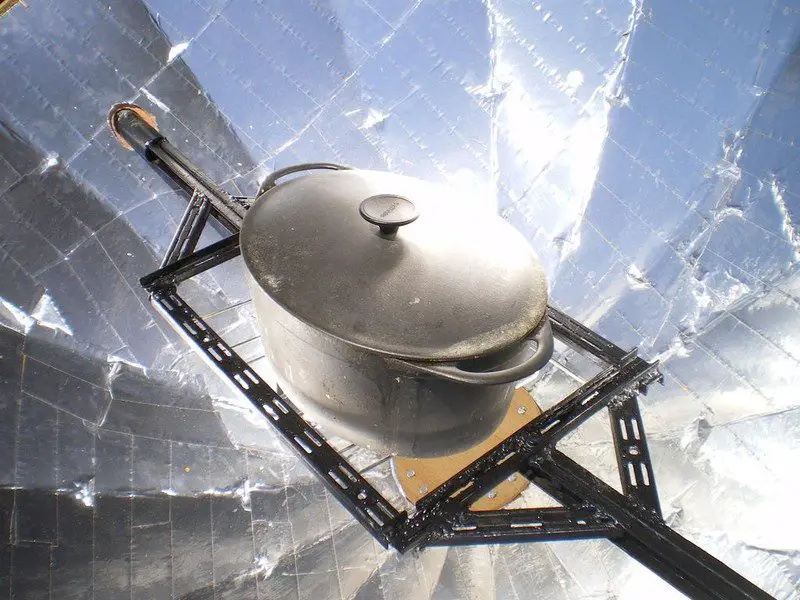
The pot holder is on the focal axis of the parabola so that it can also be used as a pivot for the parabola.
The position of the pot holder depends on the shape and the size of your parabola but in any case you can find it in the spreadsheets of the first step.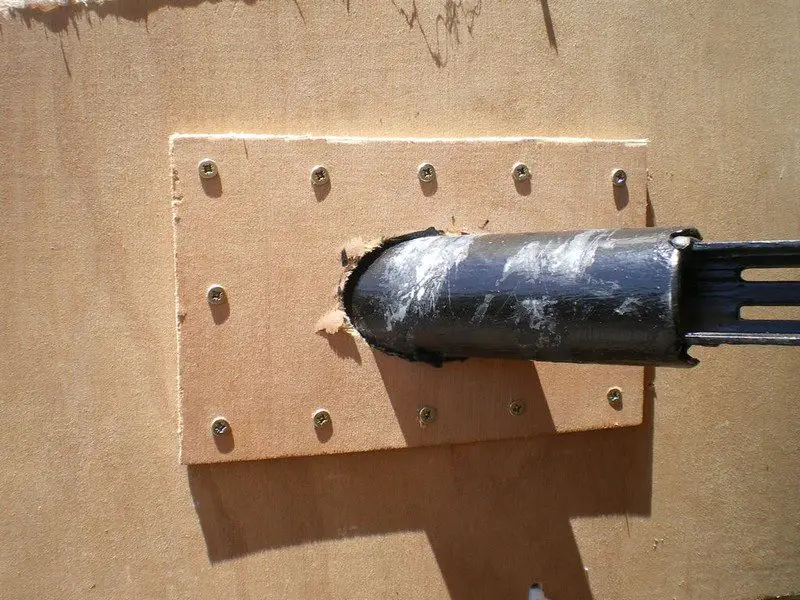
Drill a hole on two opposite petals. I used an electric wood saw to cut an ellipse (the intersection of a parabola and a cylinder can be approximated by an ellipse). The cylinder I used has a diameter of 4cm so I cut an ellipse of 4x6cm.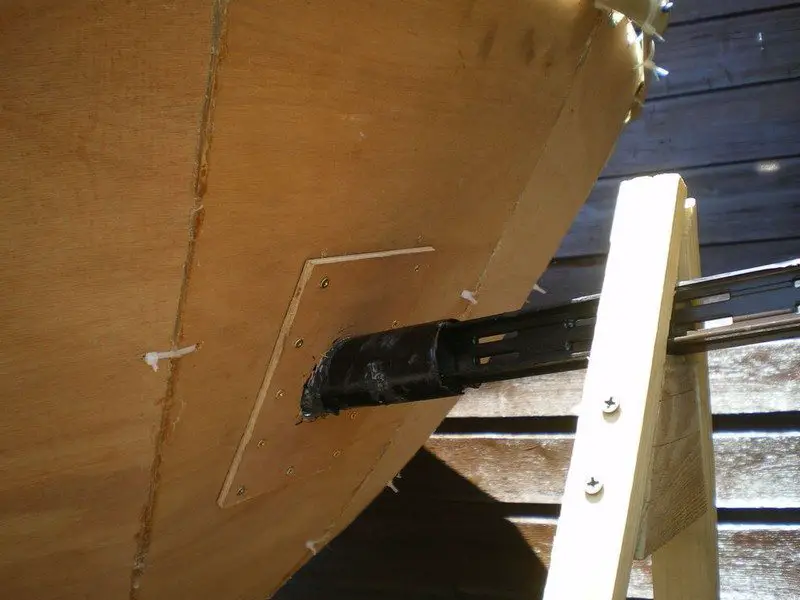
The welding should be very strong! I’ve added two extra “branches” on each side because of the weigth of the pot (I have a pot of 20L).
The place where you put the pot should be a bit lower than the rest so that the center of the pot will be on the focal point.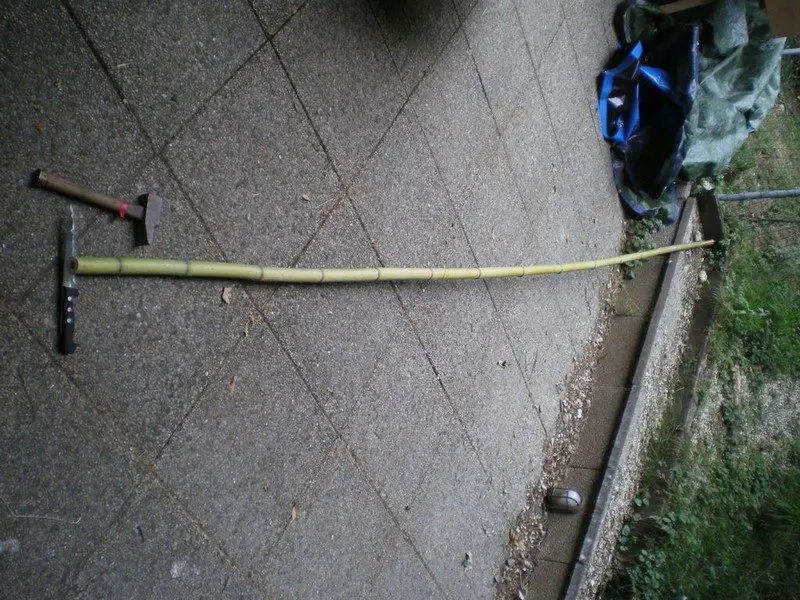
I used a big green bamboo pole that I cut in 4 to stiffen the parabola. The parabola could be stiffer, but it’s alright like this!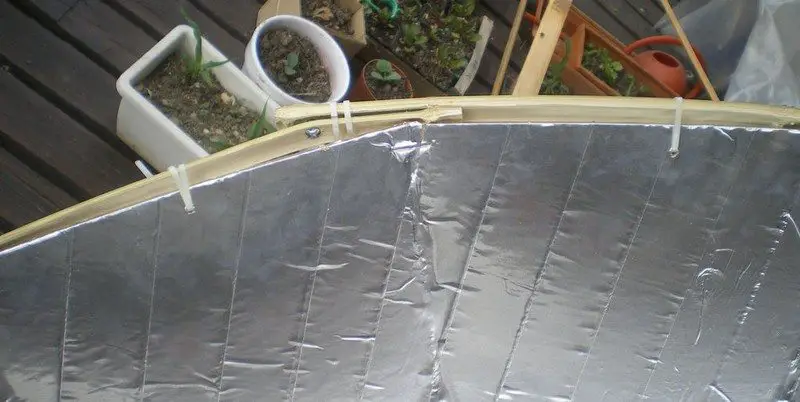
Bamboo poles are very easy to cut, use a big knife and a hammer. Cut it while green and flexible and then let it dry on the parabola.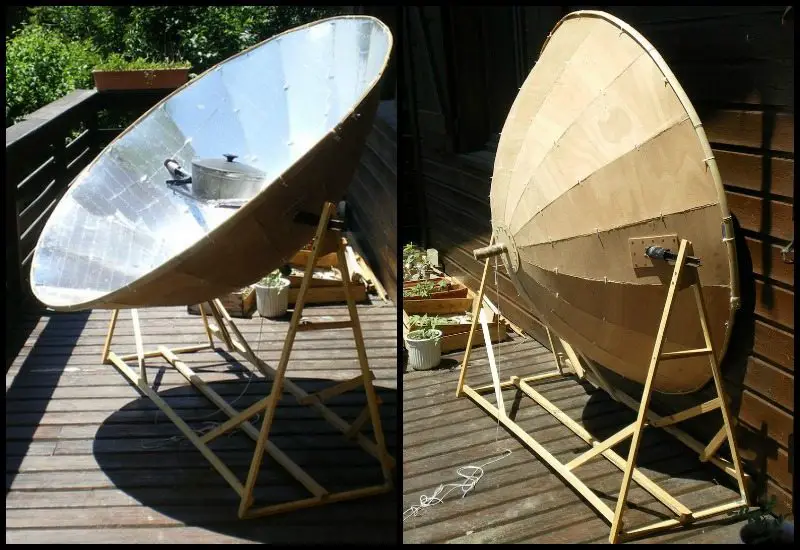
The support should be strong enough for the parabola and the cooking pot. I made it stiffer by adding wood along the diagonal.
I’ve also added a little handle to the parabola so that it is easier to rotate and to transport.
This is a great way to prepare any basic meal when camping or to use in any emergency situation. The materials that are needed for this project are easy to obtain from your local hardware store, and may even be found around your home.
Thanks to
Understanding the Science Behind a Parabolic Solar Cooker
A parabolic solar cooker might look like a simple DIY project, but there’s some fascinating science at play. The unique shape and materials work together to harness and concentrate sunlight, turning it into heat that’s powerful enough to cook a full meal. Understanding how this works helps you appreciate just how efficient and sustainable this cooking method can be.
Why the Parabolic Shape Works
The key to the parabolic solar cooker is its reflective dish. Unlike flat surfaces, a parabolic curve has a special property—it reflects all incoming light toward a single focal point. When sunlight hits the reflective surface of the cooker, it’s not just bouncing off randomly. Instead, it’s directed straight to the spot where you place your cooking pot. That’s where the temperature builds up quickly and consistently.
This concentration of sunlight at the focal point allows the parabolic solar cooker to reach temperatures high enough to boil water or cook food in less than an hour. Some designs can exceed 250°C (480°F) on a clear day. That’s hotter than many kitchen ovens, and it’s achieved with zero fuel, just sunlight and smart design.
Reflective Materials and Energy Transfer
The effectiveness of the cooker also depends on the materials used. Aluminum foil or adhesive aluminum tape works well because these surfaces reflect a high percentage of sunlight. The more reflective the surface, the more energy gets redirected to the focal point. When that energy hits the cooking pot—especially if it’s dark-colored or has a matte finish—it’s absorbed as heat rather than bouncing away.
This absorbed energy raises the temperature of the pot and the food inside it. Heat transfer occurs through conduction in the metal, cooking your food evenly without the need for an open flame or electrical current.
Thermal Focus and Practical Impacts
What sets the parabolic solar cooker apart is its efficiency. Because of the focused energy, it can be used for tasks like boiling, frying, or even baking with the right setup. It’s not just a novelty or emergency backup—it’s a real tool for off-grid or eco-conscious cooking. Understanding this science makes it clear why this design has become so popular in survivalist and sustainability circles.
The parabolic solar cooker proves that sometimes, the most powerful energy source is the one shining over us all day. You just need the right curve to capture it.
Best Cooking Techniques for Your Parabolic Solar Cooker
Though it calls for a different attitude than conventional stovetops or ovens, cooking with a parabolic solar cooker is a gratifying experience. Mastering a few basic strategies will assist you to achieve consistent, tasty outcomes every time since you are depending totally on the sun’s energy. The aim is to maximize heat absorption, regulate cooking time, and modify your recipes to fit solar cooking circumstances.
Use the Right Cookware
The kind of pot you use actually affects more than you may expect. Dark-colored, matte-finished cookware will yield the greatest results. These surfaces absorb sunlight more effectively than shiny or reflecting ones, which tend to reflect the light away rather than transform it into heat. Steel, cast iron, or enameled pots are excellent. Essential as well are lids; these aid to keep heat and speed up cooking of your meal, much as a pressure cooker would.
Preheat When Needed
Just like a conventional oven, your parabolic solar cooker needs to preheat for certain recipes. If you’re baking or making something that needs consistent high heat—like roasting vegetables or baking bread—place the empty pot in the cooker for 10 to 15 minutes before adding ingredients. This creates a stable high-temperature environment right from the start.
Track the Sun for Even Cooking
Because the parabolic solar cooker focuses sunlight on one small area, you’ll need to adjust its position regularly to follow the sun. Every 15 to 30 minutes, turn the dish slightly so the focal point remains directly on the pot. Some setups include a swivel base or tracking system to make this easier, but even manual adjustments are simple once you get the hang of it.
Layer and Cut Ingredients Wisely
For quicker and more even cooking, cut food into smaller, uniform pieces. Layer them loosely in the pot rather than piling them tightly. This allows the heat to distribute more evenly and reduces overall cook time. Stirring occasionally, especially for stews or stir-fries, also helps keep cooking consistent.
Plan for the Weather
Cloudy or partly cloudy conditions can slow down cooking time. On days like this, plan meals that don’t require high heat or long cooking times. Pasta sauces, rice, boiled eggs, and steamed vegetables work well. Save baking and frying for clear, sunny days when your parabolic solar cooker performs at its best.
Once you get used to these solar cooking techniques, you’ll find the parabolic solar cooker isn’t just a backup for emergencies—it’s a practical and efficient tool for everyday outdoor meals.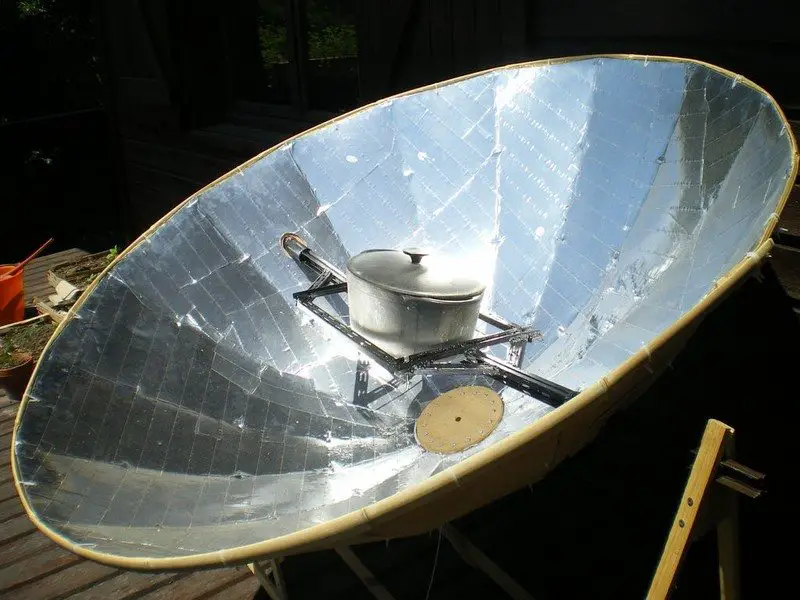
How to Adjust and Position Your Parabolic Solar Cooker for Maximum Efficiency
Getting the most out of your parabolic solar cooker isn’t just about the build—it’s about how you use it. The sun moves across the sky all day, and your cooker needs to follow that path to maintain the highest level of heat. Proper positioning and occasional adjustments will make the difference between a slow simmer and a steady boil.
Start with the Right Location
Set up your parabolic solar cooker in a wide, open area with full sun exposure. Avoid spots near trees, fences, or buildings that cast shifting shadows. Even partial shade can drastically lower the temperature and slow down your cooking. A flat, level surface ensures the cooker remains stable, especially if you’re handling heavier pots.
Angle Toward the Sun
The key to solar efficiency is aiming the reflector directly at the sun so that its rays converge at the focal point. You’ll know the cooker is positioned correctly when the shadow of the pot or its holder is directly beneath it or very minimal. Some people use a small stick mounted at the center to check alignment—when its shadow disappears or becomes the shortest, you’re in the right position.
Adjust Throughout the Day
The sun doesn’t stay in one place, and your parabolic solar cooker shouldn’t either. Every 20 to 30 minutes, rotate the dish slightly to stay aligned with the sun’s movement. This helps maintain maximum heat and ensures even cooking. A simple swivel base can make adjustments easier and smoother. If you’re cooking for an extended period, set a timer as a reminder to realign.
Know Your Latitude and Season
In summer, the sun is higher in the sky. In winter, it stays lower on the horizon. Adjust the vertical tilt of your cooker based on the season and your location. Most parabolic designs can be propped or braced to change the vertical angle. A steeper angle in winter helps you collect more sunlight. In the summer, a lower angle works better since the sun is nearly overhead at midday.
Lock It Down
Once positioned, secure the base and supports so wind or minor bumps don’t knock it off target. A small shift in angle can significantly affect performance. Use weights, anchors, or braces to keep everything steady.
With just a bit of attention to positioning, your parabolic solar cooker becomes a powerful, consistent heat source that runs all day, entirely powered by the sun.
Maintenance and Repair Tips for Your Parabolic Solar Cooker
Keeping a parabolic solar cooker in top shape extends its lifespan and performance. Regular maintenance and routine checks prevent small issues from becoming major repairs quickly.
Reflective Surface Care
Dust, pollen, and grime will reduce sunlight reflection. Gently wipe the surface with a soft cloth and mild soapy water. Rinse well and let it air dry. Avoid harsh detergents that could damage the coating. Inspect for scratches. Small marks can be masked with a touch of reflective tape to maintain performance.
Structural Integrity Checks
Inspect the frame and petal mounts of your parabolic solar cooker at least once a month. Look for cracks or splits in wood or metal supports. Tighten any loose bolts and replace damaged mounts promptly. A sturdy frame keeps the reflective surface in the correct shape. It also prevents sagging that can shift the focal point.
Fastener and Joint Tightening
Vibration from wind and handling can loosen nuts, bolts and cable ties. Carefully examine all fasteners after each cooking session. Use a wrench or pliers to snug up loose hardware. Replace worn or rusted hardware with weatherproof options. Proper tension keeps the dish stable in strong sun and wind.
Replacing Worn Reflective Material
Reflective aluminum tape or film will fade over time. Check the reflectivity by eye. Dim patches need fresh material. Remove old tape or film before adding new layers. Follow the curve of the dish closely when you reapply. Smoothing out wrinkles ensures maximum reflection. Replacing worn reflective material extends the life of your parabolic solar cooker.
Pot Holder and Support Inspection
The pot holder sits at the focal point. Inspect it for bending or cracking. Make sure welds or attachments are secure. A loose holder can shift the pot out of focus. Test the pivot or swivel function gently to confirm smooth movement.
Lubricating Moving Parts
Hinges, swivels, and pivots improve performance with occasional lubrication. Use heat-resistant grease or silicone spray. Apply sparingly to moving joints. Wipe off excess to avoid attracting dust. Smooth movement helps you align the dish quickly. You’ll avoid jerky adjustments that can misalign the focal point.
Corrosion Prevention
Metal components can rust when exposed to moisture. After cleaning, dry all metal parts thoroughly. Apply a thin coat of anti-corrosion spray or oil. Check for rust spots and sand lightly before recoating. A protected frame resists weather damage and stays reliable.
Seasonal Storage and Protection
When not in use, store the cooker in a dry, sheltered area. Cover it with a breathable cloth to keep dust off. If you expect heavy rain or snow, disassemble fragile parts. Store reflective panels flat to avoid warping. Regular storage care protects the cooker until the next sunny day.
Conclusion
Building a parabolic solar cooker is a practical and rewarding way to harness the sun’s energy for everyday cooking. It’s efficient, eco-friendly, and works without fuel. With the right materials and positioning, you can cook full meals using nothing but sunlight.
We have more interesting cooking fixtures for your space. Check out our all-in-one smokehouse pizza oven and grill project next!


