
Last Updated on July 21, 2025 by Team Ideas24
Your children’s bedrooms should be a haven for imaginative pretend play, bedtime stories, and joyful giggling. Many kids spend a lot of time in their room day dreaming and playing, after all.
Wouldn’t it be amazing to have a bed that reflects their games and dreams?
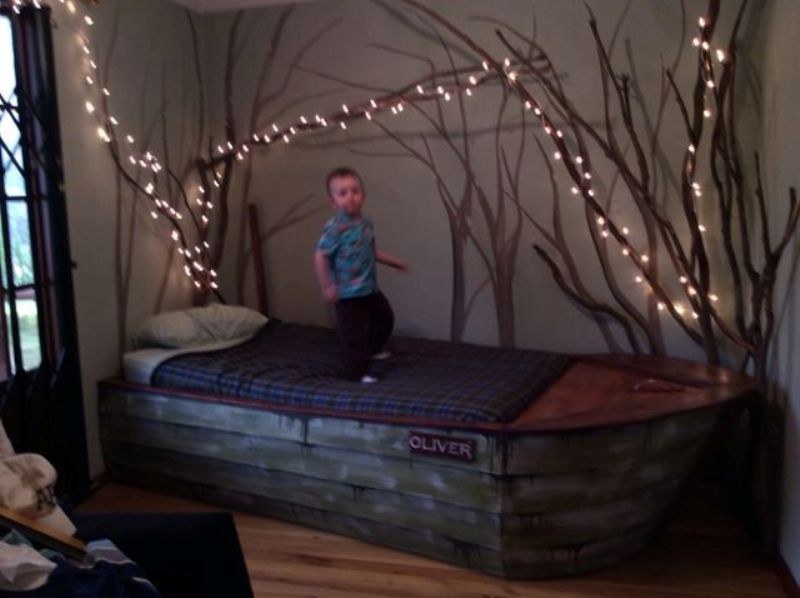
Now here’s a bed that combines both creativity and function. And it’s guaranteed to be a hit with the young pirates in your family ![]()

If you want a special kind of bed for your kids, you’ll know that buying one is an expensive exercise. Novelty kids’ bed cost a small fortune – and you can’t always be assured of the quality.
Your best option is to build your own. This DIY boat bed is the perfect example of what can be done. Use it for inspiration or you can follow the instructions to make one the same. Much love and creativity went into this build. It looks so awesome that your kids will have a great time playing pirates in it.
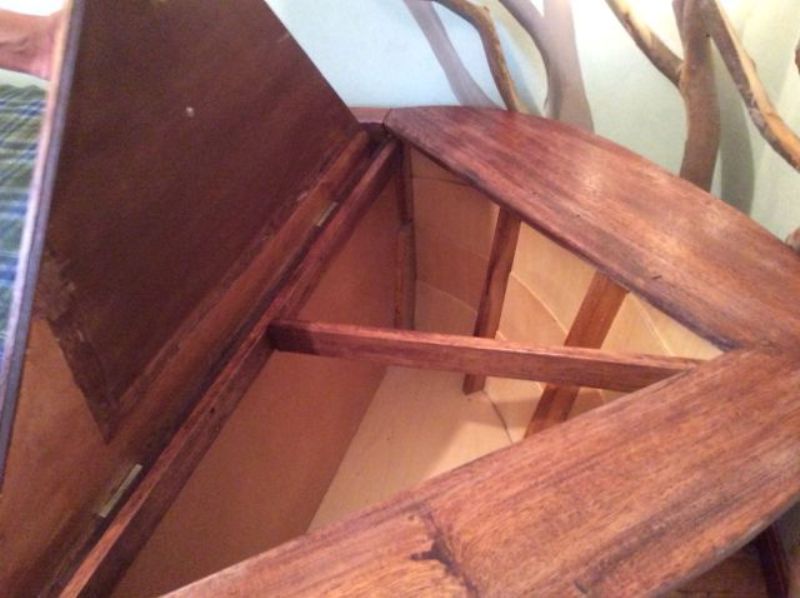
But aside from the great aesthetics, this bed is also functional. It may not be obvious, but it has a lot of secret storage that can be used to store kids toys and clothes… not to mention cutlasses and eye patches :D.
Would your kids love this DIY boat bed?
Contents
Building a DIY Boat Bed
You’ll need these materials:
- 5/8″ Plywood
- 2 sheets 1/8″ Plywood
- 3/4″ Board
- Paint
- Polyurethane
- Nails
- Screws
- Wood Glue
- Brass Rivets
- Wood Stain
- Damp Rag
And these tools:
- Paint Brush
- Circular Saw
- Jig Saw
- Router
- Cordless Drill
- Hammer
- Rasp
- Palm Sander (random orbit)
- Japanese Style Pull Saw
- Various Drill Bits
- Tape Measure
- Quick Clamps
Steps:
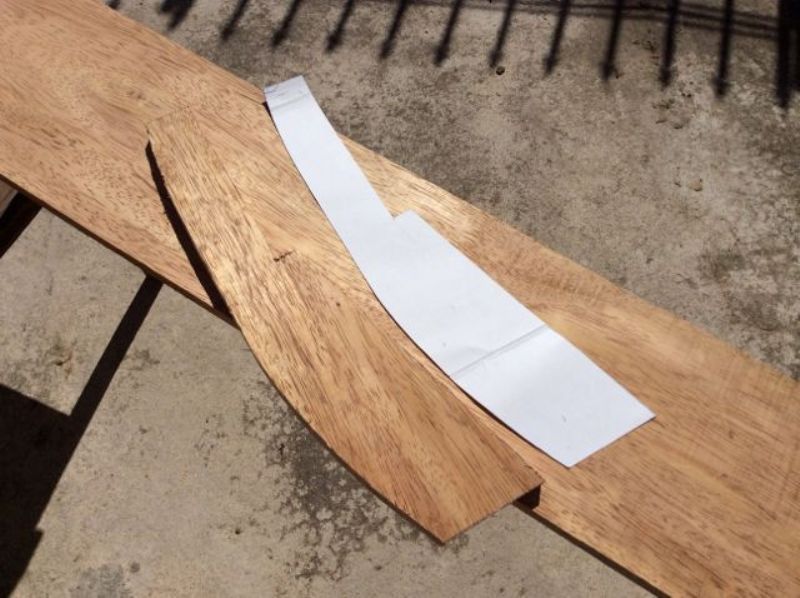
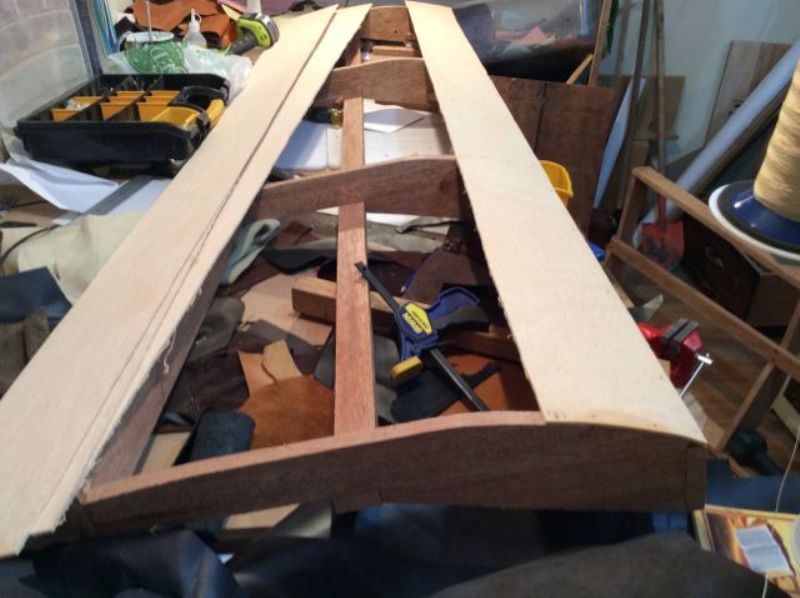
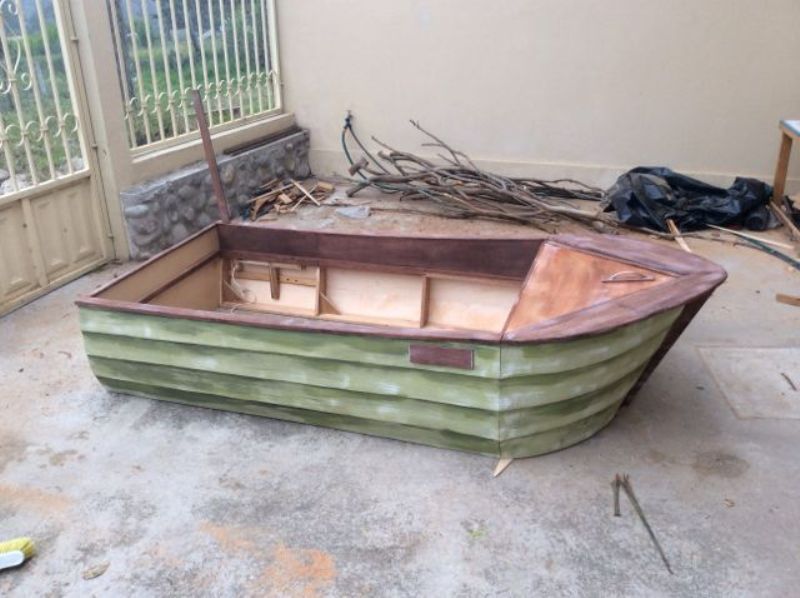
I drew the profile of the side of the “boat” full size on some poster board material and used it as my pattern(pic 1). This is the exact profile on the rear of the boat. I then cut out four of those, two for each side. These are the rear most uprights. As they get closer to the front they needed to be taller for the gentle curve from aft to prow. So I moved my pattern up 3/4″ for two more and then an inch more for the final two. I glued and screwed them to a 1×4 that is 2 inches longer that the mattress.
Then I drew the pattern on to some 1/2 inch ply I had (crib) and figured the width of the bed/boat based on the mattress width. I temporarily screwed that to the back to Hold the sides up(pic 3). I cut one for the front also but based on the uprights on the front.
I then put a 1×2 on top of the notch I had planned out on my pattern. Glue and screw everything.
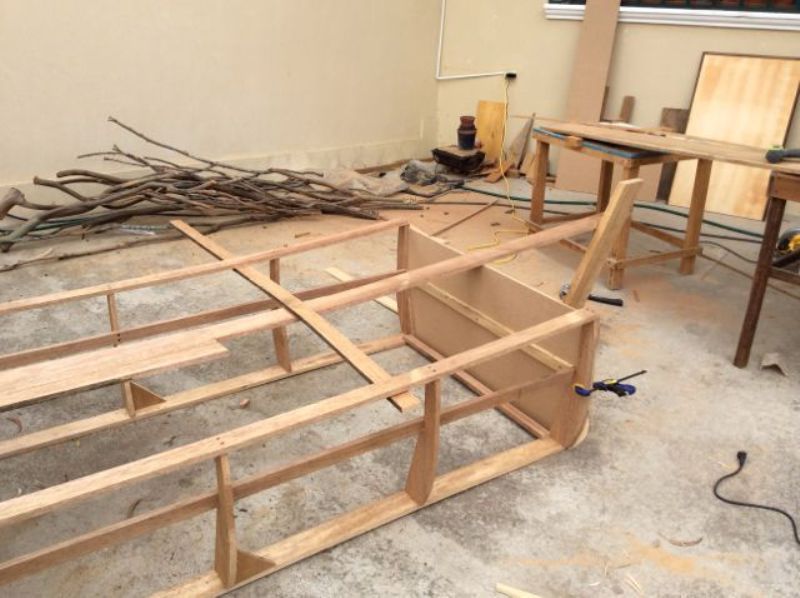
You can kind of see in the pics how I progressively figured out the shape of the boat.
Rip your top rail to overlap the 1/8″ plywood sheeting. Then I used a 5/16″ drill bit to counter sink where I would screw straight down into the uprights. Pre drill everything so you don’t split anything. Glue and screw.
Nice curve. right?
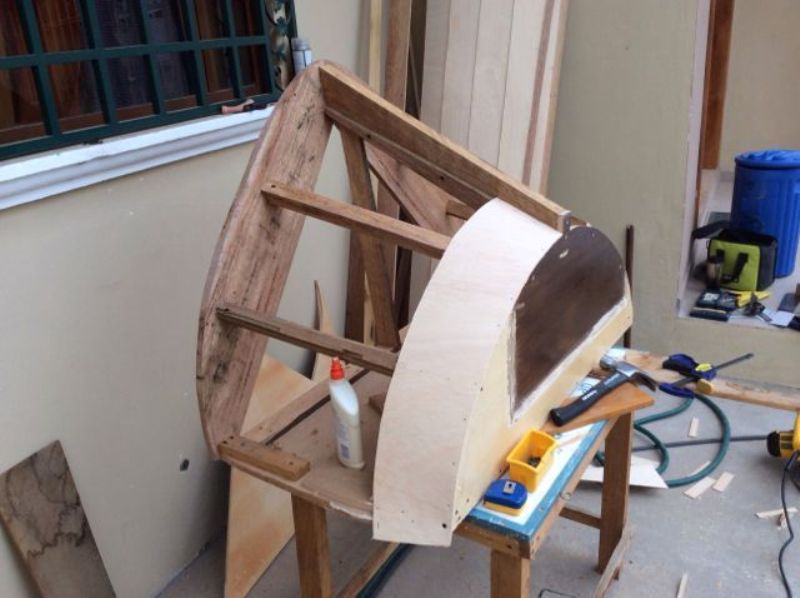
This was a bit tricky. I had to kind of just eye-ball where I wanted the prow to end up without making the boat too long in overall length for my sons room. I also wanted it to be big enough for storing a comforter. First I laid a piece of 1/2″ ply on the ground.
Then I held the 2×4 up at an angle to see where it should go and then marked and cut it. Then I got a better idea of where it would end up. I then sketched the curve on to the ply that is sitting on the ground for the bottom of the prow and cut it out with a jigsaw.
After I made sure the curve was nice I screwed the 2/4 in through the bottom.
I had to then figure out where the top of the prow should be so I bent a board from front to back with an approximation of the curve of the rails. Then I cut it on that mark.
I then used two 1×8’s from the front of the rails to the prow. I clamped them in place and then freehand drew the curve on to the top side. Then I cut out one with the jigsaw and tested it on both sides. Once it fit well I flipped it over and traced out onto the other board, cut it out, and then fit them into place.
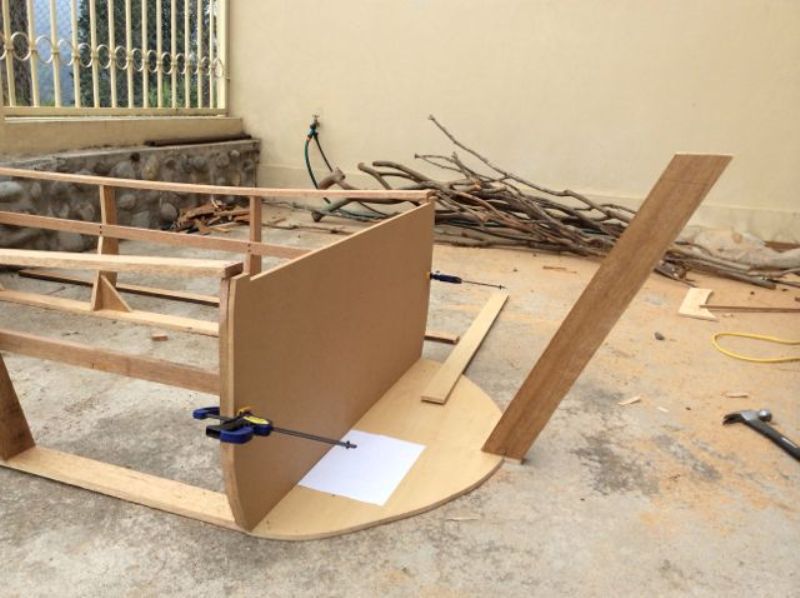
I flipped the prow over on to a work bench and fit the 2×2 uprights into place. Once it all lined up good I used a quarter round bit and routed all the edges.
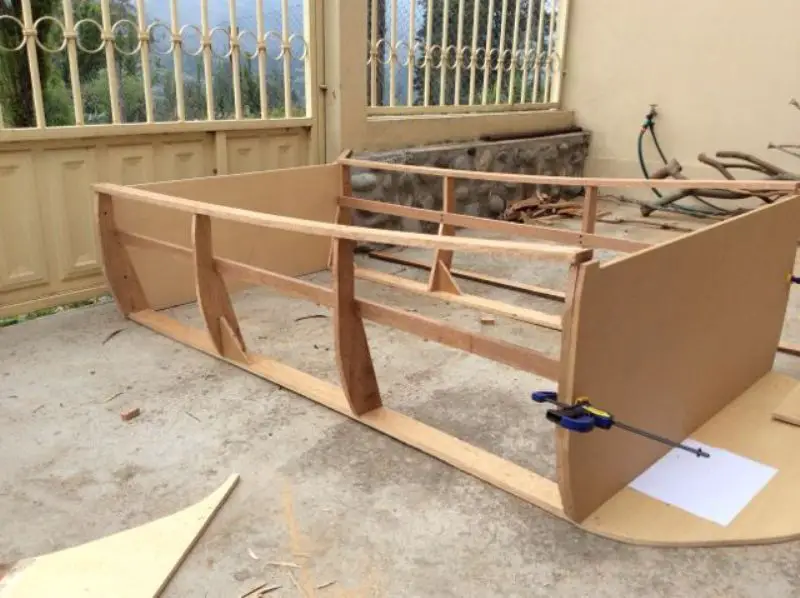
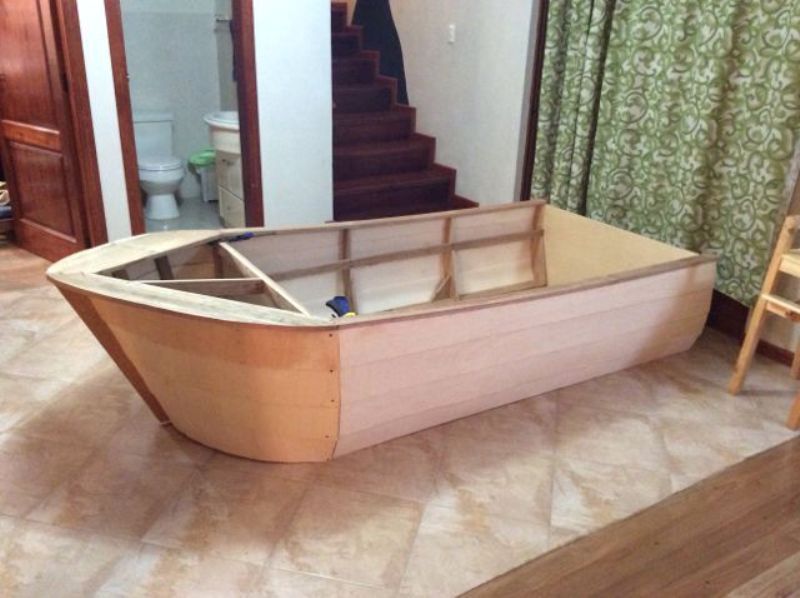
I used 1/8″ plywood to cover the boat. My dad built a kayak out of 1/4″ ply so I figured this would be plenty strong for a fake boat. Once it was all glued up and dry it was surprisingly strong and light.
For the side panels I wanted 4 “boards” to run up the length of the boat. I divided the front and back uprights into four equal parts which would be the bottom of each board. Then I ripped the ply with the jigsaw because I wanted kind of a rough old boat look.
Starting at the bottom I glued and nailed the ply onto the frame, gluing along the entire length of the overlap also. The overlap didn’t want to stay tight together so I used a couple of 1″ screws to hold it together until the glue dried. Later I removed them and filled the holes.
The top “board” of ply has that slight curve in it that runs along the top rail of the entire boat. I clamped that piece of ply where the bottom should go and scribed the back side with the curve. Then I cut it out carefully with the jigsaw.
This was probably the most difficult part of the whole project. Kind of hard to describe how I did it and I was in a rush to finish before it rained so there is only one pic.
Because of the more aggressive curve around the prow I ran the ply across the grain because it bends more readily that way. They also make “bendy ply” that would have been great for this but I couldn’t get ahold of any.
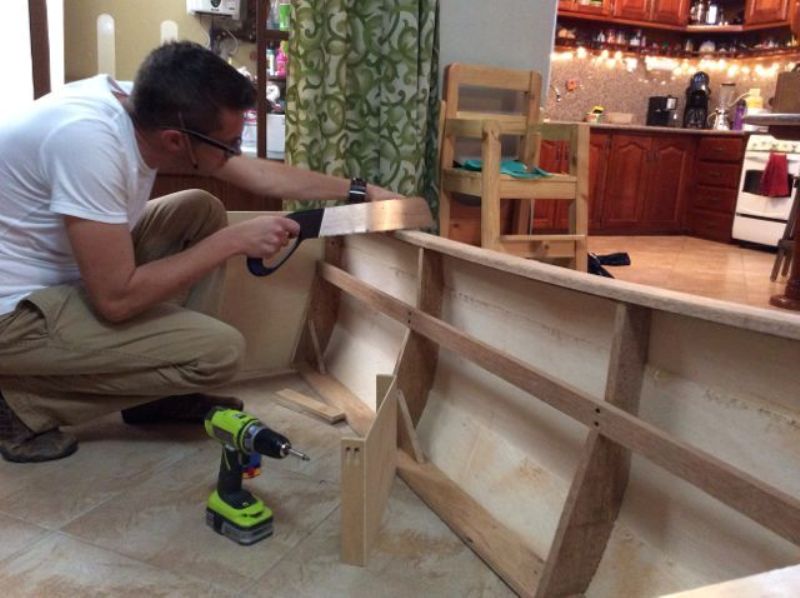
Again I marked all the uprights where the bottom of the board should be. Then I made an 18″ cut of ply and just held up in place more or less and marked the angle along the 2×4. Once the angle was cut then I could clamp it in place and draw the curve onto the back side using my bottom of board marks and adding and inch. I only needed to figure out one side and cut the reverse for the other. Each “board” has a different radius because the prow widens towards the top. I just let the boards run long and trimmed them with a hand saw flush with the back of the prow.
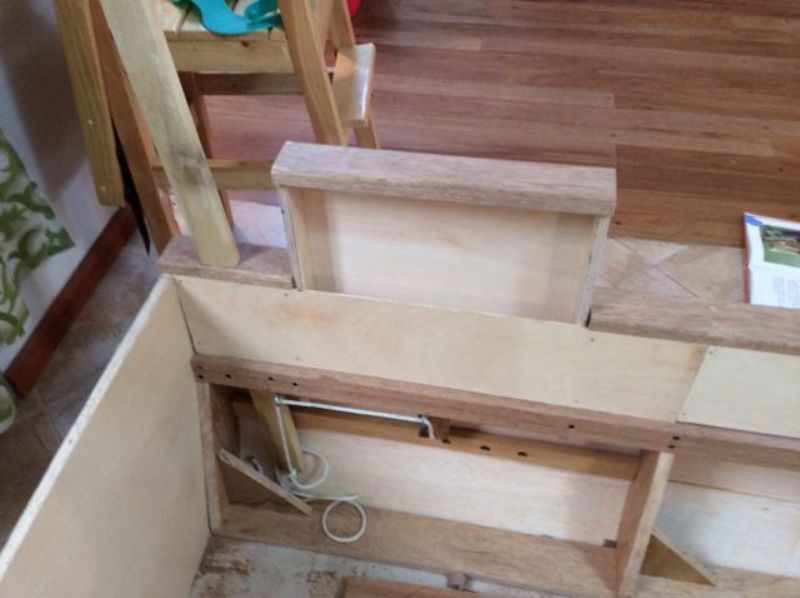
I had a rough idea of how I was going to make a secret panel that would lift out when something else was pushed or pulled. I used a thin kerf Japanese style pull saw to cut the top rail where the panel would lift up.
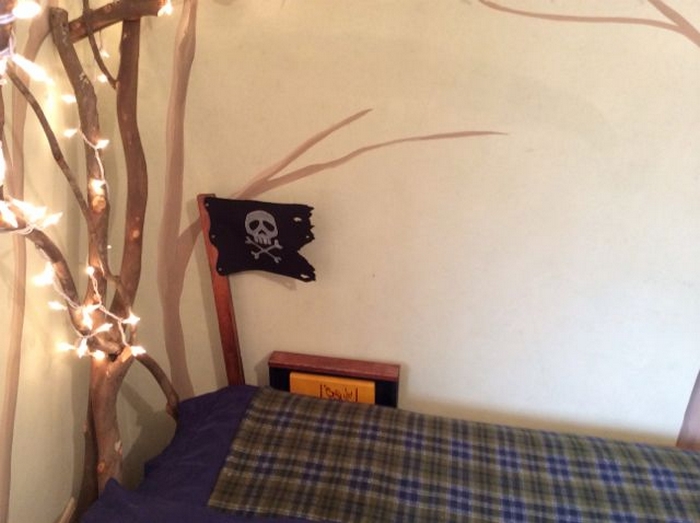
Then I built a basic drawer that served as the panel. It took some trial and error to figure out the mechanics but it’s just basically two eyelets screwed in to the bottom of the 1×2 that has a rope that runs through it. When you push down on the flag pull it pulls on the rope that raises the panel. Simple as that!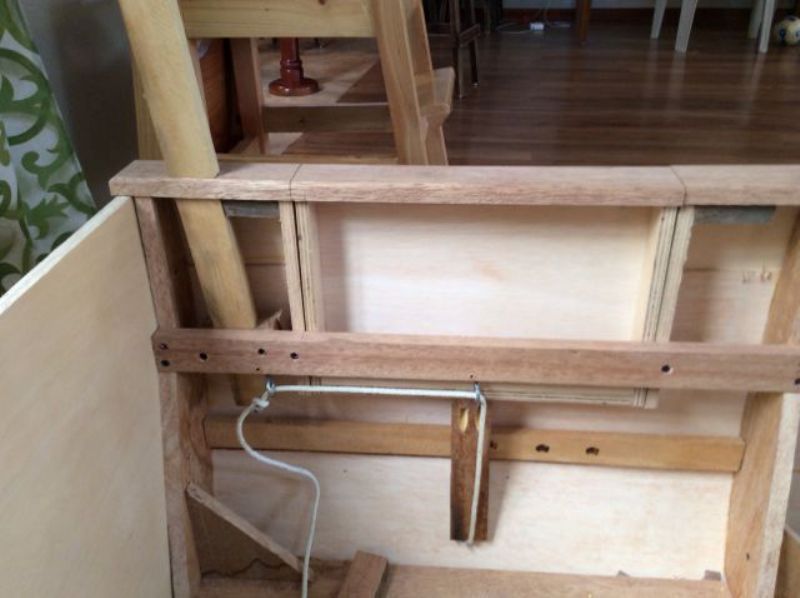
Perfect place for a iPad…and some how-to books….
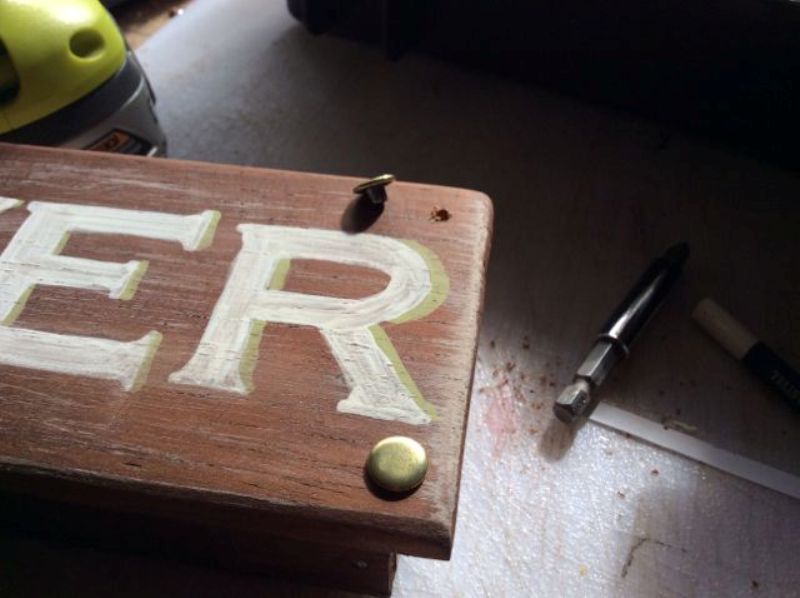
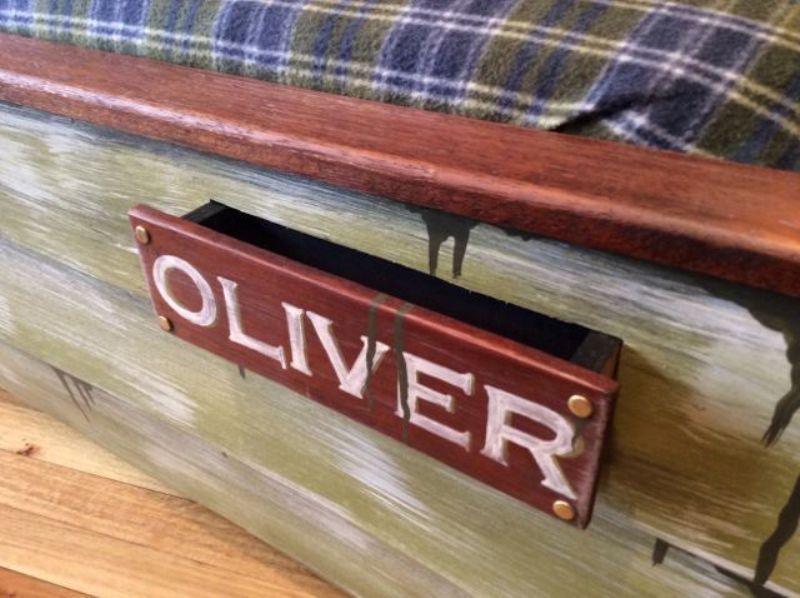
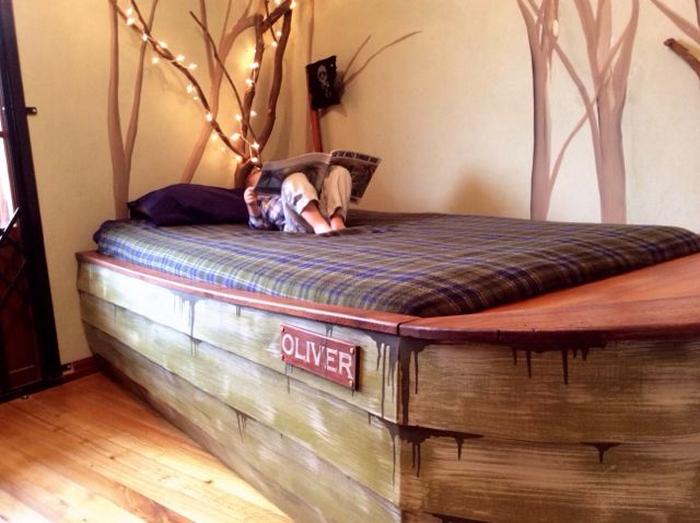
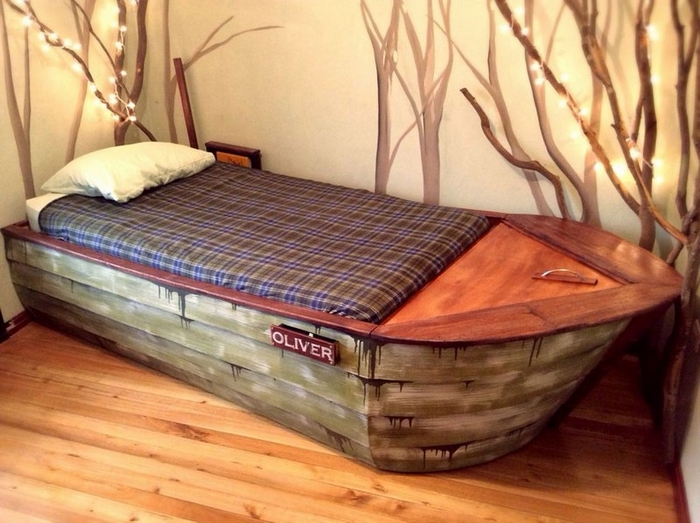
From the beginning I wanted a name plate to have my son’s name on it so I decided to make it open up. I just built a tiny drawer with a back that extended up above the sides so when in place the drawer couldn’t be pulled out to far and fall.
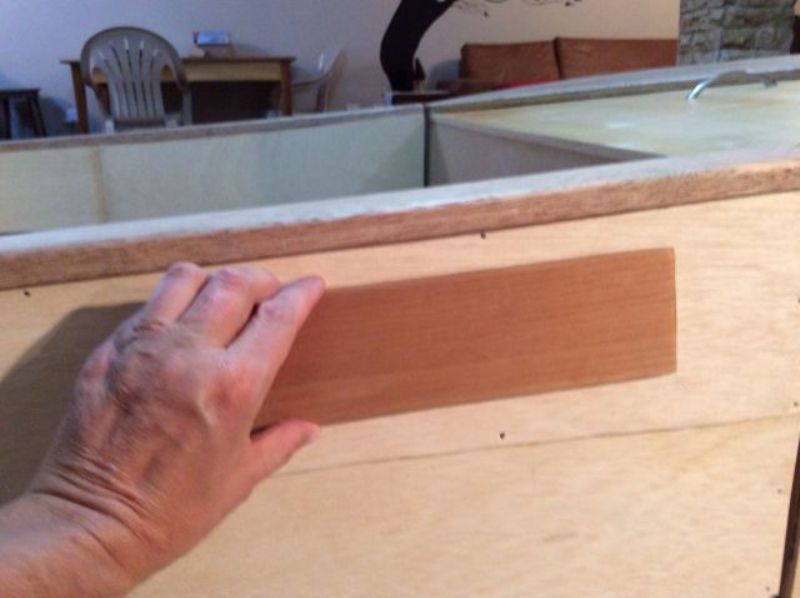
Stained the front. Printed out a font I liked and transferred it on to the wood. Painted it with watered down acrylics. Polyurethaned the whole thing at the end. Added some brass rivets to the front corners to make it look like it’s bolted on the bolt and can’t be moved.
I used the space in the prow to hide comforters and large stuff like that. Used another scrap piece of ply from the crib. I trimmed it out and put some hinges and a handle on it. I’ll eventually put something to hold it up while it is open but for now my son isn’t going to be able to open it on his own for a couple of years.
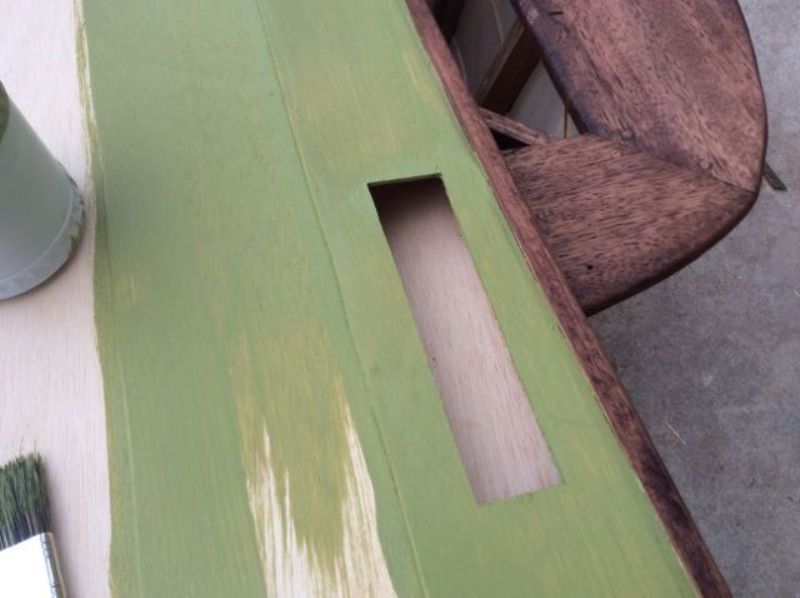
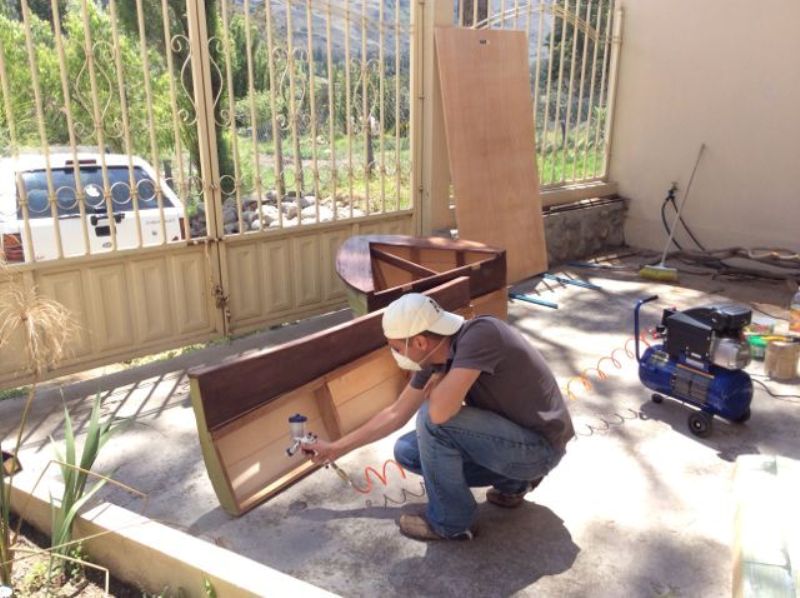
I stained the top rails and the inside of the side where the mattress will sit. Then painted the outside of the boat solid green. Once the green dried I dry brushed dark green and white in that order to give it a weathered look. I also dry brushed white onto the stained wood to also weather it. I used a damp rag to soften the contrast of the white.
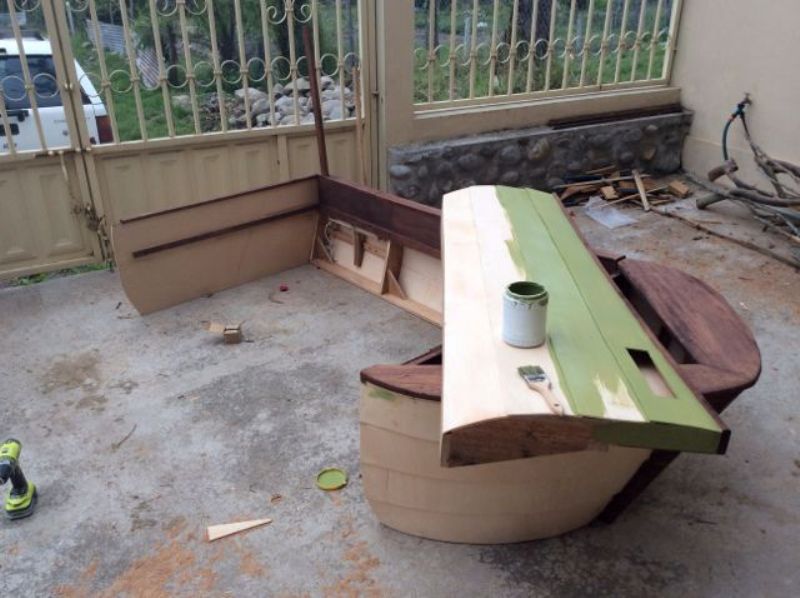

Then I painted with the dark green to paint on moss to give it more detail.
Then I sprayed the whole thing with satin finish polyurethane. I didn’t want gloss because…I don’t like gloss :) and I wanted it to look old.
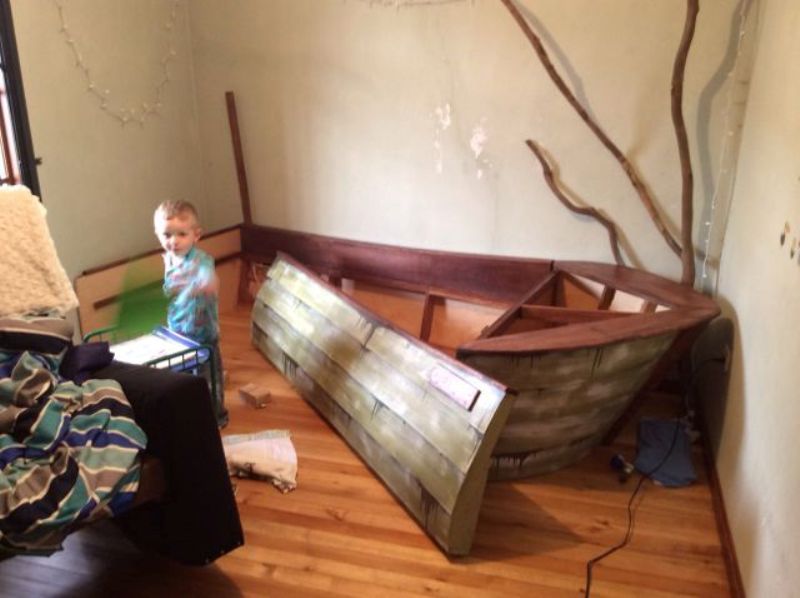
Once I installed it it looked kind of lonely all by itself in his room. So I took some dried eucalyptus branches I had sitting around for another idea I had for the bed (was going to make a rustic loft bed but transportability…) And leaned them in the corners. Once I knew where I wanted them I screwed them together so they wouldn’t move if my son pulls on them. Then the sticks looked kind of lonely so I painted some in too. That filled it in a little more.
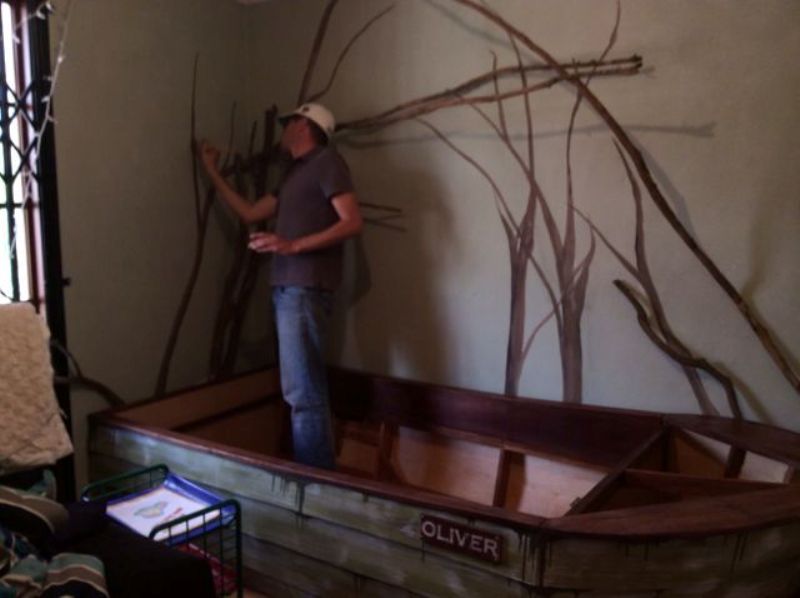
Then….twinkle lights.
That’s it…Go to bed.
Isn’t it a nice bedroom setup? Every kid would definitely have a good night sleep if they had a room like this!
Would this be your next project for the little ones?
Thanks to Phiske for this great tutorial!
Boat Bed Safety Essentials
Safety ranks above style in kids boat bed builds. Check these extra design details to keep nightly voyages smooth and adventurous sleepers free from bumps
Rounded Edges Keep Accidents Away
Shape every plank and rail with a router or sanding block until no sharp lip remains. Finished curves stop forehead knocks when kids scramble aboard. Check corners where side panels meet the bow. Add soft bumper trim or t-molding on gunwales for extra cushion. Tighten screws flush so nothing snags pajamas. Teach youngsters to climb in feet first to reduce tumbles
Non-toxic Finishes Protect Growing Lungs
Choose water-based, low-VOC paint or plant-oil varnish. They release minimal fumes and cure fast. Verify “ASTM F963” or “EN 71-3” labels that prove child-safe formulas. Apply thin coats, letting each layer dry fully before the next. Sand lightly between coats for a smooth hull that resists chipping. Keep the room ventilated during application and cure for forty-eight hours before bedding down
Sturdy Frame Prevents Wobble
Use solid hardwood or thick plywood stringers as the keel. Add cross braces every twelve inches under the deck. Bolt joints with carriage bolts and locking nuts, not wood screws alone. Test weight with an adult before kids climb aboard
Ventilated Slats Keep Mattress Fresh
Space slats two inches apart so air circulates under the mattress. Good airflow stops dampness and mold. Choose kiln-dried pine or poplar to reduce warp. Seal edges lightly to keep splinters away without blocking breathability
Secure Hardware Avoids Midnight Surprises
Pick zinc-free steel brackets and countersink every screw. Cover screw heads with wood plugs or child-safe caps. Torque nuts again after the first week of use. If the bed sits against a wall, add an L-brace to prevent tipping
Boat Bed Gallery
Click on any image to start lightbox display. Use your Esc key to close the lightbox. ![]()


Boat Bed Disassembly And Transport Tips
Kids grow fast and rooms change. Building your boat bed to come apart easily saves headaches during renovations or a move to another bedroom later
Label Parts Before You Start
Snap photos of the assembled bed so you know how every joint looks. Stick painter’s tape on each plank and write matching letters on connecting edges. Mark the keel, side panels, deck boards, and decorative trim in logical pairs.
Number the slats in sequence from bow to stern. Keep a simple sketch on your phone that lists the labels and their positions. Clear labeling turns reassembly into a quick puzzle instead of a guessing game
Bag The Hardware By Zone
Drop screws, bolts, and brackets into zip-top bags as you remove them. Write “bow,” “midship,” or “stern” on each bag with a marker. Tape the bag to its corresponding panel so parts stay with their mates.
Add a printed list of counts, eight screws, four carriage bolts, to catch missing pieces before you start the rebuild. Include the correct driver bit in one bag to avoid hunting through toolboxes later
Wrap Hull Panels For Protection
Guard painted or varnished surfaces against scratches. Slide thin foam sheets between stacked boards and wrap the bundle in moving blankets. Secure with stretch film, not duct tape, so finishes stay clean.
If pieces must travel through tight halls, pad the ends with bubble wrap to absorb bumps. Place the longest planks on a furniture dolly; shorter sections ride on top. Elevate everything off truck floors with a palette to prevent moisture damage during transit
Plan The Exit Route
Measure doorways, stair turns, and hallway widths before you undo the first screw. If a section exceeds clearance, remove trim strips or rails while the bed is still upright. Keep a cordless drill handy for quick adjustments at the doorway.
Lay old towels on sharp corners of walls to stop paint scuffs. Assign one helper to guide the load and another to watch for overhead fixtures like ceiling fans or low beams
Reassembly Is A Fresh Safety Check
Position the keel on a flat surface and confirm it sits level. As you bolt cross braces, inspect for splinters or hairline cracks that might have formed in storage. Replace any stripped screw with a new one of the same gauge.
Tighten every nut until snug, then add a quarter turn so joints stay firm through nightly waves of play. Finish by confirming slat spacing and retouching paint chips before dropping the mattress back aboard
Conclusion
Building a DIY boat bed turns a child’s room into a harbor of imagination. Careful planning of safety, materials, and modular joints keeps the project fun and worry free. Label parts, use low-VOC finishes, and round every edge so nightly voyages stay safe. The effort pays off when your youngster climbs aboard their custom craft with a grin. Inspect and maintain the bed regularly, and it will sail through years of growth.
There are more unique beds useful forthe parent’s bedroom. Check out our DIY lift top storage bed guide next!


