Last Updated on October 8, 2025 by Team Ideas24
Looking to crochet your own Pikachu amigurumi? This project is a fun and rewarding way to bring your favorite Pokémon to life using just yarn and a hook. Based on the trusted pattern from 53stitches, we’ve paired the steps with detailed illustrations to make every part easier to follow. From the iconic ears to the zigzag tail, each section builds the character’s charm. This guide is perfect for beginners and Pokémon lovers alike.
Contents
Materials and Tools You’ll Need
- Yarn colors (Yellow, Black, Brown, Red)
- Crochet hook size
- Stitch marker, fiberfill, safety eyes
- Tapestry needle and scissors
Pikachu Amigurumi Pattern Instructions
Crocheting the Head
Use a stitch marker in the first stitch of every round. Work in continuous spirals unless you prefer to join; if you join, chain 1 to start the next round and don’t count it as a stitch. Stuff as you go once the piece cups upward.
Abbreviations
- MR = magic ring.
- sc = single crochet.
- inc = 2 single crochets in the same stitch.
- dec = single crochet 2 stitches together (invisible decrease recommended).
- Stitch totals at the end of each round are in parentheses.
HEAD
Round 1: Make a magic ring. Work 6 sc into the ring. Pull tight. (6)
Round 2: Work 2 sc in each stitch around. (12)
Round 3: Inc in the first stitch. 1 sc in the next stitch. Repeat all the way around 6 times total. (18)
Round 4: 1 sc in the first stitch. Inc in the next stitch. 1 sc in each of the next 2 stitches. Repeat the part between * * five times. Finish with inc, then 1 sc in the last stitch. (24)
Round 5: Inc in the first stitch. 1 sc in each of the next 3 stitches. Repeat 6 times around. (30)
Round 6: 1 sc in each of the first 2 stitches. Inc. 1 sc in each of the next 4 stitches. Repeat that five times. Finish with inc, then 1 sc in each of the last 2 stitches. (36)
Rounds 7–10: 1 sc in every stitch all the way around. Repeat for 4 rounds total. Keep 36 stitches each round. (36)
Round 11: Inc. 1 sc in each of the next 5 stitches. Repeat 6 times around. (42)
Rounds 12–13: 1 sc in every stitch for 2 rounds. Stay at 42 stitches. (42)
Round 14: Dec. 1 sc in each of the next 5 stitches. Repeat 6 times around. (36)
Round 15: 1 sc in each of the first 2 stitches. Dec. 1 sc in each of the next 4 stitches. Repeat that five times. Finish with dec, then 1 sc in each of the last 2 stitches. (30)
Round 16: Dec. 1 sc in each of the next 3 stitches. Repeat 6 times around. (24)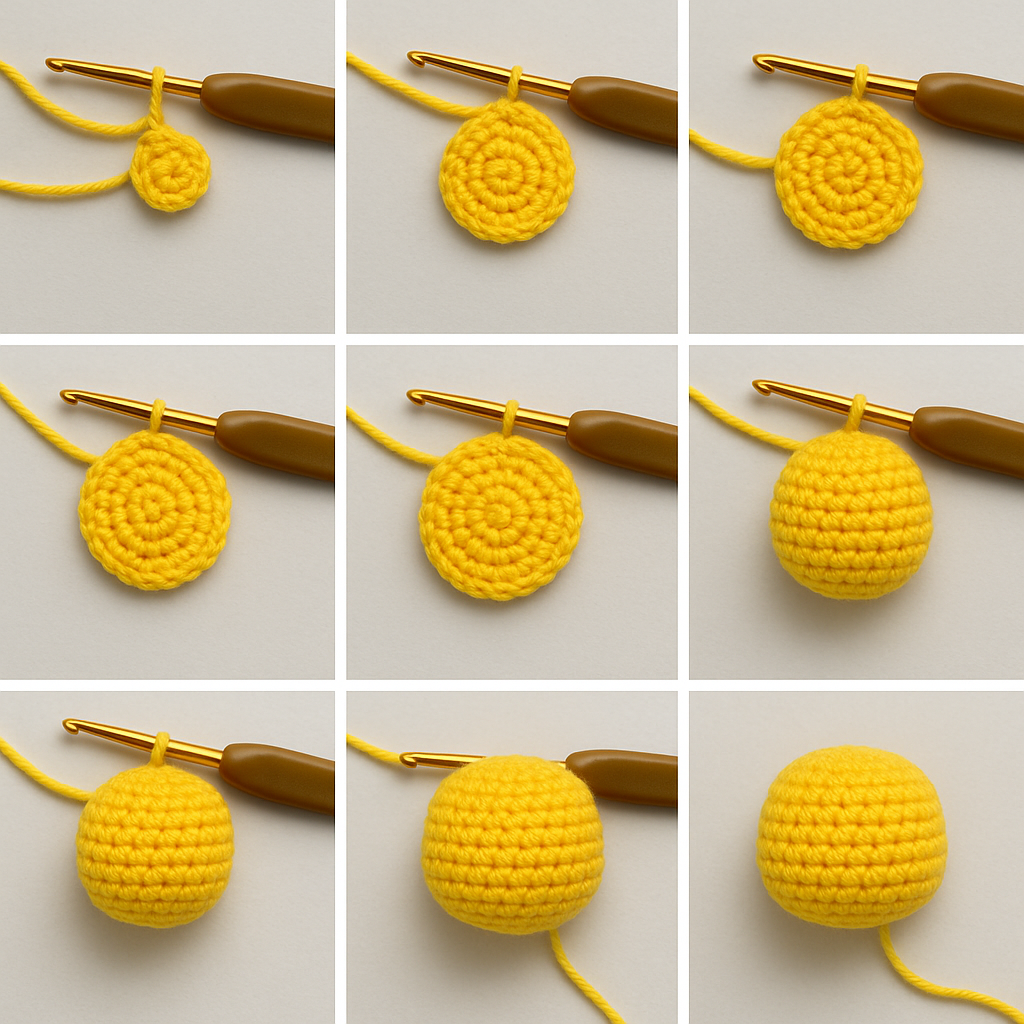
BODY
Round 1: With yellow yarn, make a magic ring. Work 6 sc into the ring. Tighten the ring. (6)
Round 2: Work 2 sc in every stitch around. You’ll increase in all 6 stitches. (12)
Round 3: Inc in the first stitch. 1 sc in the next stitch. Repeat that 6 times around. (18)
Round 4: 1 sc in the first stitch. Inc. 1 sc in each of the next 2 stitches. Repeat that 5 times. Finish with inc, then 1 sc in the last stitch. (24)
Round 5: Inc. 1 sc in each of the next 3 stitches. Repeat 6 times around. (30)
Rounds 6–8: 1 sc in every stitch around. Work 3 rounds. Stay at 30 stitches each round. (30)
Round 9: Dec. 1 sc in each of the next 3 stitches. Repeat 6 times around. (24)
Rounds 10–12: 1 sc in every stitch around. Work 3 rounds. Stay at 24 stitches each round. (24)
Finish off and leave a long tail for sewing to the head if you have not attached as-you-go. Lightly stuff the body before closing so it holds shape but stays squeezable.
2x LEG
Round 1: With yellow yarn, make a magic ring. Work 6 sc into the ring. (6)
Round 2: Inc. sc 1. Repeat 3 times around. (9)
Round 3: Sc in each stitch around. (9)
Round 4: Sc in each stitch around. (9)
Round 5: Sc in each stitch around. (9)
Round 6: Sc in each stitch around. (9)
Finish off. Leave a long tail for sewing. Lightly stuff if you want firmer feet or leave flat for a softer look. Let me know when you’re ready to place them.
2x ARM
Round 1: With yellow yarn, make a magic ring. Work 6 sc into the ring. (6)
Round 2: Inc. sc 2. Repeat 2 times around. (8)
Round 3: Sc in each stitch around. (8)
Round 4: Sc in each stitch around. (8)
Round 5: Dec once. Sc in each of the next 6 stitches. (7)
Finish off. Leave a long tail for sewing. Lightly stuff the hand end or leave unstuffed for a floppier arm. Let me know when you want placement marks.
2x EARS
Round 1 (Black): Make a magic ring. Work 5 sc into the ring. (5)
Round 2 (Black): Inc in the first stitch. Sc in each of the next 4 stitches. (6)
Round 3 (Black): Inc in the first stitch. Sc in the next 5 stitches. (7)
Round 4 (Black): Inc in the first stitch. Sc in the next 6 stitches. (8)
Round 5 (Change to Yellow): Inc in the first stitch. Sc in the next 7 stitches. (9)
Round 6 (Yellow): Sc in each stitch around. (9)
Round 7 (Yellow): Sc in each stitch around. (9)
Round 8 (Yellow): Sc in each stitch around. (9)
Round 9 (Yellow): Dec once. Sc in the next 7 stitches. (8)
Round 10 (Yellow): Sc in each stitch around. (8)
Round 11 (Yellow): Sc in each stitch around. (8)
Finish off. Leave a long tail for sewing. Shape lightly with your fingers before attaching for a crisp tip. Let me know when you want placement spacing on the head.
Tail
ch = chain. sc = single crochet. dec not used here. You’ll crochet around the starting chain to form a flat strip, then shape the lightning bolt. Change to brown near the tip.
Row 1 (Yellow): Chain 7. (7 ch)
Row 2 (Yellow): Turn. Work 6 sc down the chain’s front loops. Rotate and work 6 sc up the back bumps of the same chain. You now have an oval with 12 stitches around. (12)
Rows 3–4 (Yellow): Sc in each stitch around. Work 2 rounds. Stay at 12 stitches. (12
Row 5 (Yellow): Sc 3. Skip the next 6 stitches to form an inward notch. Sc 3. (6)
Row 6 (Yellow): Sc 6 evenly across. Chain 4 at the end to start the next offset segment. (10 working loops: 6 sc + 4 ch)
Row 7 (Yellow): Turn. Sc 1 into the second chain from hook (skip 1 ch and the next 3 foundation spaces total). Then sc across the remaining live stitches so you work 5 more sc into the base section. Total active stitches now 6. (6)
Row 8 (Change to Brown): Sc in each stitch across. (6)
Row 9 (Brown): Sc in each stitch across. (6)
Finish off. Leave a long tail for sewing to the body. Lightly block the tail flat with your fingers so the zigzag sits sharp when attached. Let me know if you want placement marks or a stitch diagram.
Stitching Pikachu Amigurumi Together
Assembly and Face Placement Instructions
Use straight pins or locking stitch markers to pre-place every part before you sew. Light stuffing helps you judge balance. Add more fiberfill only after limbs are secured so shapes stay even. Use the long yarn tails you left on each piece to sew them in place with a whipstitch or mattress stitch through the front loops of the body part and the corresponding stitches on the receiving piece.
Join Head to Body
Center the open end of the head over Round 12 of the body. Pin all the way around so the head sits straight when viewed from front and side. Stitch through one loop on the head and one loop on the body all the way around. Add or adjust stuffing before you close the last few stitches. Pull snug but not tight enough to pucker.
Place and Sew Legs (make 2)
Stand the doll upright. Mark the front center line on the body. Position the legs side by side across the lower front of the body so the top edges sit roughly around Body Round 10. Leave a one stitch gap between legs for balance. Sew each leg around its opening. Angle slightly outward if you want a wider stance.
Place and Sew Arms (make 2)
Lay the doll on its back. Mark the side center points where head meets body. Drop the arms one round below that seam or wherever you prefer a cute hug pose. Pin with the thumbs (Round 5 dec end) facing slightly forward. Sew around the arm opening. Keep stitches shallow so they do not sink into stuffing and disappear.
Place and Sew Ears (make 2)
Find the top center of the head. Count about 5–6 stitches down from the very top round on each side to set the base of each ear. Space the ears about 6–7 stitches apart across the crown so Pikachu looks alert. Tilt the ears outward a touch. Sew around the edge where the yellow section begins so the black tips stay crisp.
Place and Sew Tail
Flatten the tail. Decide which side will face front. Hold it against the lower back of the body so the first yellow section sits just below the head seam and the brown tip angles away. Pin the full width of the base so it resists twisting. Sew across the bottom edge and ladder stitch a few anchoring tacks higher up along the back to keep the lightning bolt upright.
Add Safety Eyes
Mark the horizontal eye line on the head. Good placement is usually between Head Rounds 12 and 13 (counting from the magic ring start at the top) or at the point where the head starts to widen above the body seam. Space the eyes 5–6 stitches apart for a classic cute look. Insert safety eyes before final stuffing adjustments. Lock the washers only after you confirm cheek spacing.
Attach Crochet Cheeks (or Felt Circles)
Mark each cheek one round lower than the eye line and one to two stitches outward from the outer edge of each eye. Pin in place and check the smile arc you plan to embroider. Whipstitch edges down with matching red or orange yarn. Keep stitches small so the cheek lies flat and round.
Embroider the Mouth
Thread black embroidery floss or thin black yarn on a tapestry needle. Bring the needle up centered between the cheeks one round below them. Make a short horizontal stitch for the mouth center. For a friendly smile, angle one small stitch upward toward the left cheek and another toward the right. Secure the thread inside the head with small knots buried in stuffing.
Tidy Ends and Final Shaping
Massage stuffing to smooth bumps. Roll each limb between fingers to round it out. Steam block lightly if acrylic and label allows. Fluff the tail zigzag so the points show. Your Pikachu is ready. Let me know if you want a printable placement diagram with stitch counts marked in circles.
Piccassio Crochet Kit For Your Pikachu Amigurumi
Getting started on a Pikachu amigurumi is easier when your tools are in one place. The Piccassio Crochet Kit gives new makers the yarn, hooks, guide book, and accessories you need to learn fast and finish cute plush projects with confidence.
- 20 Vibrant Yarn Colors give you plenty of yellow for Pikachu plus extra shades for cheeks, accents, and future projects. Great for testing gauge and practicing color changes on small amigurumi parts.
- 9 Crochet Hooks in multiple sizes let you match hook to yarn weight and personal tension. Comfortable grips help beginners maintain even stitches over longer sessions.
- Beginner Crochet Book walks through basics so new crafters can master the magic ring, increases, and invisible decreases used in Pikachu’s head, ears, and limbs. Clear how-to support reduces guesswork.
- Full Accessory Pack includes stitch markers, yarn needles, measuring tools, row counter, and more so you can track rounds, place limbs, and sew features securely. Ideal for assembling amigurumi pieces cleanly.
- Durable Organizer Bag with Yarn Tension Slits keeps colors separated and feeds yarn smoothly while you work small parts like ears and tail tips. Handy for travel crafting and staying tidy between sessions.
Ready to crochet Pikachu with fewer trips to the store? Grab the Piccassio Crochet Kit and start stitching today.
Conclusion
Finishing your Pikachu Amigurumi feels great because you see every round come together in a recognizable character. You’ve practiced key skills like the magic ring, clean increases and decreases, color changes, and confident assembly. Careful placement of eyes, cheeks, ears, and tail brings out Pikachu’s personality and keeps proportions cute. Try swapping yarn textures, adding a tiny scarf, or sizing up with thicker yarn for gifts.
Looking for something simple? Check out our article on simple crochet patterns!