Last Updated on October 8, 2025 by Team Ideas24
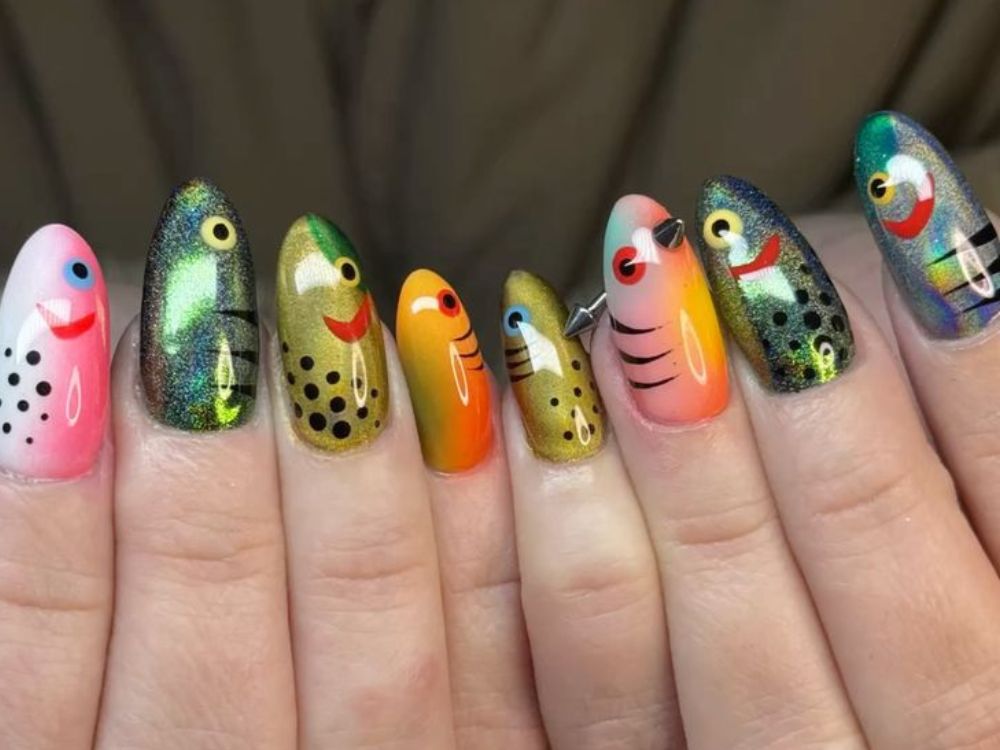
Fishing trips inspire bright patterns and glints that attract more than fish. You can bring the same energy to your manicure. Fishing lure nail art mimics scales, hooks, and flashy foil. Nail polish delivers hard shine and waterproof color that lasts through weekends on the pier. Grab your brushes and turn each fingertip into a mini lure that sparks conversation.
Contents
Fishing Lure Manicure Magic
Fishing lures sparkle with scales, foil, and hooks that grab attention. Copy those details on your nails with polish layers and a few clever tools.
Materials and Tools
- Base coat and quick-dry topcoat
- Silver or holographic polish for reflective underlayer
- Assorted bright polishes: chartreuse, hot pink, neon orange, deep blue
- Fine nail-art brushes and a striping brush
- Cosmetic sponge or mesh fabric for scale stamping
- A dotting tool or a toothpick for eyes and spots
- Cosmetic glitter, chrome flakes, or iridescent foil bits
- Acetone, lint-free wipes, and a cleanup brush
Steps to Create DIY Fishing Lure Nail Art
- Apply a thin base coat. Let it dry fully.
- Brush on one coat of silver or holographic polish. This mimics lure flash. Dry.
- Dab neon polish onto a sponge. Gently tap the tip and mid-nail to create a fading belly-back gradient.
- Lay mesh over each nail. Lightly sponge contrasting polish through the mesh to stamp scale texture. Remove the mesh before the polish sets.
- Use a striping brush to paint a dark lateral line down the centre for lifelike contrast.
- Add small dots or oval spots with a dotting tool to mimic baitfish patterns.
- Place a tiny foil circle near the cuticle edge for the “eye.” Outline it with black polish and add a white highlight dot.
- Tap glitter or chrome flakes on select areas for extra flash that catches light like real lures.
- Seal everything with a generous, quick-dry topcoat. Cap the free edge to prevent chips.
- Clean edges with a brush dipped in acetone. Your fishing lure manicure is ready to reel in compliments.
The Appeal of Fishing Lure Nail Art
Fishing culture has always mixed function with bright style. Turning that flair into manicure form builds a playful bridge between hobby and fashion.
Symbolic Connection to Angling Culture
Every lure tells a tale of patience, skill, and the thrill of a sudden strike. Wearing scaled designs lets anglers carry that narrative off the water. The shimmer of foils recalls sunrise over glassy lakes.
Hooks painted in miniature honor the clever engineering that fools trophy bass. DIY fishing lure nail art celebrates a pastime that bonds friends and generations with early mornings, shared coffee, and the first cast.
Visual Impact in Everyday Settings
Lures are engineered to flash even in murky rivers. The same optics draw eyes in office corridors and cafés. Metallic bases reflect ambient light while neon backs add pop against keyboards, coffee cups, and steering wheels.
Colleagues who miss the lake on weekdays still feel connected when those colors flicker across a meeting room table. The manicure becomes a tiny reminder to schedule the next weekend trip.
Cost Savings and Creative Freedom
Salon foils and advanced chrome powders get pricey fast. Craft-store glitters and mesh cost pennies yet create identical illusions of scales and gill plates. Experimenting at home means no design limits or rush fees.
If a pattern chips, touch-up takes minutes, not another appointment. The hobbyist mindset behind lure building fits perfectly: test, tweak, improve. DIY fishing lure nail art follows the same iterative spirit that perfects a hand-tied fly.
Social Media and Community Inspiration
Angler groups on Instagram already swap knot tips and catch photos. Adding nail designs to the feed broadens the conversation. Short reels showing mesh stamping or hook detailing rack up likes among outdoor and beauty niches alike.
Brands notice organic buzz and may sponsor gear giveaways. Community feedback turns a solo craft into a shared challenge where each fresh pattern inspires the next.
Prepping Nails for a Long-Lasting Design
Bold lure finishes mean nothing if they peel on day two. Good preparation locks pigment in place through sunscreen, dish soap, and tackle box rummaging.
Clean and Shape the Canvas
Residue and ragged edges are the enemies of adhesion. Start by removing old polish with acetone, then wash hands with unscented soap. Push back cuticles gently and clip hangnails. A uniform oval or squoval shape mimics sleek lure bodies and resists snagging fishing line.
Buffing and Dehydration Steps
Lightly buffing the plate removes shine so base coat can grip. Use a 240-grit block and focus on the center, not sidewalls, to avoid thinning. After buffing, swipe each nail with 90 % alcohol. The quick evaporation dehydrates natural oils that weaken bond.
Choosing Adhesion-Boosting Base Coats
Base formulas with rubberized polymers flex under impact, so chips stay small. Some contain ridge fillers that level the surface like primer on crankbait blanks. Apply a thin layer and cap the free edge. This locks color wraps just as sealant locks paint on wooden plug lures. DIY fishing lure nail art relies on that hidden layer to survive knot tying and fish slime.
Mitigating Water and Chemical Exposure
Water swells the keratin plate and lifts the edges. Wear gloves while cleaning tackle or rinsing bait buckets. Apply cuticle oil nightly to keep polish flexible without softening adhesion. Quick-dry topcoats are added every other day to restore gloss and guard against sun fade. Consistent aftercare turns DIY fishing lure nail art into a week-long statement instead of a weekend fling.
Glitter, Flakes, and UV Topcoats for Strike-Ready Flash
Tiny reflective particles mimic the flash that triggers predatory strikes. Smart layering turns each nail into a mini lure made for light play.
Choosing the Right Sparkle Size
Large hex glitter reflects broad flashes that stand out in murky water while ultra-fine dust gives a subtle shimmer that catches sun at low angles. Pick one primary sparkle to avoid clutter. Mix it into a clear polish on a palette so distribution stays even.
Apply the blend with a flat brush, pressing the particles where you want the brightest hit. DIY fishing lure nail art relies on deliberate placement, not random shake-on coverage that can look messy and peel fast. Finish the coat thin and let it level to keep edges smooth.
Layering Techniques for Deep Shine
Depth makes flash believable, just like on premium hard baits. Start with a silver chrome base, float translucent neon over it, then scatter flakes between layers. Each coat adds distance that bends light differently, creating internal glints. Tap the nail against a light source as you work to read how layers interact.
Stop before the surface clouds. Too many layers mute brilliance and bulk up the nail. DIY fishing lure nail art thrives on restraint that echoes how lure makers balance paint, foil, and clear epoxy.
Using UV-Reactive Polishes
UV pigments glow when sunlight shifts toward ultraviolet at dawn or dusk, prime fishing hours. Brush a thin stripe along the lateral line of your design to mimic common lure treatments. The glow stays invisible indoors yet pops outside, giving an extra hit of realism.
Cure under a small UV lamp for sixty seconds so the pigment locks tight. DIY fishing lure nail art gains an element of surprise that anglers appreciate and office mates notice when you step into daylight.
Avoiding Overload and Maintaining Clarity
Too much glitter traps bubbles and leaves rough spots that snag hair or fishing line. Wipe excess from the brush on the bottle neck, then skim the nail lightly. Cap the free edge and immediately clean stray particles with a pointed cotton swab dipped in acetone.
Let layers dry three minutes before adding more. Smooth, clear flash lasts longer and reflects brighter under a thick final topcoat. Quality beats quantity every time in DIY fishing lure nail art.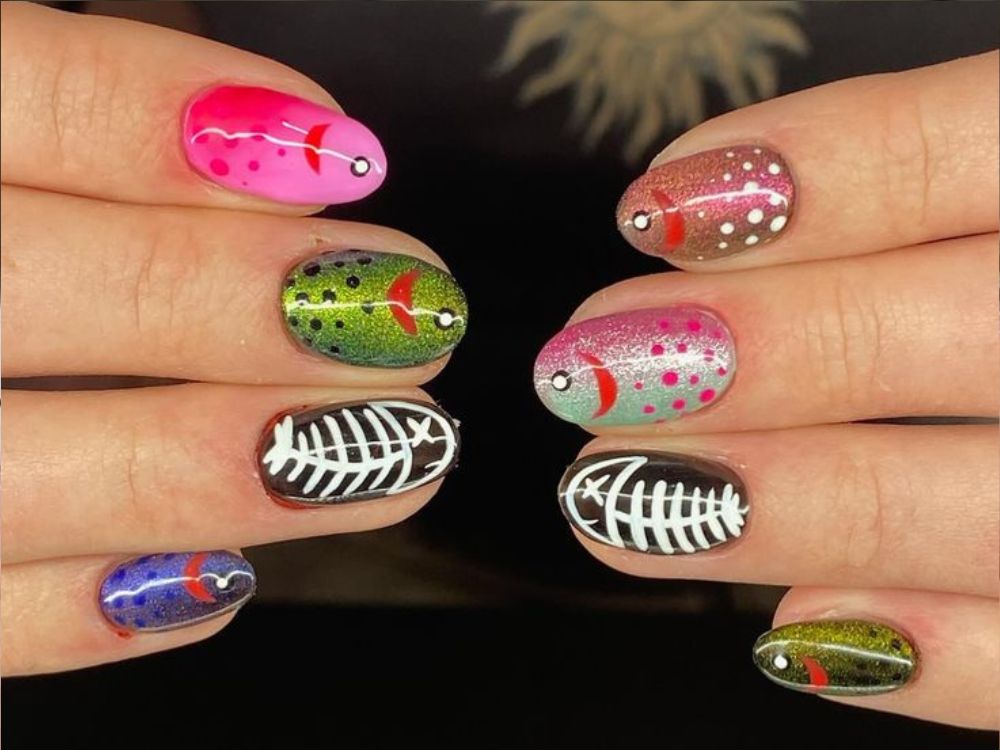
Quick Drying and Sealing for Chip Resistance
Great shine means little if it chips when you tie knots or unhook fish. Fast cures and tough seals protect detail through hard weekends on the water.
Accelerating Cure Times with Thin Coats
Thick polish traps solvents that expand and crack later. Keep each layer whisper thin so solvent escapes fast. Rotate fingers under a desk fan for sixty seconds to speed surface set.
Once tack-free, add the next coat. You’ll complete three layers in the time one heavy coat would need. DIY fishing lure nail art gains depth without the long wait that tempts smudges.
Fan and Lamp Methods
Cool moving air stops bubbles and sets surface gloss. Position a small USB fan eighteen inches away so airflow stays gentle. For gel products, slide nails under a forty-eight-watt LED lamp for thirty seconds per layer.
If you mix regular and gel formulas, alternate air and light. This combination locks pigment and glitter before dust can settle. Efficiency is key when DIY fishing lure nail art involves multiple colors, textures, and top effects in one session.
High-Strength Topcoats and Gel Sealers
Traditional clear polish scratches after a few casts. Swap to rubberized topcoats or builder gel for a shell-like finish. Float the product over the nail rather than brushing hard, letting it self-level into a smooth dome.
Flash-cure under the lamp ten seconds, then full-cure thirty more to eliminate soft spots. The result feels like lure epoxy and resists acetone better during midweek cleanup. DIY fishing lure nail art stays glossy and chip-free even when you rummage through tackle boxes.
Daily Touch-Up Strategies
If you ignore microscopic nicks, they grow into chips. Keep a pocket-size clear coat in your tackle bag. At the first sign of dullness, swipe a micro layer across the edge and let it dry while you rebait.
Overnight, rub a drop of cuticle oil along sidewalls to replace moisture lost to sun and wind. These tiny habits extend wear past a full week, the sweet spot for most manicures. Routine care cements the durability reputation of DIY fishing lure nail art.
Conclusion
DIY fishing lure nail art blends angler spirit with creative flair. Thanks to chrome bases, gradient bellies, and precise scale stamps, your nails flash like real baits. Thin layers and strong topcoats keep the design chip-free through weekend casts or daily chores. Routine touch-ups with clear polish and cuticle oil extend the shine. Show off your miniature lures and watch fellow anglers reel in the compliments.
If fishing lures are not your style, we have more ways to express yourself. Check out our nail art 101 guide next!