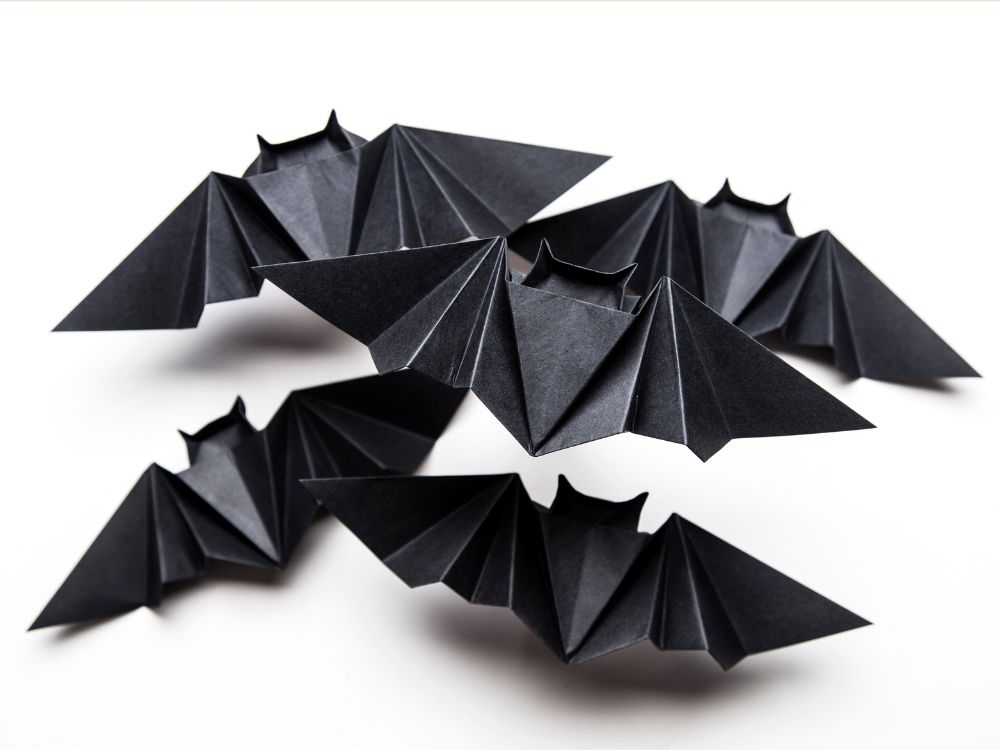
An origami bat that flutters brings instant Halloween magic to any room. You only need a square sheet and a short length of thread. A clever fold pattern lets the wings snap open and closed. Kids love making it and adults will show it off. You’re about to learn every step from creasing to hanging.
Crafting Your Fluttering Origami Bat
Crafting a fluttering origami bat looks tricky but it is pure fun. Careful creases and a hidden thread give your Halloween decor a lively flap.
Materials and Tools
- 1 square sheet of lightweight black paper (15 × 15 cm works well)
- Bone folder or blunt knife for sharp creases
Steps
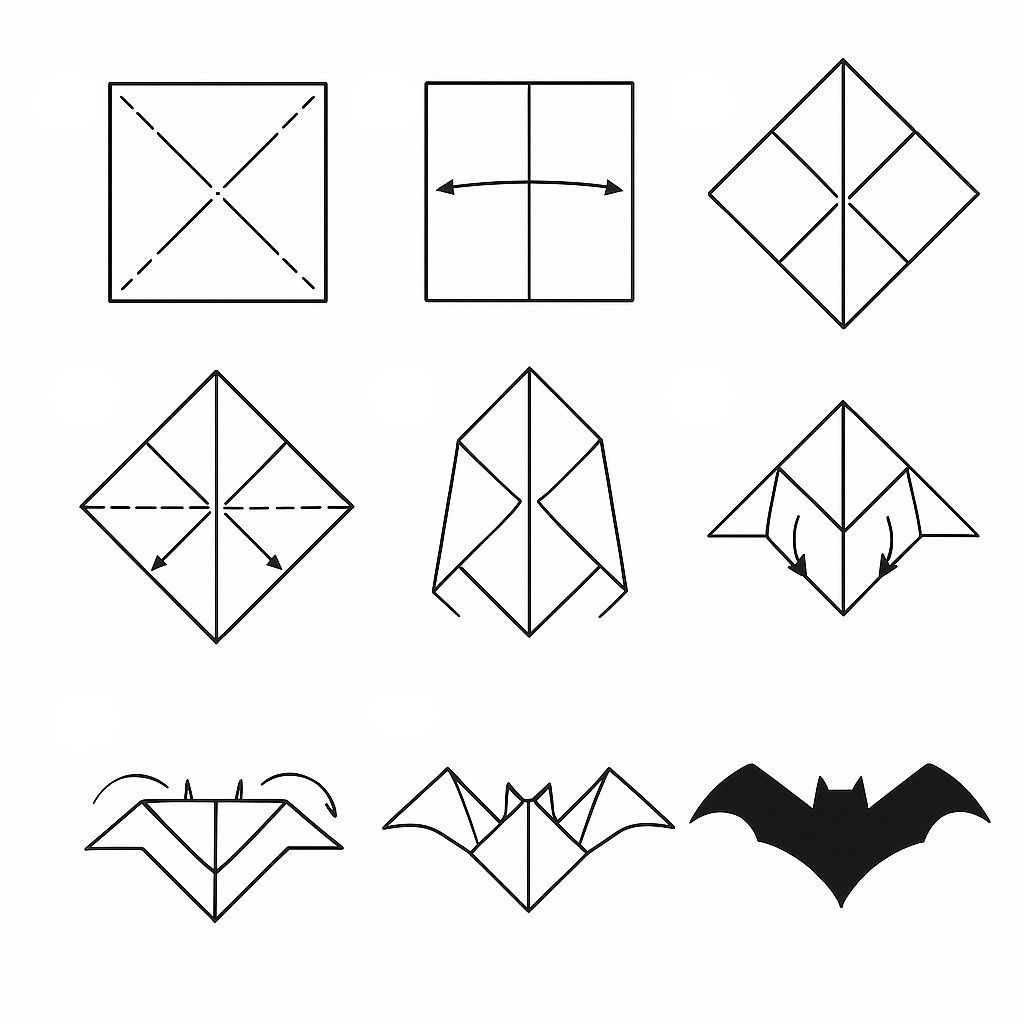
- Lay the paper color side down. Fold in half diagonally both ways. Unfold. Crease lines form an X.
- Flip the sheet. Fold in half horizontally, then vertically. Unfold to make a plus sign.
- Pinch the center. Collapse the paper into a square base with open points at the bottom.
- Rotate so the closed point faces up. Fold the two top layers’ edges to the center line. Sharp creases shape the head.
- Turn the model over. Repeat the edge-to-center folds on this side for symmetry.
- Pull the top layer of the bottom point upward. Squash flat to form wide wings.
- Fold each wing tip back slightly to curve them. This tweak helps the flutter action.
Pre-creasing Basics for Clean, Accurate Folds
Clean creases guide every fold and keep the model crisp. Master these early lines and the rest of your origami bat snaps into shape effortlessly.
- Start with the paper color side down to hide crease guides.
- Fold corner to corner, open, then repeat with the opposite corners for an X.
- Flip the sheet and fold edge to edge both ways to add a plus sign.
- Press each crease again with a bone folder for razor-sharp lines.
- Hold the square to light; intersecting lines should meet cleanly at center.
Shaping Wings for a Smooth Flutter Motion
Balanced wings give your origami bat its signature flutter. Small alignment tweaks ensure both sides open together and ripple with every tug on the thread.
- Open the square base and pull the bottom layers upward into long triangles.
- Flatten triangles to create wide wings flanking the body.
- Reverse-fold the leading edges to angle wings slightly forward.
- Add a tiny inside reverse fold near each tip for graceful curvature.
- Flick each wing; they should bounce back without stiffness.
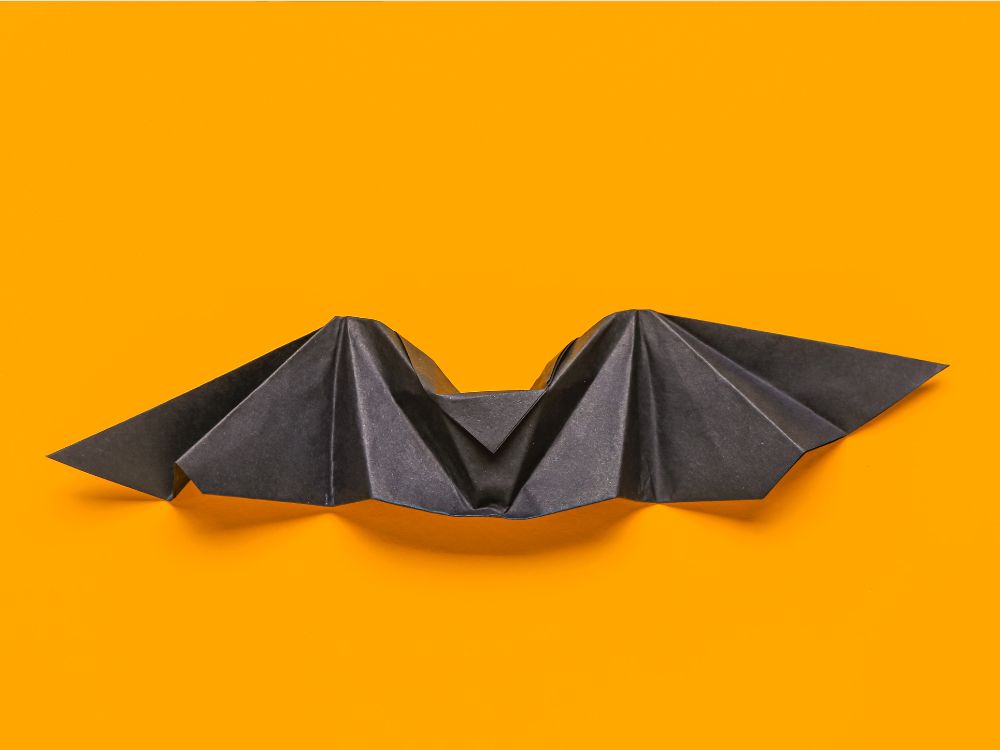
Attaching Thread to Activate the Flap Effect
A hidden thread brings the bat to life, making wings beat on command. Secure placement stops tears and keeps the motion smooth every Halloween night.
- Thread a needle with about 20 cm of thin, strong line.
- Pierce the bat’s head through an existing crease to avoid new holes.
- Pull the line halfway, tie a double knot, and tuck it inside the fold.
- Leave roughly 10 cm of free line above the knot for hanging control.
- Tug gently; wings should snap open, flutter, then settle back in place.
Troubleshooting: Tears, Misaligned Wings, Stiff Movement
Small tears or crooked wings ruin the flutter. These tips show how to spot trouble early, reinforce folds, and rescue your origami bat before Halloween guests notice.
- Spot the problem early. Hold your bat against a lamp and watch for thin bright spots along creases. Light reveals weakness before paper splits so you repair, not rebuild.
- Reinforce weak creases. Rub a bone folder along sagging lines until they heat slightly under pressure. Warm fibers reset and hold shape without cracking.
- Mend tiny tears. If a rip stays under five millimeters, press acid-free tape on the back, smooth it flat, then refold. The patch disappears once wings close.
- Patch bigger rips. Snip a matching scrap, slide it under the gap, brush on thin glue, clamp with clips ten minutes, and trim any overhang once dry.
- Realign crooked wings. Pinch the body, pull each wing tip toward the same diagonal crease, and tap creases sharp again so both sides sit level.
- Balance symmetry. Uneven wings often hide extra paper. Unfold two layers, shave excess with a craft knife, refold, and test the flutter.
- Loosen stiff joints. Roll a toothpick inside stubborn hinges to open fibers, then flex gently until the movement feels free.
- Condition paper fibers. Lightly mist tight spots with distilled water, wait five seconds, and refold. Damp fibers accept new angles without splitting.
- Restore flutter motion. Tie the hanging thread to a pencil, pump it like a puppet, and adjust knot height until both wings flap together.
- Prevent future damage. Store bats flat between wax-paper sheets away from humid rooms. A thin coat of archival matte sealer adds strength without shine.
- Choose tougher paper next time. Swap flimsy kami for 75 gsm sulfite or handmade lokta. Both fold sharply yet resist tearing.
- Transport safely. Slide each bat into a comic-book sleeve. Smooth Mylar stops snags during the ride to the party.
Decoration Ideas: Eyes, Glow Paint, and More
A fluttering origami bat already moves, but decoration takes it from simple craft to spooky showpiece. Add glow paint, glitter, and scent for extra sensory surprise.
- Give it eyes. Draw wide cartoon circles for cute or sharp slits for menace, or glue tiny googly eyes so they wobble with every wingbeat.
- Brush on glow-paint. Water-based phosphorescent acrylic on the underside charges in daylight and glows lime green after dark, turning each flap into a flash of light.
- Add metallic sparkle. Dry-brush silver or copper along wing edges; reflections mimic moonlit flight without weighing the paper down.
- Trace subtle veins. Use a fine gel pen a shade darker than the paper to draw membrane lines, creating lifelike texture that shows when guests look close.
- Heat-emboss the belly. Ink the body, dust with black embossing powder, warm it until raised, and you’ll have a leathery finish that feels real.
- Layer patterned tissue. Glue translucent scraps behind small cut-outs in the wings so light passes through like stained glass.
- Install micro LEDs. Thread a tiny diode behind vellum eyes for a dim red stare that chills the room without bulky batteries.
- Paint expressions. A white paint pen adds fangs, quirky brows, or comic smiles in seconds; short strokes keep fibers intact.
- Dye naturally. Dip finished bats in cooled coffee or beet juice for earthy hues. Natural dyes stiffen wings slightly and stay eco-friendly.
- Scent the scare. Mist bats with diluted cinnamon oil so a warm aroma drifts whenever the wings flutter.
- Sprinkle fine glitter. Brush clear glue on selected spots, shake glitter over parchment, then tap off excess. A hint of shimmer catches candlelight.
- Soften LED glare. Cut tiny vellum circles, glue behind eye holes, and your light diffuses into a ghostly glow.
Creative Display Options Indoors and Outdoors
Placement turns a single bat into a full spectacle. Use height, light, and motion so every origami bat you hang becomes a moving Halloween headline.
- Create a mobile cluster. Tie five bats at different lengths from an embroidery hoop and spin it slowly; wings beat in a gentle spiral over the snack table.
- Line a staircase. Run clear monofilament along the banister and space bats every third step so visitors walk through a rising swarm.
- Silhouette a window. Pin black bats flat on sheer curtains; indoor lights backlight them, mimicking real creatures circling a night sky.
- Swarm the porch lantern. Hang bats just below gauzy lanterns; warm bulbs reveal glow-paint while hiding string, selling the illusion of flight.
- Use the ceiling fan. Tie threads to fan blades on the slowest setting. Continuous rotation triggers synchronized flutters that mesmerize guests.
- Animate garden trees. Spray bats with acrylic sealer, dangle them from low branches on elastic thread, and let evening breezes power the show.
- Build a photo-booth backdrop. Cover foam board in deep purple felt, pin bats at varied angles, and let partygoers tug strings for dynamic snapshots.
- Transform a chandelier. Wrap thin wire around fixture arms, attach bats in a circle, and dim lights so metallic wing edges sparkle above dinner.
- Set up a learning corner. Label classroom bats with fun facts about real bats; kids pull threads, watch movement, and read about echolocation.
- Craft a terrarium diorama. Place miniature bats inside a glass case with moss and tiny LEDs; the contained scene feels like a haunted ecosystem.
- Mark the driveway. Glue bats on bamboo skewers stuck in soil; reflective-tape eyes grab car headlights, guiding trick-or-treaters safely.
- Frame year-round art. Mount one ornate bat in a shadow box, wings half open, and swap backgrounds seasonally to keep décor fresh.
Conclusion
You now have a fluttering origami bat that thrills guests and shows off your folding skill. The model costs almost nothing yet delivers a high-impact effect. Swap paper colors and decorations to match any theme beyond Halloween. Hang one or group many to turn empty space into animated art. Enjoy the tiny rush each time its wings leap to life.