Last Updated on October 29, 2025 by Team Ideas24
Creating a blast furnace at home can significantly enhance your metalworking projects. This guide will walk you through the process of building a functional and efficient blast furnace using readily available materials. We’ll also cover essential safety precautions to ensure a secure working environment. Additionally, we’ll explore various applications of a blast furnace in DIY projects and crafts.
Contents
Key Takeaways
- Building a “blast furnace” at home usually means a melting furnace or small cupola, so match the design to your goal.
- Safe, efficient operation depends on code-compliant setup, proper PPE, reliable ventilation, and a sealed, fully cured refractory lining.
- Consistent heat and clean pours come from tuned airflow, dry quality fuel, preheated charges, and proactive slag tapping with smart flux control.
Understanding the Blast Furnace
Metal and ore-melting blast furnaces are specialist furnaces. It heats faster than a typical furnace because it employs pushed air. This furnace melt iron, brass, and aluminum by blowing heated air into the chamber. Making a blast furnace at home enables you produce unique metal components and tools. Building one requires refractory materials that can withstand above 1,500°C (2,732°F), making it vital for serious hobbyists and crafters.
Step-by-Step Construction Guide
Creating your own furnace at home is a rewarding project if you’re serious about metalworking or crafting. While the construction process is straightforward, attention to detail is crucial for a safe, efficient, and durable result. Below is a complete guide on how to make a blast furnace.
Materials and Tools Needed:
- Metal drum or large steel container (for furnace housing)
- Refractory cement or firebrick mix
- Firebricks (optional for lining)
- Steel pipe (for air intake/blower tube)
- Sand (for insulation and base)
- Angle grinder or metal cutter
- Drill and drill bits
- Mixing bucket and trowel
- Blower (hairdryer, leaf blower, or specialized furnace blower)
- Safety gloves and goggles
- Respirator or dust mask
- High-temperature thermometer (optional)
Steps:
- Prepare the Furnace Body
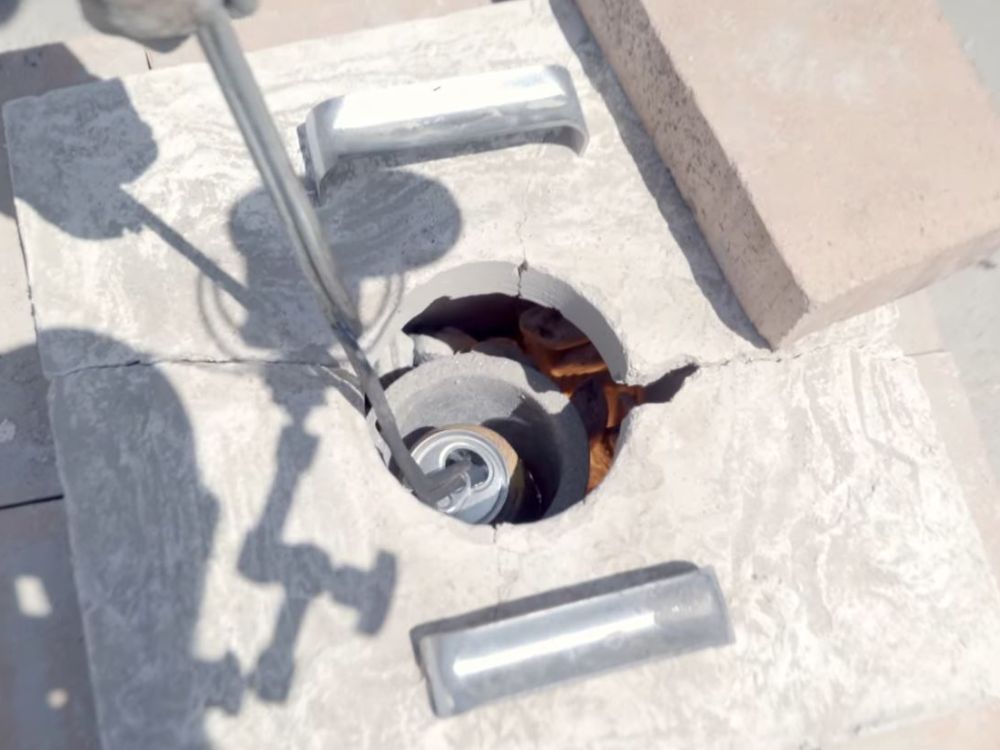
- Cut the top off a metal drum or container using an angle grinder to create the furnace opening.
- Smooth out sharp edges for safety.
- Install Air Intake
- Drill a hole in the lower side of the drum to fit your steel pipe.
- Insert the steel pipe snugly into the hole, ensuring it’s angled slightly downward to keep airflow steady.
- Line the Furnace
- Mix refractory cement according to the package instructions in your bucket.
- Apply a thick, even coating (2–3 inches thick) inside the drum, completely covering all sides.
- If preferred, line the bottom with firebricks for extra heat resistance and insulation.
- Allow Furnace to Cure
- Let the refractory lining dry naturally for at least 24 hours.
- Heat gently for a short period afterward (using small fires) to cure the refractory and prevent cracking.
- Set Up the Blower
- Attach your chosen blower securely to the intake pipe, making sure air flows freely into the furnace.
- Build the Lid
- Cut a lid from metal to cover the furnace opening. Drill ventilation holes into the lid to allow controlled airflow.
- Optionally, line the underside with refractory cement or firebricks for insulation.
- Test the Furnace
- Start with a small initial fire to verify airflow and heat distribution.
- Gradually increase the fuel quantity and blower speed to test higher temperatures.
Safety Guidelines
Creating and using a blast furnace at home can greatly enhance your DIY capabilities, but it also introduces risks you need to manage carefully. Blast furnaces generate extreme heat, hot surfaces, and potentially hazardous fumes. Staying safe requires more than just common sense, it involves preparation, proper gear, and careful work habits. Here’s a detailed look at essential safety guidelines for constructing and operating your own blast furnace safely.
Personal Protective Equipment (PPE)
When working with a blast furnace, personal protective equipment isn’t optional, it’s necessary. High temperatures can cause serious burns, so always wear heat-resistant gloves specifically designed for metalwork or welding. Thick leather or specialized gloves provide the best protection from radiant heat and accidental contact with hot surfaces.
Additionally, eye protection is critical due to sparks, splashes of molten metal, or fragments of refractory lining that might break loose. Wear impact-resistant goggles or a full-face shield for optimal protection. Never overlook respiratory protection either, since fumes from molten metal, fluxes, and refractory materials can be harmful. Choose a respirator rated for fumes and dust to keep your lungs safe.
Proper Clothing and Footwear
The clothing you wear during furnace operation matters just as much as PPE. Avoid synthetic fabrics like polyester or nylon, as they can melt or ignite if exposed to high temperatures. Instead, opt for cotton, denim, wool, or specialized flame-retardant materials.
Always ensure sleeves and pant legs are long enough to fully protect your skin. Footwear should be sturdy, closed-toed boots made of thick leather to guard against falling hot materials or spilled molten metal. Steel-toed boots add another level of safety.
Workspace and Ventilation
Your workspace setup directly impacts safety. Always position your blast furnace outdoors or in a well-ventilated workshop designed for high-temperature activities. Adequate ventilation helps remove hazardous fumes and keeps oxygen flowing to support combustion properly.
Be mindful of nearby flammable materials, keep a clear perimeter around the furnace and maintain at least several feet of open space in all directions. This reduces the risk of accidental fires or injuries from falling debris. Ensure your workspace floor is stable and fireproof, like concrete or packed earth, avoiding wooden or carpeted surfaces that can ignite or melt easily.
Safe Operation Practices
Operating your blast furnace safely is just as important as construction safety. Always monitor temperatures closely, and never leave the furnace unattended while active. Use long-handled metal tools, like tongs or pokers, to handle hot metals and manage fire inside the furnace, minimizing your direct exposure to heat and flames.
When adding fuel or materials, do it gradually and carefully to prevent sudden temperature spikes or violent reactions. Always keep a fire extinguisher nearby, ideally one rated for Class D fires, since you’ll be handling molten metals and potentially combustible metal dust.
Maintenance and Inspection
Regular inspections and maintenance of your blast furnace significantly improve safety. Routinely check the refractory lining for cracks or deterioration, repairing any damage immediately. Inspect your blower system and ventilation setup to confirm they remain secure, undamaged, and functional. Replace worn or damaged parts before operating the furnace again. A well-maintained furnace is less likely to malfunction or cause hazardous incidents.
Emergency Preparedness
Finally, prepare for the unexpected. Keep a first aid kit accessible, fully stocked, and ready in case of injury. Familiarize yourself with emergency procedures and practice responding to potential issues, such as extinguishing small fires, managing spills, or quickly shutting down the furnace in an emergency. Inform anyone assisting or working near you about these procedures, ensuring they understand how to act in a critical situation.
By strictly following these comprehensive safety guidelines, you can confidently enjoy crafting and metalworking with your homemade blast furnace, knowing you’re well-prepared for a safe and productive experience.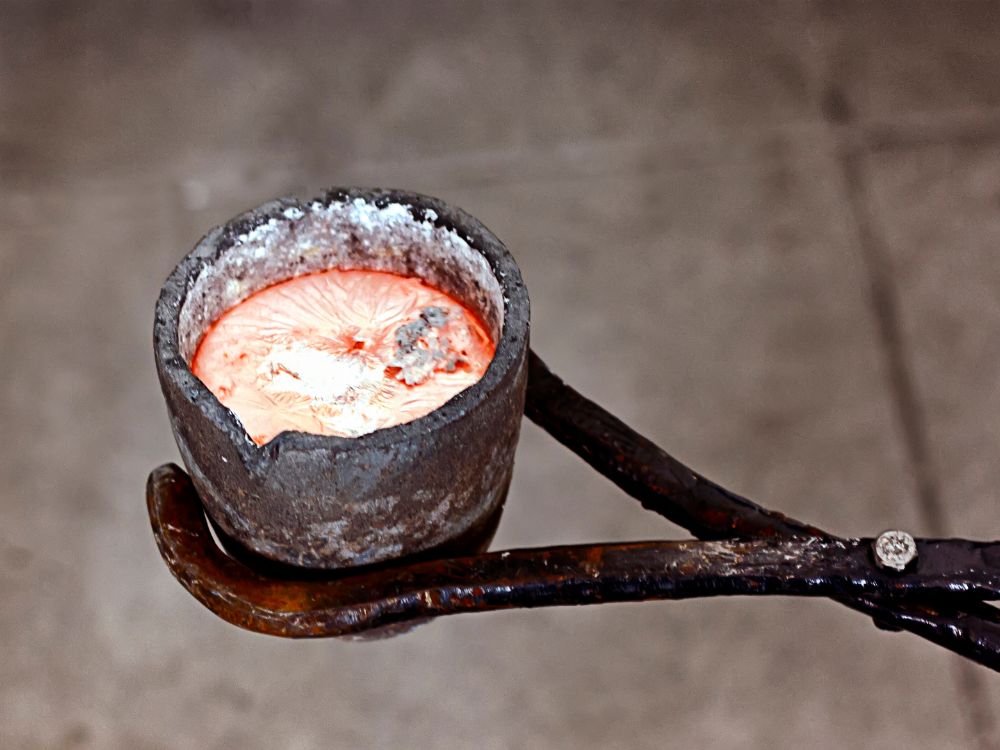
Fuel, Charge, and Firing Schedule for Reliable Heats
Nail the firing rhythm and your furnace will melt cleanly, pour on time, and waste less fuel. These steps align fuel, air, and charge so melts become predictable, repeatable heats.
Choosing and Preparing Fuel
Start with dry, uniform charcoal or coke in walnut to egg sized pieces. Screen out fines that clog passages and smother the bed. Store fuel under cover so humidity doesn’t steal heat during startup. If you’re learning how to make a blast furnace at home, keep one bucket of smalls only for lighting, then switch to your main screened batch. Consistency matters because airflow, burn rate, and jet penetration all depend on size and dryness.
Lighting, Preheat, and Bed Build
Prime with a small bed and a gentle blast for 10 to 15 minutes, then feed in measured charges until the glow climbs to two thirds of the bore. Listen for a steady roar, not a shriek, and watch the vent for a lively but controlled spark stream. Raise air in small trims as the bed deepens. The goal is an even, bright orange core that responds quickly to small increases in air without throwing embers or puffing smoke.
Crucible Warm-Up and Placement
Moisture ruins heats and cracks refractories, so warm the crucible at the vent until it releases no visible steam. Ease it onto the fuel bed with tongs, keeping the tuyere clear. Bring air up a notch, then wait for the glow to envelop the crucible walls before charging. This staged warm-up reduces thermal shock, protects the hot face, and makes your first additions wet and fuse faster, which shortens time to liquid and improves surface cleanliness.
Charging Strategy and Metal Additions
Start light. Add a small warmed charge to establish a molten pool, then feed preheated ingots or clean scrap in modest, repeatable batches. Avoid burying the crucible under a heavy cold load that steals heat and stalls the bed. Keep lids on briefly after each top-up so temperature rebounds. Track charge weight versus minutes to wet for your alloys. That pattern lets you predict the next heat and improve future results for any how to make a blast furnace build.
Flux Use and Slag Control
Use only enough flux to wet dross and sweep inclusions. Too much steals heat and swells slag volume. Sprinkle a thin layer after the first pool forms, then refresh lightly as oxide reappears. Skim with long tools before the final superheat so the lip pours clean. If slag thickens or drags, pause additions, trim air up slightly, and wait for a brighter bath before reskimming. Clarity at the surface usually mirrors good chemistry underneath.
Air Management and Bed Maintenance
Air makes or breaks the melt. Mark three reference settings on your gate or valve for light-off, steady melt, and tap. During steady melt, top fuel little and often so the bed height stays constant and tuyere penetration remains the same. Manage sparks at the vent as a live indicator of jet strength. A thin spark veil is ideal. None means starved air or a soggy bed. A shower means too much blast that strips heat from the crucible.
Troubleshooting Heat Sag and Stalls
If temperature fades, resist the urge to bury the fire in new fuel. Give a short air bump to wake the bed, then add a modest fuel sprinkle and wait for the glow to recover. Check for fines choking the tuyere and clear if needed. If sparks vanish, lift the lid briefly to confirm flame quality, then restore your last proven air mark. Persistent stalls often trace back to damp fuel, an overfilled crucible, or a bed that drifted below target height.
Recordkeeping for Repeatable Heats
Treat every heat like a test you can rerun. Log bore size, tuyere diameter and angle, blower CFM or valve position, fuel type and screen size, charge weights, flux amounts, time to first liquid, and tap temperature cues. A simple U-tube manometer or inline gauge adds pressure data that explains stubborn sags. Those notes turn one successful melt into a routine. They also sharpen your tutorial credibility whenever you teach someone else how to make a blast furnace.
Applications in DIY Projects and Crafts
Once you’ve learned how to make a blast furnace at home, you can significantly broaden the scope of your DIY capabilities. Having your own blast furnace allows you to tackle metalworking projects that would otherwise be difficult or even impossible. From casting custom components to artistic metal sculptures, your homemade furnace becomes a powerful tool in your workshop.
Casting Metal Parts and Components
With a blast furnace, you can melt metals such as aluminum, brass, and copper to create personalized parts for your DIY projects. By constructing your blast furnace from simple materials like a metal drum lined with refractory cement and an air intake system, you gain the ability to recycle scrap metals into valuable pieces. For example, aluminum can be melted and poured into sand or graphite molds to produce custom handles, hardware fittings, or replacement parts for machines and furniture.
Blacksmithing and Tool Making
Your homemade blast furnace generates enough heat to soften or melt metals like iron and steel, making it perfect for blacksmithing projects. By learning how to make a blast furnace, you’ll have the heat necessary to forge tools, blades, gardening implements, and custom hardware. Crafting your own knives, chisels, axes, or even decorative iron gates becomes achievable, allowing you to add a personal touch to practical tools or decorative ironwork.
Metal Sculptures and Artwork
Artists and DIY enthusiasts alike will appreciate the creative possibilities a blast furnace provides. You can melt metal and pour it into molds to create unique sculptures, ornaments, and decorative art pieces. Using materials like copper or brass, you can cast intricate statues, garden sculptures, or abstract artistic forms, adding beauty and originality to your indoor or outdoor spaces. A homemade blast furnace makes artistic metal casting accessible right from your backyard workshop.
Custom Jewelry Crafting
Jewelry making is another popular use for a homemade blast furnace. Melting metals such as copper or brass lets you create beautiful and personalized jewelry pieces. You can craft earrings, pendants, bracelets, rings, and even detailed charms by pouring molten metal into specialized molds. Because the blast furnace heats metal quickly and evenly, you’ll achieve better precision and quality, resulting in professional-grade jewelry pieces at home.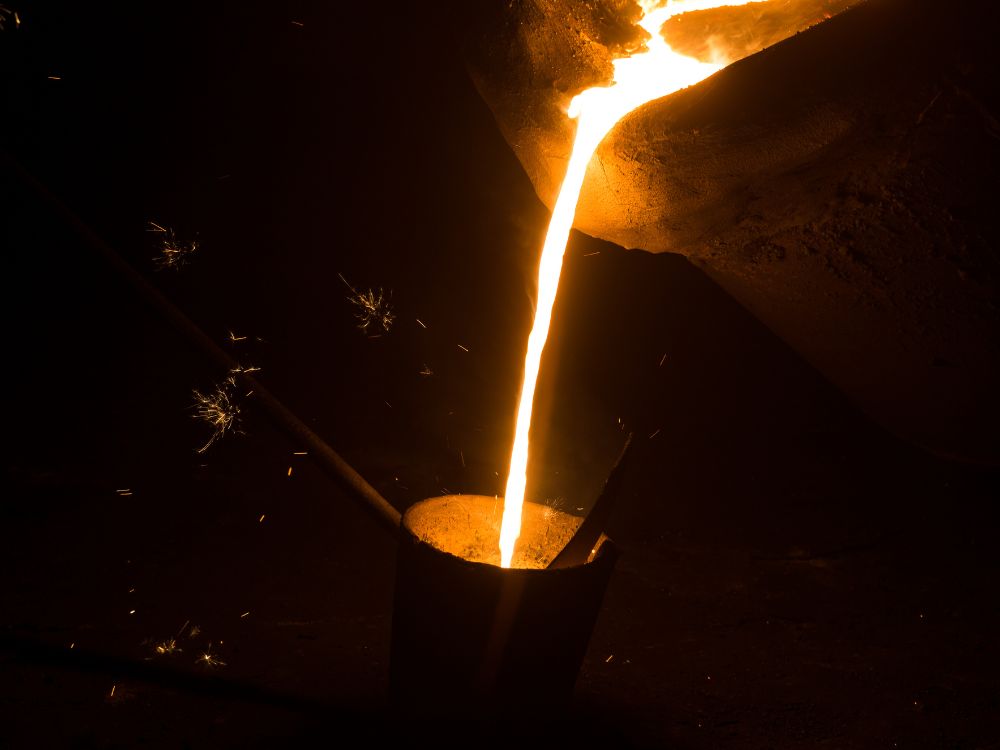
Restoration and Repair Projects
Finally, having your own blast furnace simplifies restoration and repair projects. Antique furniture, vintage hardware, or damaged metal fixtures often require custom-made replacement parts that can be expensive or impossible to find. Using your blast furnace, you can melt down suitable metals to fabricate exact replicas or replacement components. This capability helps you restore or refurbish antiques and vintage items authentically, extending their life and preserving their historical value.
Learning how to make a blast furnace is straightforward and rewarding. It involves constructing the furnace body from a sturdy metal drum, lining it with heat-resistant refractory cement, and attaching a blower for airflow. Once complete, your furnace provides limitless opportunities to explore and expand your DIY projects, crafting possibilities, and metalworking skills.
Air Supply and Tuyere Design: Sizing CFM, Pipe Diameter, and Angle
Airflow decides how your fuel burns and how hot the furnace runs. Get blower size, tuyere diameter, and angle right. Your melts start faster and stay stable without wasting fuel.
Blower CFM and Pressure
Target airflow to match bore size and fuel. A 6–8 inch bore runs well at 30–60 CFM with 1–2 inches of water column. A 10–12 inch bore typically needs 80–150 CFM and 2–4 inches. Choose a blower that can exceed the target, then tame it with a gate or speed control. This gives headroom when the bed is fresh or the charge is dense. If you’re mapping how to make a blast furnace for repeatable heats, note your CFM at each fuel type and charge weight.
Pipe Diameter and Tuyere Bore
Keep gas velocity high enough to penetrate the fuel bed without blowing embers out. Use 1 inch NPT for 6–8 inch bores. Step up to 1¼–1½ inch for 10–12 inch bores. Stick with steel or black iron pipe. Thin tubing warps and leaks under heat. Seat the tuyere flush to the hot face with a short sacrificial nipple so you can replace it after wear.
Tuyere Angle and Height
Aim the blast 10–15 degrees downward toward the hearth. This pushes heat across the crucible and reduces back-blast. Set tuyere height about 1½–2 inches above the floor on small furnaces and 3–4 inches on larger units. Too low starves the bed. Too high creates a cold heel that wastes fuel and slows melts.
Single vs Multiple Tuyeres
Start with one tuyere until your heat is consistent. Add a second only when the hearth grows or you swap to denser fuel. Run both through a tee and individual valves so you can balance flow. Uneven blasts create hot and cold zones that bend crucibles and increase slag.
Blast Control, Nozzles, and Diffusers
Install a blast gate or ball valve near the blower for quick trims. A reducer nozzle at the tuyere boosts jet velocity when fuel is damp or coarse. A perforated diffuser puck can soften the jet for coke or anthracite. Keep controls reachable with gloves. You’ll adjust often during light-off and first charge.
Sealing and Thermal Protection
Seal joints with furnace cement where they meet the shell. Back it with a clay slip to catch hairline leaks. Wrap exposed pipe with ceramic fiber and a thin refractory wash. Heat creeps fast at the tuyere. Protection keeps threads free and prevents frozen fittings mid-pour.
Commissioning and Tuning
Mark three blast settings on your valve for light-off, steady melt, and tap. Use a simple U-tube manometer to log inches of water at each setting. Read the flame and sound. A healthy bed gives a steady roar and bright orange glow with minimal sparks at the vent. For anyone documenting how to make a blast furnace, record bore, fuel, tuyere size, angle, CFM, and static pressure so others can replicate your results.
Troubleshooting Heat Loss and Slag Control
Heat loss and uncontrolled slag ruin melt times, fuel economy, and metal quality. Use these checks and fixes to seal hot zones, steady burn, and manage slag before it solidifies.
- Cold lid or poor seal: Add a gasket, re-seat the lid, add a ceramic fiber blanket, and check hinge alignment.
- Damp refractory stealing heat: Cure fully, then run a gentle drying fire to drive off moisture. Patch cracks with castable refractory.
- Wind stripping heat from the lid and shell: Add a windbreak, extend the flue, and check chimney draw. Install spark arrestor mesh.
- Short stack and weak draft: Add a vertical stack to improve natural draw on solid fuel builds. For propane, shield the exhaust path to reduce convective loss.
- Overblast cooling the bed: Too much air chills the fire. Throttle the blower until the flame turns neutral and the roar steadies.
- Underblast and lazy combustion: Orange smoke and slow heat point to airflow issues. Clear the tuyere, remove clinker, and check blower filters and hose leaks.
- Poor fuel quality or sizing: Use dry, evenly sized charcoal or coke. Avoid damp scrap that chills the melt on contact.
- Charge size or cadence off: Feed smaller charges on a regular rhythm. Preheat scrap on the lid safely so it enters hot.
- Plinth and crucible height wrong: Raise the crucible above the jet line. Keep metal out of direct blast to reduce oxidation and heat loss.
- Wall hot spots and leaks: Watch for glowing seams or smoke trails. Patch joints, apply rigidizer, and seal the lid seam with sand.
- Instrument error from emissivity: Shiny metal reads cold on IR guns. Use a thermocouple or soot the crucible to boost emissivity.
- Slag bridging over the tap: Tap more often to prevent arches. Break bridges with a steel rod through the poking hole. Increase flux slightly if needed.
- Slag too viscous: Add a small dose of the correct flux for your alloy. Raise bath temperature in small steps.
- Slag too runny and carrying metal: Reduce flux and pause to let dross settle. Skim gently to avoid pulling metal.
- Clinker choking the tuyere: Rake ash often and clear clinker with a hook. Keep a standby bar to break it mid-melt.
- Moisture in charge or lining: Preheat ingots and tools until dry. Store fuel and refractory under cover. Hissing means water is stealing heat.
- Heat loss through the floor: Set a dry plinth on an insulating layer under the hearth. Replace any spalled kiln shelf.
- Exhaust backflow at the lid: If smoke pushes out, open a secondary vent or raise the stack. Restore draft before charging again.
Slag tapping safety: Wear a face shield, jacket, and leggings. Stand to the side and treat every tap as a splash hazard.
Conclusion
Building your own blast furnace is straightforward when using simple materials like a metal drum, refractory cement, and a blower. Having a blast furnace at home expands your DIY possibilities, from blacksmithing and toolmaking to artistic metal sculptures and custom jewelry. It also enables you to recycle metals, saving money and resources. By following proper safety guidelines, your homemade blast furnace becomes an invaluable addition to your creative toolkit.
FAQs
- Can I run a DIY blast furnace in a residential area?
- You can only do it where local rules allow and where the site is safe. Check zoning and fire-code requirements, work outdoors on non-combustible ground, keep Class D and ABC extinguishers within reach, and use a CO monitor any time fuel burns.
- What’s the practical difference between this build and a true blast furnace?
- Your project melts metal for casting and recycling. A true blast furnace smelts iron ore into hot metal and needs continuous burden charging, high air volumes, and complex slag control that aren’t feasible for home shops. Steering readers to a melting furnace or small cupola avoids frustration.
- Which crucible should I choose for aluminum, brass, or bronze?
- Graphite-clay and silicon-carbide crucibles handle non-ferrous work well and last longer under thermal shock than steel pots. Pick a size that leaves tongs clearance, preheat to drive off moisture, and retire any crucible with cracks or glaze spalls.