
Last Updated on March 5, 2025 by Team Ideas24
Creative minds are very good at finding treasure in what others consider to be trash. This project is a very good example.
Imagine turning discarded cardboard paper into a fabulous light source. You can use this to add a whimsical touch to your kids’ bedrooms. They’ll surely love it!

This do-it-yourself turtle lamp is made using very simple – and inexpensive – materials.
With a little imagination, you can upcycle old cardboard paper into a one-of-a-kind light source. Not only is this a great way to add some personality to your home, but it’s also a great way to save money.
If you have old cardboard paper lying around, you just need to add PVA glue and put in the work. Your kids will be enjoying this adorable turtle lamp anytime soon.
So next time you’re about to throw away that old cardboard box, think twice and see if you can’t turn it into something beautiful.
Plus, this is a great bonding activity for the whole family. Just be extra careful with the hot glue and other sharp tools used here. You can have your kids paint the turtle!
Contents
Crafting a Turtle Lamp
Here’s how you can turn cardboard paper into a fabulous light source.
You will need the following tools and materials to make a turtle lamp using a balloon.
- Recycled cardboard paper
- P.V.A. glue
- Hot water
- Balloon
- Hot glue
- Acrylic paint
- Small battery-operated light source
- Blender
- Strainer/sieve
- Knife
- Glue gun
- Scissors
- Sharpie/pencil
- Paper cutter
- Paintbrush
Steps:
Making a turtle lamp is a great way to show your creativity and add a personal touch to your home decor. Once you have your supplies, it’s time to get started!
1. Create the mixture
Cut the recycled cardboard papers into small pieces and place them in a blender with hot water.
Remove the recycled cardboard papers from the blender using a strainer and squeeze to remove the water.
Place the recycled cardboard papers in a bowl and add PVA glue. Mix well.
2. Make your turtle’s shell
By using the balloon to shape the turtle’s shell (vertebral shell), carefully apply the mixture, starting from the top, down to the sides. Let it dry.
Once the applied mixture is dry, carefully poke the balloon with a needle. Then remove.
For the sides of your turtle’s shell (coastal shell). Cut a piece of recycled cardboard paper (cut recycled toilet paper is an example of this) into small pieces. Using hot glue, attach them all over the sides of the vertebral shell of your turtle.
This will serve as your turtle lamp’s cover.
3. Make your turtle’s body
Using recycled cardboard paper, cut it round, or better yet trace your turtle’s shell (bottom part). To make this thicker, use two or three of these, and attach them all together.
4. Make your turtle’s legs
Using recycled cardboard toilet paper, cut each into half lengthwise. Fold it like a turtle’s legs, close it with hot glue, and attach them to the turtle’s body.
Carefully apply the mixture. Let it Dry.
5. Make your turtle’s head and neck
Once the legs are attached to the turtle’s body, you can now add a neck and head. The neck should be similar in shape to the legs. We can make the head using the same process as making the turtle’s back. Just use a smaller balloon, attach it to the neck, apply the mixture, and let it dry.
To make it all sturdy, apply the mixture to the neck, legs, and body too. Let it dry.
Once your paint is dry, you can smooth out the surface of your turtle with a sheet of paper or very thin sandpaper. Just be careful not to damage your work! This will give your turtle a nice, smooth look.
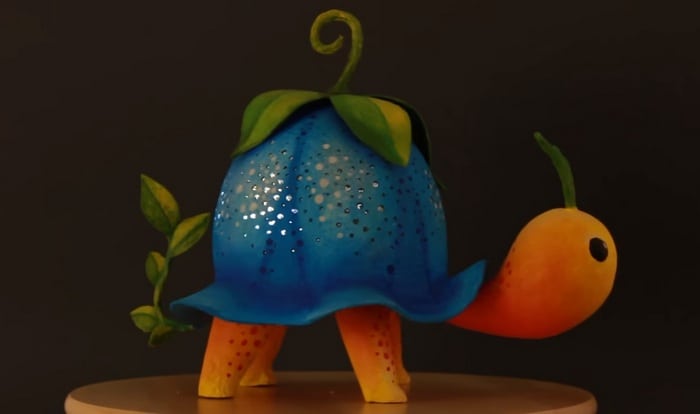
6. Add a plant on top of the turtle’s shell
Using the cutter, puncture a hole at the center of the turtle’s shell. Using the wire as a stem, Insert it into the hole and bend it to make a hook-like image. Fix it with hot glue. Add a small amount of mixture and let it dry. Remove excess wire.
Add some leaves to the turtle’s shell using hot glue. Use the remaining recycled cardboard paper & mixture to make some small leaves.
7. Add your turtle’s small tail
Attach a small wire to the bottom part of the turtle’s shell using hot glue. Use your pliers to shape it to make a tail look. Add a small amount of mixture and let it dry.
8. Add your turtle’s little horns
Poke two holes in the turtle’s head and add a small wire and shape it into two little horns. Add a small amount of mixture and let it dry.
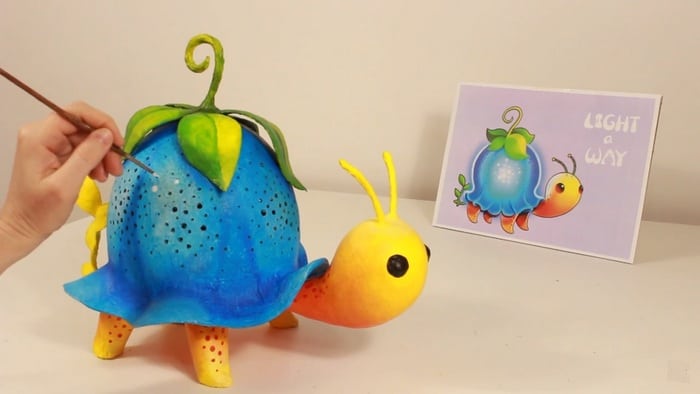
9. Paint your cute turtle lamp
Once all is dry, you can paint your turtle white. let it dry.
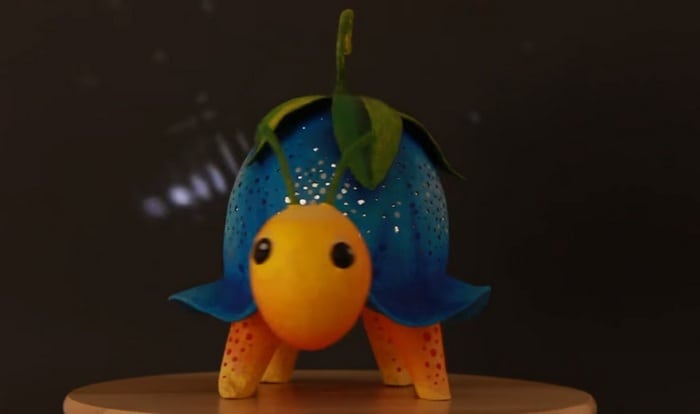
Put some tiny holes in the shell, then paint it blue.
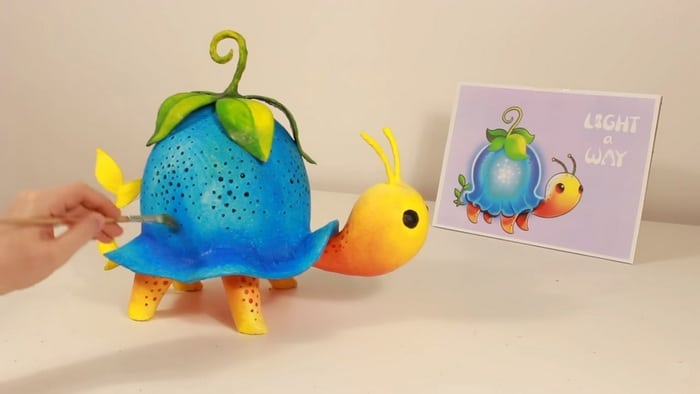
Paint the turtle yellow, then a shade of orange or brown.
Add the details. Paint the eyes black, the dots white or red and the leaves green. Let it dry.
You can use your own favorite colors, just be creative! 😉
10. Add the LED light
Finally, add your LED light inside your turtle lamp’s cover.
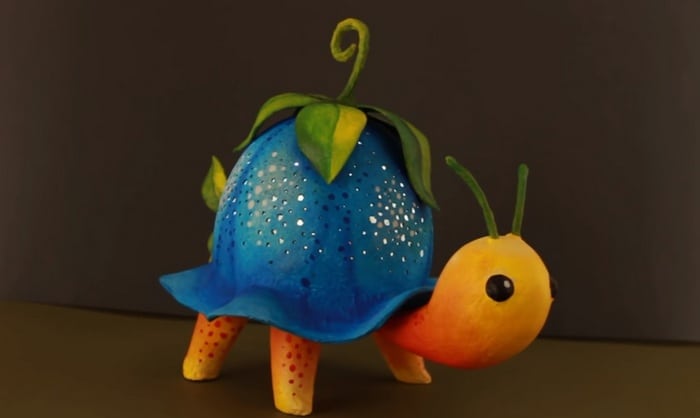
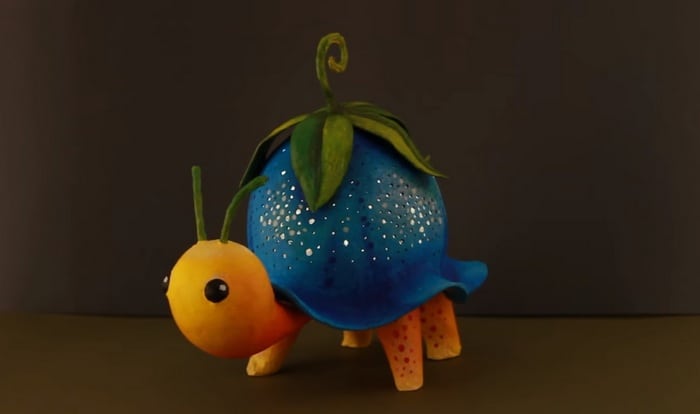
And that’s it! You now have a super cute and unique lamp that will add some extra personality to your room.
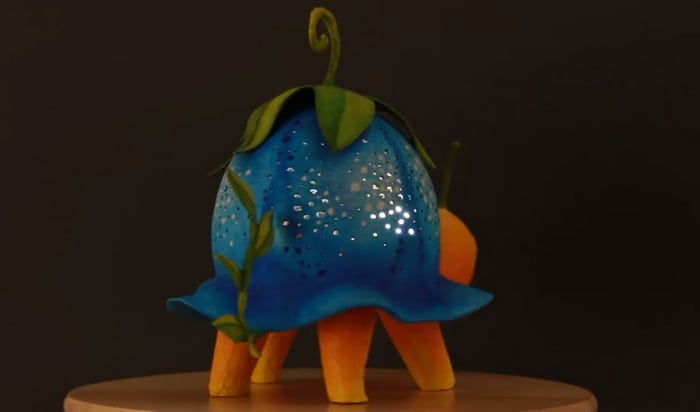
Now that you’ve added your LED light inside your turtle lamp’s cover, it’s time to enjoy the relaxing, warm light it provides. You should see the light shining through the cover, creating a beautiful effect.
Just sit back and enjoy your new turtle lamp! 😎
If you prefer, below is a video guide to making your own turtle lamp.
Customizing Your Turtle Lamp
Adding a personal touch to your turtle lamp makes it even more special. While the basic design is charming on its own, customization allows you to create a piece that fits your style and home décor. From unique colors to creative patterns and additional elements, you can make your turtle lamp one-of-a-kind. Here are some ways to customize your turtle lamp and make it stand out.
Choosing the Right Color Palette
The colors you choose will define the overall look of your turtle lamp. Traditional green and brown shades give a realistic turtle appearance, while pastel colors create a soft, whimsical effect perfect for a nursery. If you prefer a more modern style, consider metallic or monochrome finishes. Glow-in-the-dark paint is also a fun option, especially if the lamp is for a child’s room.
Adding Unique Patterns and Textures
Instead of a plain surface, add patterns that enhance the turtle’s shell. A mosaic-inspired design using small painted paper pieces can give a tiled effect. Use a sponge to dab on darker tones for a more natural look, mimicking a real turtle shell’s texture. Stencils can help create symmetrical geometric or floral designs. Another option is to glue on small decorative beads, seashells, or eco-friendly glitter to create a textured, eye-catching finish.
Personalizing with Hand-Painted Details
Hand-painting small details adds character to your turtle lamp. Create cute facial expressions, add freckles or spots to the head, or give the turtle cartoon-like eyes for a playful touch. You can also paint tiny stars or constellations on the shell to enhance the lamp’s glow at night. If you prefer a more artistic approach, use fine brushes to create intricate tribal, mandala, or ocean-themed designs.
Incorporating Additional Elements
Add creative accessories to enhance your turtle lamp. A tiny fabric bow or a felt scarf can make the turtle look adorable. If the lamp is for a nature-themed space, attach small artificial vines or mini succulents to the shell. For an ocean-inspired theme, use seashells and sand-colored paint to create a beachy aesthetic.
Experimenting with Different Light Colors
The LED light inside the turtle lamp plays a significant role in its appearance. A warm white LED creates a cozy glow, while a color-changing LED can shift between shades, adding a fun, dynamic effect. If the lamp is used as a nightlight, consider soft blue or green lights to create a calming ambiance. You can also use multiple lights inside to create a layered illumination effect.
Customizing for Different Occasions
Your turtle lamp can change with the seasons or special events. For the holidays, add small festive decorations like mini Santa hats or snowflakes. For spring and summer, consider floral embellishments or pastel colors. If you want a Halloween twist, paint the shell black and orange and add tiny bat stickers.
Customizing your turtle lamp lets you express creativity while making it a truly unique piece. Whether you go for a simple design or an elaborate, detailed look, your personalized turtle lamp will be a charming addition to any space.
Making a Waterproof Outdoor Turtle Lamp
A turtle lamp adds a whimsical touch to any outdoor space, whether it’s placed in a garden, on a patio, or beside a pond. However, since the original design is made from recycled cardboard, exposure to moisture can weaken the structure over time. To make your turtle lamp durable enough for outdoor use, you must waterproof it properly. Here’s how to reinforce and protect your DIY turtle lamp from rain, humidity, and other weather conditions.
Choosing the Right Materials
Cardboard is a great upcycled material, but it’s naturally vulnerable to water damage. If you’re planning to place your turtle lamp outside, consider using more weather-resistant materials. Papier-mâché can still be used, but adding a waterproof sealant will be necessary. Alternatively, swap the cardboard for foam board, plastic sheets, or fiberglass mesh, which are much more durable in outdoor conditions.
Applying a Waterproof Sealant
To protect the lamp’s structure, apply a waterproofing sealant after the design is complete. Clear acrylic spray sealant, polyurethane, or marine varnish will create a protective barrier against moisture. Use multiple layers, letting each coat dry completely before applying the next. If you want an eco-friendly option, beeswax-based waterproofing solutions can also be effective.
Using Weather-Resistant Paints
Acrylic paint is often used for DIY projects, but not all types hold up well outdoors. Choose outdoor-grade acrylics or exterior paints designed to withstand sun exposure and rain. If you want a glossy, polished look, consider using automotive spray paint, which provides a tough, weatherproof coating. Once painted, apply a final layer of weatherproof clear coat to prevent fading and chipping.

Enhancing Structural Durability
For extra reinforcement, add a layer of fiberglass resin over the turtle lamp. This will strengthen the structure and make it more resistant to moisture. If fiberglass is too complex to work with, epoxy resin is another great alternative. It creates a smooth, solid shell that locks out water while maintaining the lamp’s shape.
Protecting the Electrical Components
If you’re using LED lights inside the turtle lamp, make sure they are suitable for outdoor use. Battery-operated LED puck lights are a simple solution, but for long-term outdoor placement, consider solar-powered LEDs. Place the battery or solar panel in a waterproof casing to prevent damage. If you’re using a plug-in light, ensure that the cord and plug are rated for outdoor use.
Sealing Gaps and Openings
Moisture can seep into small cracks, so sealing all joints and openings is crucial. Use waterproof silicone caulk or weatherproof glue around any connections, especially where the legs, head, and tail attach to the body. This will help maintain the lamp’s structure even during rainy conditions.
Placing the Turtle Lamp in a Sheltered Location
Even with waterproofing, placing your turtle lamp in a partially sheltered area, such as under a covered patio, near a wall, or beneath plants, will help extend its lifespan. Avoid placing it in direct exposure to heavy rain or constant sun, as this can cause faster wear and tear.
A waterproof outdoor turtle lamp is a fun and functional addition to your outdoor decor. With the right materials, sealants, and placement, you can enjoy this creative piece in your garden for years to come.
Turtle Lamp Gallery
Click on any image to start the lightbox display. Use your Esc key to close the lightbox.
Creative Uses for Turtle Lamps
A turtle lamp is more than just a charming piece of décor. With a little creativity, it can serve multiple purposes beyond being a simple nightlight. Whether you use it indoors or outdoors, this unique lamp can add warmth, personality, and functionality to different spaces. Here are some creative ways to use your turtle lamp.
A Cozy Nightlight for Kids
The soft glow of a turtle lamp makes it a perfect nightlight for children’s bedrooms. Its whimsical design can help ease bedtime anxiety, providing a comforting presence in the dark. To make it even more interactive, use a color-changing LED light to allow kids to switch between soothing colors like blue, green, or warm yellow.
A Unique Reading Lamp
Place your turtle lamp on a bedside table or reading nook to create a cozy atmosphere for nighttime reading. A warm white LED inside the lamp provides a gentle light that’s easy on the eyes. If the turtle’s shell has small holes, the lamp can cast beautiful patterns on the walls, making the reading space feel even more inviting.
An Ocean or Nature-Themed Décor Piece
Turtle lamps fit perfectly into an ocean or jungle-themed room. Whether placed in a child’s room, a beach house, or a tropical-inspired living space, it can serve as an eye-catching décor element. Pair it with seashells, driftwood, and other natural elements to enhance the look. If you prefer a forest theme, paint the turtle in earthy tones and surround it with small plants or moss.
A Garden or Patio Accent Light
A turtle lamp can be a beautiful addition to your garden or patio if properly waterproofed. It can be a decorative light near flower beds, pathways, or even ponds. Use solar-powered LED lights inside the lamp to create a glowing effect at night. The lamp can blend seamlessly into outdoor spaces while providing soft ambient lighting.
A Personalized Gift Idea
Handmade gifts always carry a special touch, and a custom turtle lamp makes for a thoughtful present. Whether for a birthday, housewarming, or baby shower, you can personalize the lamp by painting it in the recipient’s favorite colors or adding their name to the design. Pair it with a matching set of DIY décor items for a complete, heartfelt gift.
A Conversation Starter in Living Rooms
A turtle lamp can be more than just a light source—it can be a statement piece. Placing it on a coffee table, shelf, or mantel can spark curiosity and conversation among guests. It can add personality to any living space, whether painted in vibrant colors or designed with a modern, minimalist touch.
A Creative Night Market or Craft Fair Product
If you enjoy DIY projects, consider selling custom turtle lamps at craft fairs, holiday markets, or online platforms like Etsy. You can turn this craft into a small business by offering different sizes, colors, or themes. Handmade, eco-friendly lamps appeal to customers looking for unique, sustainable décor items.
An Accent Light for Aquariums or Indoor Water Features
For those who love aquatic-themed interiors, a turtle lamp can enhance the look of an aquarium setup. While the lamp itself shouldn’t be placed inside a tank, it can sit next to an aquarium, complementing the underwater scenery. If you have an indoor fountain or small pond, placing a waterproof turtle lamp nearby can create a relaxing ambiance.
A turtle lamp is more than just a DIY project—it can be a functional and decorative addition to any space. Whether used as a nightlight, a garden accent, or a custom gift, its versatility makes it a delightful piece that brings creativity and warmth wherever it’s placed.
Conclusion
Making a turtle lamp is a creative and enjoyable approach to upcycling objects that will accentuate your house décor. With the correct materials, personalization, and even waterproofing techniques, you can design a lamp that suits any space—indoors or outdoors. Whether used as a thoughtful handcrafted gift, a garden accent, or a nightlight, this do-it-yourself project adds elegance and utility to any environment.
We have more creative lighting projects. Check out our concerte candle holder guide!


